I'm a dark denim kind of girl (although after sewing these I've become mildly obsessed with looking at denim and have been tempted by all sorts) and was for some reason drawn to this particular Marc Jacobs Stretch Cotton Denim online. Something about the description just said to me that it would be the right choice of this garment. Miraculously as I ordered this so long ago the same fabric is still in stock but if dark denim isn't your bag or you're after something a little more interesting the Mood Fabrics website has a consistently pretty spectacular collection of denim on offer in all different weights, colours and even prints. This one has a lovely deep colour which comes across as almost black in the pictures but in reality is a dark dark indigo blue. It was quite stiff to begin with but is now washing up an absolute dream. After a few weeks in rotation it is starting to develop that lovely worn quality I really like in denim. It can be quite hard to judge the exact colour weight and texture of a traditional denim when buying online but the bonus is there are detailed description including fabric content so you can see how the stretch will work for your pattern with no guesswork involved.
For my first jeans making attempt I was tempted to pick something super cheap and cheerful but i'm glad I picked a good quality denim as it made the whole sewing process so much more enjoyable. I'm a big advocate for investing in good quality materials when and where you can as it can benefit your finished garment in so many ways. Not only did it give me a more accurate idea of how this pattern works on my body than a mega cheap muslin using a decent fabric makes me so much more careful and more determined to get things right rather than let the mistakes slide by without correction. Plus working with better quality fabric generally makes the sewing process easier as it will handle and press better. This cut, pressed and sewed really well without fraying terribly and it's the perfect weight for jeans of this sort. Nice and tough without being too restrictive or stiff.
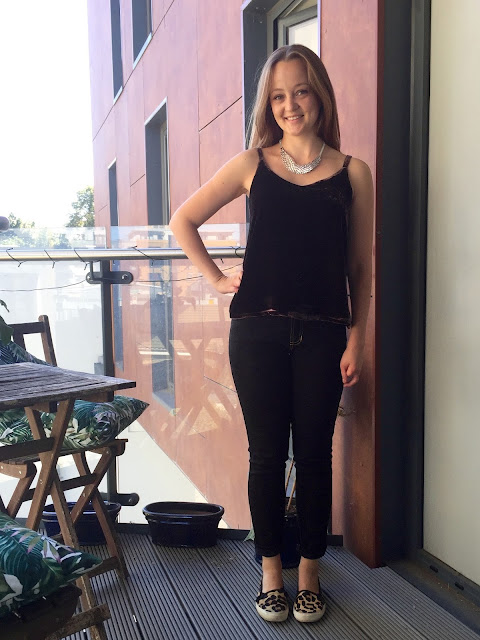
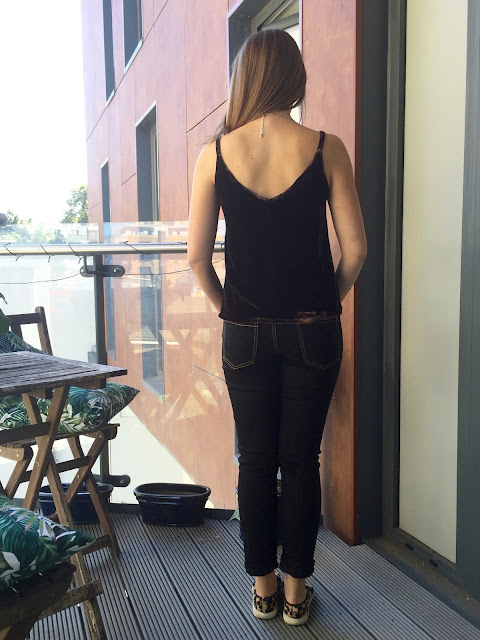
Fit wise I'm pretty delighted for my first try. This is view B with the high rise and skinny legs. I cut the size 6 and luckily am pretty much the same size as I was a million years ago when I cut them out! I am so comfortable in them all day long and have absolutely loved wearing them. I have got some wrinkling under the bum but now I've worn them for a bit I don't think I'm going to try and change this as the amount of excess fabric in this area is good for movement and sitting down. I've also got some wrinkling behind the knees which is quite common with slim trousers on me and bothers me more. From a bit of research I think I need to do a slight full calf adjustment to stop the fabric bunching up in this area.
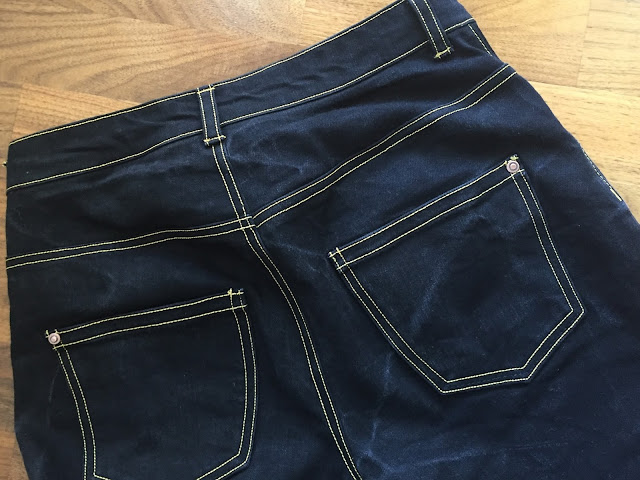
They are slightly wider at the ankle than I would usually like but I think this is due to the fact that I shortened them by 4" at the hemming stage. Now I know how long I want them I'd shorten them in a couple of places up the leg rather than taking this much of a chunk from the hem as I think I lost some of the slimming at the ankle in this. I have been wearing them a bit with the hems turned up as I quite like that look with this width of leg. I do absolutely love where the waistband sits and the way it hugs the body. I'm not sure I have got my pocket placement quiet right, what do you guys think? Any thoughts and advice on fit would be much appreciated as I am a trouser sewing newbie and am not yet entirely sure what to look for. I've tried to lighten the pictures a bit so you can see better as I know the dark denim conceals a lot!
Despite being mega proud of these there is definitely a lot of room for improvement with my jeans making and I kind of can't wait to get started all over again so I can put into practise what I have learnt from this pair. The main issue I have with these is the state of the insides where I didn't quite nail getting the tension right all of the time when topstitching. It was kind of bonkers of me to pick dramatically contrasting gold topstitching thread for my first go I suppose. What can I say, I love a bit of topstitching! I used Gutermann topstitching thread in the needle (with a topstitching needle) but kept normal Sew All thread in the bobbin and was mildly surprised at the success I initially had. I found it a little frustrating to have to keep swapping the thread and needles over but soon got into the swing of it. The only part I got really frustrated with was the belt loops. Everything was going so well and I was amazed at how well my basic Janome machine was coping with all the layers of denim and topstitching. It even handled the bar tacks without too much coaxing. That thing is a little trooper. But the belt loops proved to be a step too far. I took a hammer to the folded ends of the belt loops to flatten things out as much as possible. a just tried, tried and tried again until I managed to get them all on somehow. It's not particularly tidy but they're there,
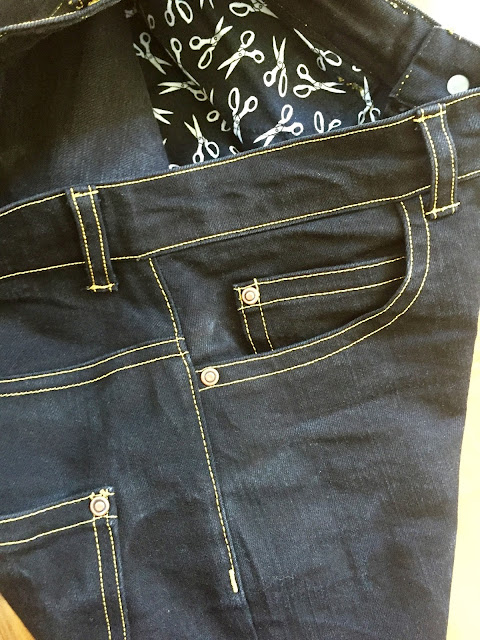
The pockets of the other hand I am absolutely chuffed to bits with. I loved that these are pretty much the first thing you do so you get to feel excited about the fact that you are actually MAKING JEANS pretty much straight away. I did the pocket stay that stretches all the way across to the fly rather than the separate little pocket bags. I'll absolutely be doing this again as it feels so nice to wear as it keeps a nice shape across your stomach without being uncomfortable. The current PDF version of the pattern includes the pocket stay with this view but as I was using a (very) old copy I followed Heather Lou's instructions in the sew-along to draft my own. The interior pocket fabric came from a stash of quitting cotton scraps and fat quarters that I have squirrelled away. Pockets are the perfect thing to use these for!
I wasn't planning on adding rivets as it was my very first pair and I was thinking it was best to take things one step at a time. But by the time the fly went in and I was looking at an assembled front I knew I wanted to go the whole hog! I usually rely on my good old vario pliers to insert snaps, no sew buttons and such like but because the rivets aren't at the edge of the garment the pliers won't reach. Instead I remembered I had this strange and untouched tripod tool hidden away at the bottom of my box which (once I'd figured out how to use it) was pretty great. The same pieces that hold either end of the rivet in the pliers fit into this tool and it works in pretty much the same way except that the two parts are separate so you can use them anywhere on your garment. Line them up, give it a few strong whacks with the hammer and voila. Who said sewing was a peaceful hobby?! I didn't use the punch that comes with the kit to make the holes for the rivets as I find they come out worryingly large and I think the rivet will sink through the hole with time. Instead I poked a small hole through with an awl that was just about big enough to squeeze the base of the rivet through.
To pair with my jeans I wanted a sleek and simple top which might dress them up a little. I am always disappointed when the warm weather and sunshine depart but one failsafe way to cheer myself up is to embrace the trends for the next season and get to grips with my autumn/winter sewing plans. One idea that's really grabbed my attention this year is using velvet for more casual garments when it is traditionally viewed as a fabric more suited to evening/special occasion wear. I love the thought of mixing in a different texture in small areas of an outfit and the rich tones and plush nature of velvet seem to suit the season so well.
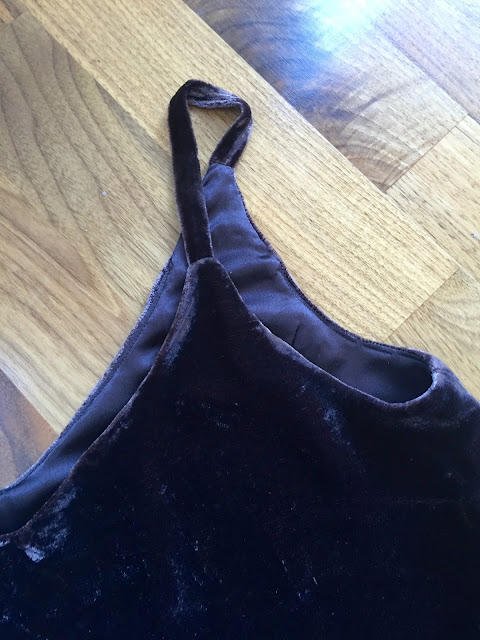
I chose this Fudge Soft Rayon-Silk Velvet from the new arrivals page as the description sounds so luxurious and I was drawn to the warm, neutral tone despite the other lovely colours in the range. I like a slinky drapey velvet which is exactly what this is thanks to the viscose content. I paired it with the True Bias Ogden Cami pattern which I'll review in more detail in another post soon as this was actually my second version of the top. The fact that I've already made two kind of speaks for itself! To give you a brief rundown I cut the size 4 and took 1.75" off the length of the straps to get it to sit comfortably. Instead of using the half lining pattern pieces I chose to fully line this version as I thought the silk satin I discovered in my stash would be nicer against the skin than the back of the velvet.
I'm pleased that I thought outside the box a little with the fabric choice for this pattern. The simple style is a great way to showcase a special or interesting fabric and it's pretty quick to construct so is nice to give yourself the challenge of working with something trickier to handle. And while I'm on the subject of tricky to handle this slippery little gem sure is that! it took real concentration to get this cut on grain but it did sew up surprisingly easily with the use of plenty of pins and a microtex needle. I did think that perhaps the little straps wouldn't work out great in the velvet and I almost opted to use the silk lining for them instead as that might have been a cute contrast but I gave the velvet a whirl and am delighted with how they turned out.
The pile of the velvet was slightly damaged from travelling all the way across the Atlantic in a box with a number of other less delicate yardages but it had a pleasing semi crushed finish which I went right along with and was a little heavy with my handling of it throughout. I think the slightly worn effect really works with the idea of using it for a casual garment to pair with jeans. I'm also looking forward to pairing this with a simple skirt and heels for a night out.
Now that my handmade wardrobe includes jeans I'm definitely going to be wearing home sewn almost every day. All in all being able to say 'thanks I made them' when a friend at work said 'they're nice jeans Fi, where are they from?' was one of the best feelings I've had since I started sewing!




Congrats on making the jeans! They look very profesh. And that top is divine...a silk velvet cami, what a good idea. I'm stalking some silk velvet in pastel pink on The Remnant Warehouse website, I might have to bite the bullet and buy!
ReplyDeleteOo pastel pink velvet sounds gorgeous! You only need a metre, less than that actually if you line in a different fabric so go on treat yourself! thank you
DeleteCongrates on the jeans Fiona, they are truly wonderful! Go you!
ReplyDeleteThank you Jannie! It's such a feeling of accomplishment to have made a pair!
DeleteThese look great! I have to say I had similar issues with topstitching thread and stole the idea from Melissa of Fehr Trade to use the grey spool upholstery thread instead of topstitching thread and wouldn't look back, soooo much easier! I haven't yet braved ordering such expensive rivets as she suggests and have found that with an awl as you use mine hold up with no problems. I will be having a good poke in Ditto fabrics next time I'm in Brighton though! Finding decent stretch denim in the UK is tricky...
ReplyDeletehttp://blog.fehrtrade.com/gallery/2857/sewing-jeans-against-the-world/
Thank you so much for the tips Liz, I'm definitely going to try the upholstery thread as hopefully that will make just the difference my machine needs.
DeleteStretch denim can indeed be very tricky, especially finding it in person as I like to have a good feel to see if the weight is right for my project.
They look great! The fit is spot on!!
ReplyDeleteThank you Tee! I think it still needs a few tweaks but fitting can be a never-ending mine field once you get started can't it?!
DeleteAmazing job with both garments Fiona. The thickness of the top stitching on jeans can be tricky and stitching up velvet can be go awry too so you should be really proud!
ReplyDeleteThanks Georgie! They definitely presented their own challenges!
DeleteGreat job all around. You asked for comments soooooo, I personally would raise the packets up so the are just slightly above your bum crease. From photo I can't say exactly how much this would be on you but a guess would be an inch. Since you are a wee diddy thing you might want to just make them smaller or shorten the length but keep the shape. My belief is they should sit square on your bum not slope down to the crease. If you have a favourite pair that fits you might measure. Again lovely job.
ReplyDeleteThank you so much for your comment Mary, that is just the kind of advice I was after! Now you've said about the pockets I can totally see the difference that would make. I'm definitely going to compare the size to another pair I own as I think they are quite different. Thanks!
DeleteWhat a great outfit! I love the pairing of jeans and velvet. I, too, love to mix formal and informal fabrics for a unique look. You should be very proud, both of these garments are lovely.
ReplyDeleteThank you! I am very proud of these and they have been worn together as an outfit a number of times already! I haven't tried much of a mix of formal and informal before but am really enjoying it. It's inspired me for a few other autumn projects!
DeleteYour cami is fab, what a great idea to use velvet, your jeans are amazing, they look amazing!! I'm not ready to make jeans yet but it will be Gingers when I'm brave enough.
ReplyDeleteThanks Lynsey! I don't know where the idea to use velvet came from but I'm really pleased with how it worked out!
DeleteI felt exactly the same as you about the jeans making but you can absolutely do it! The Gingers are such a great pair to start with because of the brilliant sew along
I recently made the Ginger jeans and followed the sew along - great isn't it! I enjoyed making the jeans so much I'm currently making two more pairs at the same time for me and my 16 yr old daughter.
ReplyDeleteMy partner, he is my strongest critique ;-), told me to make the pockets smaller - he said they weren't feminine on my bum - I'm a size 12. Maybe the pattern size pockets are OK on bigger bums? I reduced them by a quarter inch all round. I also placed mine a bit higher up than the pattern suggests. Also, after reading By a Gum By Golly's blog post about these I centred my pockets using the centre of the top stitching as a guide so visually the pockets look more centered.
I now have a Pinterest board dedicated to jeans inspiration. I'm wanting to do some pocket designs.... :-)
Your jeans are great and I imagine like others you will tweak the pattern here and there for you.
It is SUCH a great sew-along! Two pairs at the same time is a great idea, it must save on all that switching around of thread!
DeleteYour thoughts on the pocket are absolutely raining true with me now I've looked at my pictures and had a think. I'm definitely going to try making them smaller and moving them up a little next time. Now I've worn them few times the bottom edge does feel a bit low.
I can see why you've got a bit addicted, it's so satisfying and I'm looking forward to improving on these
I'm very impressed! Lovely...
ReplyDeleteThanks Melody! I'm pretty impressed myself haha! Can't believe I made them
DeleteAmazing work!!!
ReplyDeleteThanks so much! I'm really proud of them
DeleteDid you make a muslin for this? Or just took the plunge? I have the pattern and denim sitting here... and am slightly terrified to leap into it.
ReplyDeleteHi Dana,
DeleteI was a bit terrified to but go for it! I didn't make a muslin as I think what fabric your are using plays quite an important part in the fit so unless the muslin fabric has exactly the same stretch and weight to it your fitting changes are likely to be a bit different anyway. The pattern instructions have you baste up the side seams to check fit before sewing them properly so you can make some alterations at that stage but obviously not to things like crotch depth. I'd recommend comparing the pattern pieces to a pair of jeans you like the fit of to see if anything is drastically different first. Good luck! It's so much fun
I'm sewing a pair of Gingers at the moment and like you I was apprehensive about the fly but, before I knew it, it was done! I'm at the stage where I have a pair of fitting Ginger jeans (*squeal of delight*) minus a waistband so the end is in sight. I'm not looking forward to the buttonhole and beltloops (my machine is very temperamental) or the rivets and button (I'm not sure I have the right kit!) but I cannot wait for them to be done and for me to be able to say 'I made them'. For pocket placement, Heather Lou has a great post on what to look out for: http://closetcasefiles.com/ginger-sewalong-pt-12-back-pocket-placement/
ReplyDeleteI really want to make an Ogden Cami too (even though summer is basically gone but I can wear it with a cardi!), yours looks great!
Thanks Jen, looking forward to seeing yours! Like you there were so many steps I was apprehensive about and it really put me off of getting stuck in with it for a while but nothing is as difficult as you think it might be! The belt loops were a little tricky so I recommend having a play around with stitch length and tension on some folded scrap fabric first
DeleteThe Ogden cami is a winner for every season I think! Perfect for layering under knitwear
Love! So gorgeous and impressive - the silk velvet especially, as I've sewn cotton and silk velvet and sworn off both forever much though I love them:(.
ReplyDeleteI'm vacillating between this and the Tessuti CAMI - I've tried Pauline Alice's and really like it, but want tho try another one - have you tried either of them?
The velvet can be a bit tricky, requires being in the right frame of mind and a lot of patience!
DeleteI haven't tried either of those patterns I'm afraid so I can't give you a comparison, just to say that I really like the Ogden! I've made two already and plan to make more. I like the way the neckline scoops up into the straps on this one
Thanks Fiona, it does look rather nice, you're right. Maybe I'll try this one first!
Delete