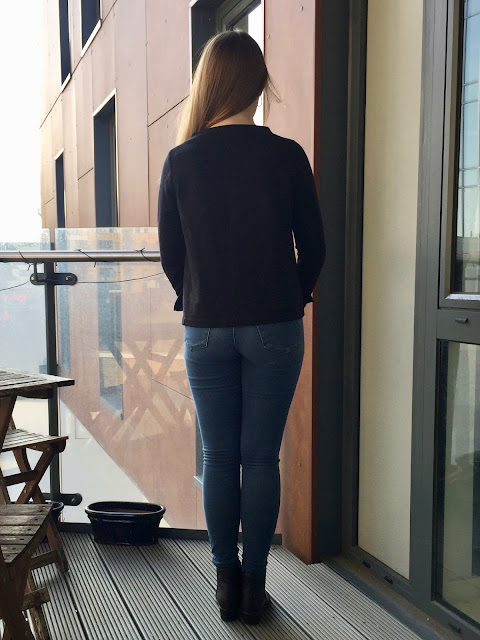
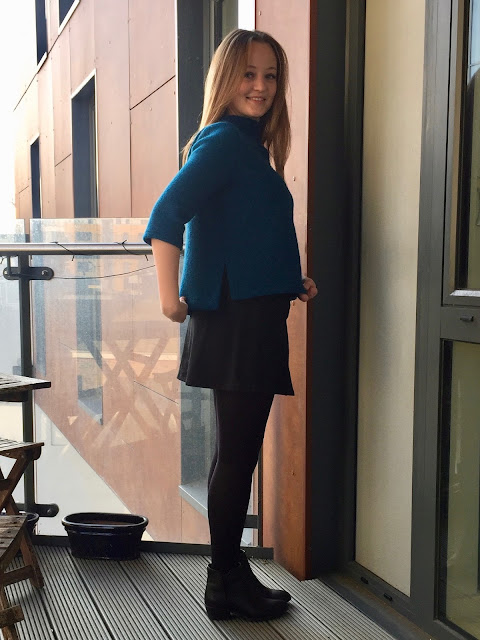
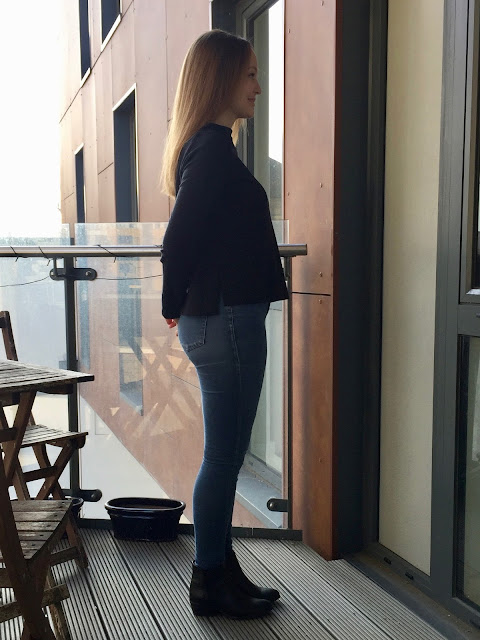
My first completed project post of 2017 is actually one of my favourite pattern discoveries of last year. I didn't include these sweaters in my round up of 2016 as I hadn't shared them with you guys yet but if I had they definitely would have won a slot in the top 5! These tops are both made using the Sweater #2 variation of the Toaster Sweater pattern from Sew House Seven. It has become such a staple in my winter wardrobe and was really enjoyable to make too. The style is right up my alley with simple lines and interesting details.
I've waxed lyrical about my love for merino wool knits when I shared my Neenah Dress a couple moths ago and I used another piece of my prized stash from The Fabric Store for my first version of this top. This is a sweat-shirting rather than their standard jersey knit and I want to make everything in it now. Its loop backed and spongy and warm but still quite fine and lightweight. Unfortunately it seems the one I ordered is no longer stocked online as all I could find was this merino/polyester blend and I'm sure mine is 100% wool. I cut the size small and the only change I made was to tale 1/2" off the sleeve length and use a 1" turn up for the hem. Its snuggly and comfortable with the perfect amount of ease not to feel swamped in. Perfect to layer over pretty tops and underneath coats.
The teal version is made with this petrol boiled wool which Dragonfly Fabrics kindly offered me a chance to review. They have a huge selection of beautiful rich colours and team there were so helpful sending me samples of a variety so I could get just what I wanted. Its top quality stuff with a lovely thickness and body to it. They do now stock another slightly finer boiled wool made with viscose which I have seen a sample of and it has the most beautiful drape. I'm very tempted to make another sweater in that! I did almost have a total disaster with this one before I even got started. My merino had been coming up so well with a wash in the machine that I sort of mindlessly threw this in on a cold wool wash...and it came out smaller than it went in! I didn't notice at first as the shrinkage doesn't really affect the qualities of the fabric as boiled wool is felted up already. When I came to lay out my pattern pieces I didn't have quite enough though! I spent some serious time doing a pattern piece jigsaw puzzle and eventually worked out that I had enough if I made the sleeves shorter. A very happy accident as I absolutely adore the three quarter length sleeves on this now! I think it works really well with the more dramatic shape. This baby is going to be hand-washed from now on and I think I'll be sticking to non washable projects with boiled wool in future. It definitely hasn't put me off boiled wool though as sewing with with was such an enjoyable experience. I've just ordered some more in a beautiful mottled grey to make my mum a coat to go with her wedding outfit!
By the way the skirt in the pictures is my second Rosari Skirt from Pauline Alice. I used a fairly heavy black denim from Mood Fabrics for it and love the way that emphasises the A-line shape. Its exactly the same view as my first one but I think I'll still post about it soon as I had quite the adventure with the snaps!
I have worn the black version pretty much day in, day out since I finished it. I could not be happier with my decision to use some of my precious merino knit for it and am genuinely gutted when it has to go in the wash! I think the softer drape of the fabric plus the neutral colour makes it more versatile day to day and something about it feels so vey much more me than a chunky, more structured jumper. Having said that I am quite taken with the sculptural effect that the body of the boiled wool gives the second version and adore the colour. There's proof right here of how dramatically fabric choice can change a pattern!
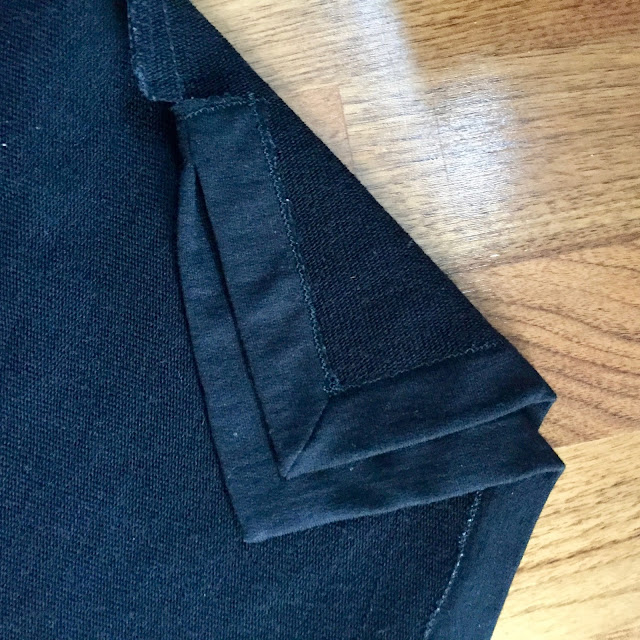
My absolute favourite part of this pattern is the split side seams and the mitred corners at the hem. The method and instructions for this are fantastic and I am so delighted with the finish I have achieved. I used a twin needle for the hem on both versions although you could even get away with a normal straight stitch as the relaxed fit means this area doesn't need to stretch. Concentrating on my aim to sew slower and more carefully I marked the stitching line with tailors chalk so I knew exactly where to turn and this really paid off. I stopped and started again at each corner as you can't pivot with a twin needle and am so pleased with my crisp little corners!
The instructions are really thorough and clear with great illustrations. Its a really speedy and satisfying sew. Even with finishing the split hem it takes no longer than making a basic t-shirt but you end up with a much more interesting garment. The only thing I did differently to the instructions was to use and narrow zig zag stitch for construction and then my overlocker to give a professional looking finish to the seams, which is my preferred method for sewing knits. The pattern recommend using a double stitch which I have never tried. This involves sewing a straight stitch along the seam line and then a zig zag 1/4" away from it. The instructions say that the zig zag allows for some stretch but surely the straight stitch negates that? I guess for this relaxed style stretch isn't essential along the seams so that works out ok? Anyone else had any experience with this technique?
I've not done much stitching in the ditch on the machine before (I love a bit of hand stitching so tend to plump for that option where possible) so found stitching into the shoulder seam to secure the neckline facing down a little tricky. I decided it was easiest to do this from the right side and then if things were a little off inside it didn't matter so much! I did a much better job the second time around so practice must make perfect in this case.
There's something so chic about the shape of the neckline; its like a subtle version of a turtleneck which feels really elegant on. I actually doubted that just securing the facing at the shoulder seams would keep things sitting securely and was tempted to hand-stitch the edge down inside. It actually sits beautifully when on and the folded top edge of the neckline just needs a good press into place when it comes out of the wash. I used tailors tacks in a garish coloured thread to mark the neckline fold and stitching point for the hem vent originally. I love a tailors tack for when you want to be super accurate!
I made the other version of this pattern (they are available to purchase individually or as a combined pattern which I think is great) in an incredible striped boiled wool from Fabric Godmother (currently on sale!) to review for an article in Sew Now magazine. Here's a quick pic of that one! Although this variation was the style that initially appealed to me I'm not as much of a fan of this one as I don't like anything too bulky around my neck and I don't think the proportions suit me so well. But I do like that the wide collar sits away from the neck and I loved the slim fit, slightly cropped length and wide hem and cuff bands.
You might have heard about Project #SewMyStyle which Alex from Bluebird Fabrics is running throughout 2017 to raise awareness of the slow fashion movement and encourage people to sew their own wardrobes. There's a different pattern to sew each month and make your own and January is actually Toaster Sweater month so my timing is quite appropriate! I'm looking forward to seeing lots more of these popping up on my Instagram feed at the end of the month...and possibly even in my wardrobe! I'm pleased that I've dabbled in a bit of wool sewing this year as I haven't used it a lot before and my handmade winter wardrobe is reaping the benefits. I've now got a good amount of wool knits and boiled wool under my belt. What else would you recommend giving a try?


Great job! The blue boiled wool is just so mod and classy and paired with the button up skirt it's a winner!
ReplyDeleteMod is just the word I was looking for to describe it! Thanks Allyson
DeleteThese are fantastic! I love the neckline, so elegant!
ReplyDeleteMe too Kelly! It's got quite an unusual feel to it and it sits really nicely. Thank you!
DeleteI, like you don't like anything too high on my neck but was drawn to Toaster 1. I've just finished my version but I reduced the height of the T1 neck by half and it's much more wearable for me. I do love the split hem of T2 so I think I may actually make that as my SewMyStyle version.
ReplyDeleteReducing the height of the neck is a great idea Dee, I might give that a try myself as I think its the fact that its so close to the face that bugs me as it sits away from the neck quite nicely.
DeleteDo give T2 a try, I like it so much more than I thought I might!
I love your Toaster Sweaters! I actually made my first one just this weekend as well.
ReplyDeleteIts such a quick and satisfying project isn't it?! Thanks very much
DeleteI love THESE!!!! They are great looking and, somehow, extremely modern! I agree about the cowly one -- I, too, was first drawn to this one but after making it I ended up wearing it three days in a row on a car trip where I forgot my suitcase....I never want to wear it again and hated wearing it. I plan on remaking it into something one day but not any time soon! The other style just looks so great and effortless -- love the tea on you, especially!
ReplyDeleteThanks so much Colleen, there's something about the details in these that does make them vey current I agree!
DeleteIt has surprised me that the split hem one has turned out so much easier to wear as I didn't think it would flatter me
As always, excellent post and beautiful tops. I am very interested in trying some of that sweat shirty wool fabric too.
ReplyDeleteThanks so much Kathy, I often feel like I ramble on so its wonderful to hear that you find the post worth a read!
DeleteI love the sweat shirting so much, wish I could get my hands on more easily in the UK!
These all look great Fiona! I've just used that technique - straight stitch with zigzag right beside it- on 2 tshirts for me son & a dress for me. It looks great as you don't risk any of the thread showing like can sometimes happen with just a zigzag. We'll see how it holds up though! It is the technique recommended in the built by Wendy sew U home Stretch book.
ReplyDeleteI too as drawn to version 1 but am now thinking maybe the neck of version 2 is more my style so might reduce the width of version 1 neck like Dee suggests. Your versions sound perfect for all this cold weather!
O thats really good to know Kathryn! I just presumed all the straight stitches would pop when you tried to put them on. Do let me know if its a big success and I'll have to try next time! I really need to get my hands on the Sew U Home Stretch book
DeleteI love your Toaster Sweater, it is very "stylish", I have a question, did you use a stretch wool fabric to do it ? In the pattern they say to use a stretch fabric, but I wonder if it is necessary. Thank you for your answer.
ReplyDeleteThanks so much! It actually feels pretty stylish on!
DeleteYes both fabrics had some stretch to them. The merino is a knit so is pretty stretchy. The boiled wool has less of a stretch to it, more like a give because of the way the fabric has been made. It doesn't need huge amounts of stretch but you do need some to get it on over your head and for comfort around the shoulders. I hope thats helpful and you do give the pattern a try!