My Completed Robson Coat!
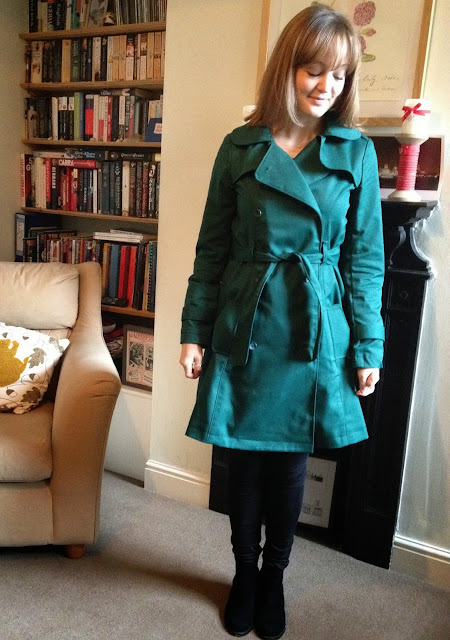
Tah Dah! I'm giving you warning this is going to be a long post with lots of photos but I'm not going to be cutting it down because I'm so SO proud of this make! It's the Sewaholic Robson Coat and definitely the best and most complicated garment I have sewn to date.
I can't believe I've actually made a coat! But first things first, a big part of this accomplishment is down to Tasia from Sewaholic's amazing drafting skills and instructions. I've always loved working with her patterns and in fact her Lonsdale Dress was the first dress I ever made so I knew if I could make any coat it was going to be this one with Tasia's guidance to hold my hand throughout. This pattern is a dream, not only do I love the design of it (including rounded collar and storm flaps), the construction process is genius and you end up with a beautifully finished coat inside and out without the need for lining. If you're tempted by the challenge of making a coat I think a lightweight style like this is a good place to start and I highly recommend this pattern in particular!
You do need a lot of supplies for making this coat so costs can add up but I still spent considerably less than I would have done buying one in the shops that will last as long as this, and even if it did add up to more it would be totally worth it! I used a rich green cotton twill from A-One fabrics on Goldhawk Road for a bargain £4.95/m. I bought 4 metres but I think if you are careful and are removing some of the length as I did you could get it out of 3.5. The fabric was an absolute dream to work with, pressed beautifully, went through the machine smoothly even at bulky points and as I've worn this every day since I finished it I can vouch for it holding up in the unpredictable UK weather.
The buttons were from the haberdashery stall at my local market and I used medium weight black iron on interfacing from Minerva Crafts. I chose to use their budget version as it was my first attempt at a coat and you need quite a lot for this. I was a bit concerned about the interfaced pieces being a bit like cardboard to begin with but once pressed and handled as the rest of the coat came together they've softened up nicely.
I was torn between cutting a size 4 or 6 (Sewaholic size) but in the end opted for a 4 as looking at the finished garment measurements they included a lot of ease, particularly around the waist where I like things to be fitted. I made the right choice as I feel like this fits comfortably and I can move easily, even with it done up over a jumper, and I don't feel like I'm being swamped by a coat which I hate. In case it's useful to know I'm 5ft 3" and I took 2.5" off the length and didn't shorten the sleeves at all. The length out of the envelope hit just below my knee which you might like but I prefer this style of coat to be shorter as I know I will wear it a lot with jeans.
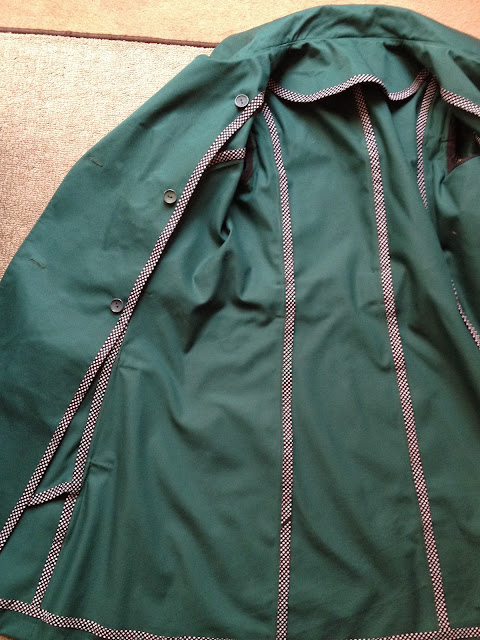
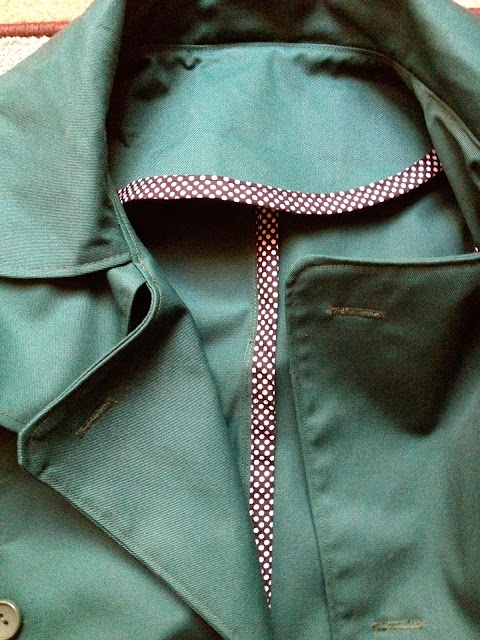
The inside is all finished with bias binding. I love this element of the pattern as it's another aspect that you get to be a bit creative with. I used this polkadot cotton binding, again from Minerva Crafts. It's wider than the pattern calls for (25mm instead of 13mm) but it worked out fine and I'm pleased that it's a bit more visible than the narrow tape would have been. It was great to work with as it held a crease nicely once I'd pressed it to fold it in half. I could then sandwich the raw edge inside it and stitch it on just once rather than sew on one side, fold it over, then sew it down again. A great time saver. One thing to mention about this though is that the pattern calls for 11 metres and as a couple of other bloggers have mentioned, I used way more than that! I had to order more (which I didn't mind as it meant I ordered a tailors pressing ham as well which is a revelation!) and still didn't have quite enough so I ended up binding the arm holes in plain black binding which worked out fine.
 |
| I love the buttons inside which keep everything sitting nicely when worn |
I was initially thinking about making this up in black as I thought I would get more wear out of it but I'm so pleased I went for one of my favourite colours instead as it looks great with most of my wardrobe! I've never had a coloured coat before and it makes such a difference to your mood on a cold and wet morning on a train platform full of commuters in black. The strange thing is about this fabric is that (as well as looking wrinkly when it's not!) it seems to come out a different colour in nearly every photo! It's actually a gorgeous forest green, I think this photo is the closest colour wise:
I learnt SO much making this coat. Looking back now I'm not sure why on earth I thought this project was suitable for me to try as there were so many techniques involved that I had never attempted before, I'd never even sewn a buttonhole! Ha! (F.Y.I. So much easier than I thought!) But I'm so glad I went for it because I've made something I'm really proud of and it's spurred me on to set myself some more sewing challenges. I've also crossed off quite a few techniques on my Technique Checklist which was exciting!
As I went along I was so pleased with what I had already done that I was terrified of messing up the next part and ruining all my hard work! I think the coat sat ready for belt loops and button holes for about 3 weeks, partly because I didn't have much time to sew but also because I was terrified of doing those parts! The seam ripper did come out quite a lot (particularly around the collar area) but I learnt to be patient and took time to look up techniques and reread instructions to make sure I was getting things just right.
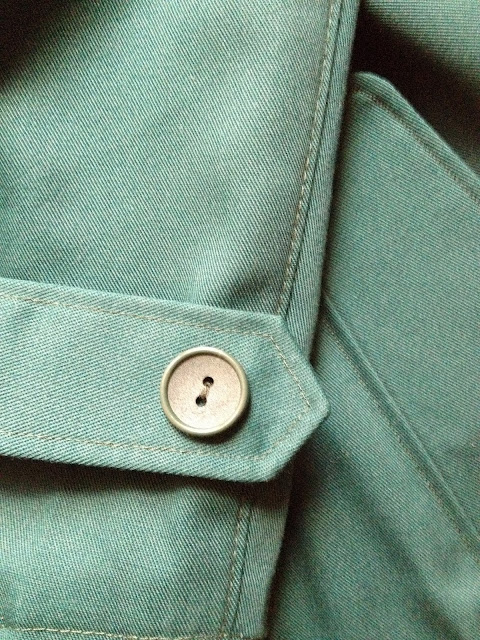 |
| I'm most pleased with my topstitching; is it weird that I really enjoy that part?! |
I thoroughly enjoyed every single step of this make, even the cutting out! I knew it was going to take some time (there are pattern pieces!) so it was great to be able to just accept that and go nice and slowly with all these new techniques to make sure everything turned out just right. I think I can sometimes have a tendency to set myself unrealistic silly deadlines with my sewing and trying to speed through things can often result in there being a few things I'm not 100% happy with about the garment. I knew this would be a piece I could get a lot of wear out of if done right so I wanted to put the time and effort in to every element.
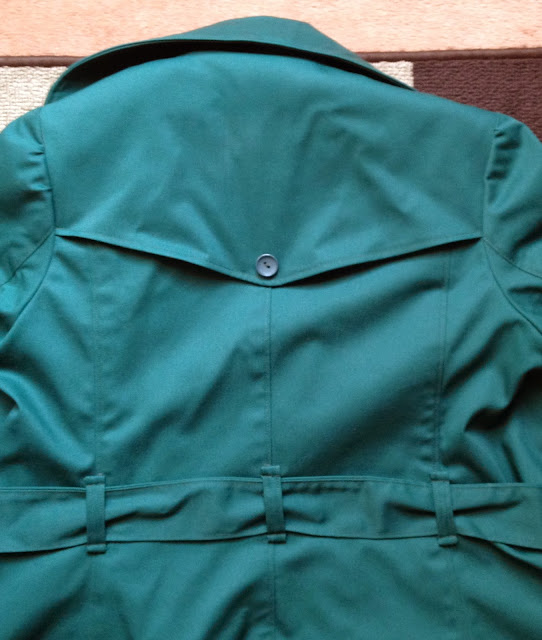 |
| See what I mean about the colour looking different?! |
Even though it's a huge time consuming project when I finished this one I wanted to start another! I'm holding off for the time being but you may see another appear in the Spring. Next time I'd like to try using a patterned fabric for the pocket linings and undersides of the storm flaps and now I know I love the style I'd splash out on some fancy interfacing. The only other change I would make is to shorten the coat and sleeves at the 'lengthen/shorten here' lines on the pattern rather than cutting it off the hem. I only did that this time as I couldn't decide at the cutting stage what length would look right and if I would need to shorten the sleeves at all. I'm happy with how it looks this time but the pockets are perhaps just slightly too low to be the perfect resting position for hands and the sleeves could maybe do with being just an inch shorter.





It's beautiful! Great job on the coat ~ it's a lovely fit and a gorgeous color.
ReplyDeleteThanks Jenny! The fit is all Tasia's talent rather than anything to do with me! I love this shade of green, was so lucky to find it!
DeleteI'm all for 'challenge' sewing, that's how you learn after all! You've done a great job with this Fiona, well done!
ReplyDeleteThanks Sally! So pleased with the result. Here's to more challenging sewing all round!
DeleteWow, what a lovely coat. I LOVE the colour as well. I really want to try giving this a go too, maybe a spring rather than autumn coat for me.
ReplyDeleteThank you! I'm so pleased I didn't go with black in the end. Definitely give this a go! Give yourself plenty of time and following the instructions it will definitely turn out great!
DeleteOh wow - you have every right to be proud of this make, it's fantastic! Well done! And I really love the colour you chose too.
ReplyDeleteThank you Suzie! I'm so pleased I went with the green and something a little different for me
Deleteoh it's gorgeous! i have recently won this pattern and planning a spring make! i will be picking your brains about it! great job!
ReplyDeleteO how exciting Jo! It's such a great pattern, I can't wait to see what you do! Yes pick my brains!
DeleteWowsers!! Your coat is fab-u-lous!!! And I really love the colour, you can't go wrong with green!
ReplyDeleteThanks Lynne, I could totally see you in this colour too!
DeleteGorgeous colour! It looks very classic. I wish I could sew up this pattern, but I have too many belted coats as it is haha.
ReplyDeleteThanks! You can never have too many belted coats! And as you're making this one you have the freedom to make it totally different to the rest...go on!
DeleteWell done, it's gorgeous. And I totally love that color!
ReplyDeleteThank you! So do I! I can't stop wearing it!
DeleteYour Robson is absolutely beautiful. Yay for having the guts to take on such an involved project...I've got the pattern but haven't gone for it yet. This gives me inspiration - thanks! And I love the color. Definitely more fun to go out on a dreary day wearing such an alive color.
ReplyDeleteThanks, you should just go for it! Take it step by step little by little and it will come together without you realising what you are doing! I can't wait to get into my next big project now!
DeleteGorgeous, I'm so glad you chose this colour, it's beautiful!
ReplyDeleteThank you! Green is one of my favourite colours and this one just felt so warming and right for autumn
DeleteWow! This is gorgeous! I'm so impressed! Well done!
ReplyDeleteThanks Sonja! I'm pretty impressed with myself too!
DeleteWhat a fantastic job you did! You are much gamer than me. I too have this in stash and just trying to get the courage to do it. You have spurred me on. Well done.
ReplyDeleteGo for it Stephanie! Honestly if you just take it step by step in little chunks it's much more straight forward than I thought it might be. You do a few little bits and then think 'wow look at that!'. Thank you
DeleteAnd proud you should be... it's a huge accomplishment and turned out so well!
ReplyDeleteThank you! It is a sewing accomplishment isn't it?! I think it might be time for me to tackle trousers now...eek!
DeleteYour coat is just lovely, the colour is especially amazingly awesome. I like the idea of turning each sewing project into a means for learning new techniques, it can be easy to get lured into making the same type of garments over and over.
ReplyDeleteThank you Laurel! I'm pleased I picked a fun colour as it kept me motivated at the difficult points, rather than being bored of the black! I love learning new things with each project and am trying to pick patterns now based on what I haven't done before. It's so satisfying
DeleteYour attention to detail is phenomenal! Can't believe you hadn't done a buttonhole yet but tackled a jacket! Way to go!
ReplyDeleteThanks Mela! I can't believe I just plunged myself into it either! I think I'd been avoiding buttonholes, they had become of those things that you get irrationally afraid of doing - like making trousers! But this jacket forced me to face the fear!
DeleteWhat a lovely coat!
ReplyDeleteNot only did you choose a beautiful colour (greens are my favourite) but your sewing looks very professional in all the close-ups.
I recently used woven interacing (that cost as much as my fabric per metre) and it was a revelation. I will never go back! I got mine from Ditto in Brighton.
That's quite a project for your first buttonholes! Congratulations!
Thanks Alice! Professional looking is a very big compliment! I can assure you there are some bits that took a good few goes to look ok! Thanks for the tip on the interfacing, I've been trying to find out where I can get some good stuff for not too ridiculous a price.
DeleteWhat an achievement - it's GORGEOUS! I adore the teal green colour fabric you've used and the spotty bias binding is heavenly. Great top stitching and it looks amazing on! Nice work :)
ReplyDeleteThanks! I'm pretty pleased with my topstitching, found it quite therapeutic!
DeleteYou top stitching is perfect!!! Colour is gorgeous, you look wonderful!
ReplyDeleteThank you! I'm so pleased I didn't go with the black, I think it probably would have made the sewing more complicated too as it would have been difficult to see certain things!
DeleteSewing with black is difficult!! Thought it was just me and my poor eyesight! Unpicking black on black is a nightmare!
DeleteAbsolutely gorgeous! The colour is fabulous and I love the bias binding. I am still a bit intimidated by this pattern, it looks like a lot of work, but it is definitely on my 'to make' list.
ReplyDeleteO you can absolutely make this Jo! It does take quite a bit of time but it breaks down into nice bitesize chunks so you can make it alongside other projects and honestly with Tasia's instructions it's not complicated. Thank you!
DeleteAbsolutely beautiful! The fit is great, the finishing is fantastic and the colour is stunning - in every photo! You've done an amazing job with this...I think I'll have to add this to my pattern wishlist!
ReplyDeleteDefinitely add it to your list! It's a really enjoyable and satisfying make. Thank you for your lovely comment!
DeleteCan't believe you made this! Totally inspirational. I haven't loved the other versions of this pattern I've seen but in this green twill it looks so amazing! It's the perfect coat.
ReplyDeleteI could totally see you in this coat! Make one! Your comment has made me smile, thank you!
DeleteWow, Fiona this really is your BEST make ever! I am in love with that silky Anna you did, but this is really incredible. I have a Vogue trench on my Spring to-do list, but maybe i'll make this one instead after seeing your make. Really lovely and the colour is beautiful on you.
ReplyDeleteThanks Clare! I'm so proud of it and everyone's lovely comments are making my head far too big! I really recommend this pattern if you like the style of it. I think I would have really struggled with a commercial one as the Sewaholic instructions were a massive help
DeleteWhat a lovely colour and the fit ist amazing!
ReplyDeleteThank you!
DeleteBEAUTIFUL coat!
ReplyDeleteThanks!
DeleteWhat a great coat - you're right to be proud of it! I love the colour and the cute polkadot binding inside!
ReplyDeleteThank you! The polka dot binding makes it I think, just makes it a little bit different from anything you can buy!
DeleteWell done you!! I'm super impressed with how well this has turned out! And picking up new techniques along the way is always a great thing isn't it?! Can't wait to see what you make next!
ReplyDeleteI've got a few more simple projects up my sleeve (and queued up to blog about!) then I'm going to try another big one! I'm developing a bit of an addiction to trying new techniques!
DeleteAmazing! I'm not surprised you are proud of it and pleased with that top stitching - it looks perfect! Well done!
ReplyDeleteThank you! Topstitching is my new favourite thing!
DeleteAnd so you should be proud - its brilliant. And are those welt pockets? You didn't even mention those! Great work!
ReplyDeleteThanks Nicole! Not quite welt pockets! They are set in the seam and have flaps...maybe welt pockets should be my next sewing challenge!
DeleteYour Robson turned out amazing! And I love the color! I have the pattern and some lilac gabardine for mine- but now I am really liking that cotton twill! I thought I'd make a few of them anyway so I will keep my eyes peeled for a twill! All the little details of yours look great- and the inside too. Very well done!
ReplyDeleteOoo lilac gabardine sounds lovely! I bet it would hang really nicely in gabardine...that's giving me ideas for my next one! Thank you!
DeleteWow what a beautiful trench! That colour is gorgeous and really really suits you :)
ReplyDeleteYou mustbe so so pleased with this! Trench coats are so great all year too so I'm sure you will get tons of wear out of it!
I have had a trench coat on my sewing list forever and have been half finished on one for a while- somehow it seems to get left on the 'finish later' pile. This Spring I WILL finish it! Hehe ;)
Love your bias binding choice too and clever idea to sew it on in one step to save time :)
Thanks Ami! Definitely get on with those trench coats, I haven't stopped wearing mine and keep coming up with ideas for more!
DeleteThis is absolutely gorgeous Fiona! You must be so proud of it! I've been wanting to sew a coat, and this is a pattern I'd really like to do, but I've been putting it off because I thought that, without much time to sew, it would take me forever. But I think I should just go for it! I had forgotten how good challenge sewing is, but I totally agree! I'm in a bit of a lull at the moment and can't seem to bring myself to start anything, despite the fact that I have about 10 patterns lined up to make! And for some reason, I'm a but scared of making a jersey dress with my overlocker, which is daft given that the second thing I ever made was a swimsuit, using it! But I think it was the whole challenge thing - it was something that was completely out of my league, and if it went wrong, I could blame in on that, rather than me just doing a rubbish job! So maybe I should try a coat next! Just out of interest, at what point between the two sets of size measurements did you fall?
ReplyDeleteO definitely try it! It will take some time but is very manageable in small stages as there's lots of little steps to take. A sewing slump is always hard isn't it? I think a challenge or a deadline is a really good way to get out of it, you'll impress yourself I bet! Size wise I cross a few as Sewaholic patterns are drafted for pear shaped ladies, I'm about a 34, 26.5, 37. I didn't want the skirt to be too full and like my coats quite fitted so I risked the smaller size. If you look at the finished measurements there's quite a lot of ease built in, especially at the waist. Good luck!
DeleteThis is really amazing - it looks so professional, I can't believe it's your first coat! And I love the contrasting bias binding, makes it totally unique! : )
ReplyDeleteSome bits don't look so professional up close! I'm so pleased I took my time to get everything just so. Thank you!
DeleteThis is amazing! You've made such a great job of it and you really suit that colour! Love it :)
ReplyDeleteThanks Hazel! This shade of green is my favourite!
DeleteI'm going to stop leaving comments on my phone cos it never works! I couldn't let this post pass without leaving a comment. Your work is so beautiful, I wish my topstitching looked half as neat.
ReplyDeleteI get so frustrated trying to comment using my phone too! I seem to have problems on every type of blog or commenting system! There's so much topstitching on this coat I'm sure yours would be neat too after all this practice!
DeleteWow and wow! Really great coat and so professionally finished! Sorry can't offer any challenging project tips - I'm still only checking out all the quick and easy ones! Interested to see what you choose though.
ReplyDeleteThank you! I still think this is the best thing I've ever made! I'm thinking trousers or something with boning is up next!
DeleteYou've done a wonderful job on this. From what I see, it looks as if an experienced sewist created this masterpiece. You should be very satisfied with completing such a challenging project with such great results.
ReplyDeleteO thanks so much Annette! It was definitely not an experienced sewist, just one taking it really slowly with some amazing instructions! Absolutely my proudest make to date
DeleteWow, your coat looks amazing! I love the colour! Good job on the button holes, I think I'm finally getting over my fear of them myself... ;)
ReplyDeleteThey're not so bad are they? I found I flew through the last few on this, there's plenty of them to practice on! Thank you
DeleteThis is just gorgeous, Fiona! You did an amazing job! LOVE the binding you used too!
ReplyDeleteThank you Gail! I love the method of binding the seams for this style of coat, a really straight forward and effective way to add a personal touch!
DeleteLove the coat!
ReplyDeleteI've made Sewaholic's Minuro jacket, and agree that the sewing instructions are easy to follow, and it's very satisfactory to complete a project like that.
So satisfying! Even though I don't really need another mac I think I might be making another for spring, the process is just so satisfying!
DeleteThe coat looks fabulous! So impressive!
ReplyDeleteThank you Beth! I love wearing it!
DeleteYou did a fantastic job! I am in love with the color - so gorgeous <3. I have this pattern and plan on making it but haven't figured out exactly what colors/fabrics to use. Btw, your top stitching looks fantastic!!
ReplyDeleteThank you Amy! I actually really enjoy topstitching so this was a really satisfying make for me! It is hard to choose colours for a project which will get so much wear and take so much time isn't it?! I've dreamt up endless options!
DeleteWow! That looks amazing. So well made. You are right to feel proud of yourself.
ReplyDeleteThank you! It's still the garment I'm most proud of making!
DeleteI am clapping gleefully for you, how you enjoyed this project, and how you successfully tackled it! :-) I've just ordered my own Robson pattern and have NO IDEA when I'll be able to afford fabric and notions to complete it. I am shooting for November, claiming it in the name of the Lord, LOL.
ReplyDeleteSince I want to make the Minoru in a fire engine red I'll have to come up with some other color for the Robson. All I do know is that the lining will be psychedelic, wacko crazy fun, and I will lengthen it below my knees; oh and I am going to interline it like Seamstress Erin (https://seamstresserin.com/sparkly-underlined-sewaholic-robson-trench/). Uwww, I can't wait.
Cheers,
Lyric
http://www.sewlyricallyvintage.wordpress.com
Your comment has just put a big smile on my face thank you! I was too clapping gleefully when I finished it. I still don't think I've enjoyed a sewing project more. I love the idea of underlining it in a wacky print and am looking forward to seeing yours. Enjoy the process of sewing it up!
Delete