A Knit Scout Tee Duo
So ok, this is basically a post about t-shirts so may not seem that exciting but bear with me here because I'm super happy with how these turned out and the fabrics themselves are lovely! I have (on a number of occasions!) previously documented my love for the Grainline Studio Scout Tee pattern. It's such a great simple, wearable wardrobe staple and I think my favourite pattern to use as a basis to play around with my ideas. Over time I've used it almost as a block to create different styles of loose fitting woven tops. My hammered silk version with a dipped hem got worn literally to death (I was so sorry to see that go!) and I keep meaning to make another with a chevron of diagonal pleats across the front after the success I had hacking the pattern for my pleated cotton voile version. I love the neckline, cap sleeves and the way it fits around the shoulders so when I spotted that a few of you had made it up in knit fabric rather than woven I had a bit of a moment of revelation...this may be my perfect pattern for a relaxed fit tee!
The fabric for both of these tops came from the crazy Cloth House moving sale a couple of months ago. I can't remember exactly how much they were to begin with but both were in the £10-15/m price bracket and were down to just £1/m! I had to show some serious restraint and only allow myself to buy fabrics which I could 100% imagine as a particular type of garment and that I could see myself wearing. The inky blue burnout jersey jumped straight out at me as it was so unique and the striped cotton jersey was a must buy after I touched it and discovered how beautifully soft it is! I needed less than a metre for each so as I already had the pattern these are a total bargain at £1 each!
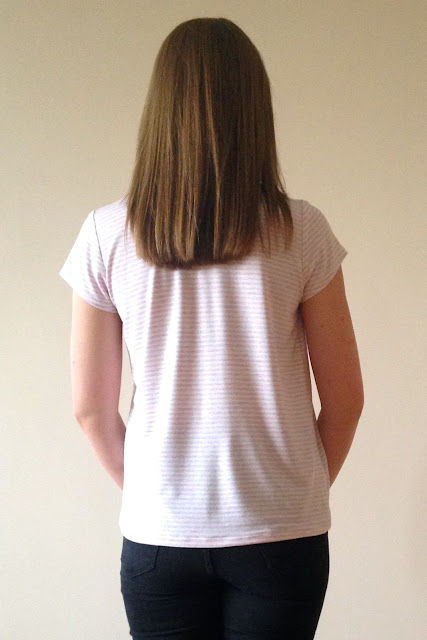
I'd previously fiddled around so much with the Scout Tee pattern, changing the hemline e.t.c that rather than try and work out what changes my currently traced version of the pattern involved I decided to revert back to the original. I cut a straight size 4 as the size guide indicated despite briefly considering going down the 2 as I was using a stretch fabric. I'm pleased I did this as I like the relaxed fit and also the burnout jersey doesn't actually have a huge amount of give.
I like how these each turned out so differently because of the varied stretch and drape of the two jerseys. The blue burnout is closer fitting, the pink and white stripe is much more relaxed and slouchy; I think the colours and designs of the fabric suit the fit of each one! The pink and white stripe is also slightly heavier which means the hem hangs a little little longer when worn oddly enough. The stripes are so fine that I wasn't all that bothered about matching them. I simply made sure that the same coloured stripe was at the armhole and hem of the side seams on both front and back pattern pieces then lined everything up when I was pinning.
As has become usual practice for me with knits now I used a narrow zig zag stitch on my regular machine to assemble all the seams then overlocked them for a nice professional finish. I love how this looks on the inside of the pink striped version especially. I always have to remind myself as I go that Grainline patterns have a 1/2" seam allowance - that tripped me up on the Archer Shirt before!
I used a stretch needle in my regular machine for both, but for some reason it didn't like the burnout jersey as much and I had some issues with skipped stitches. I think it struggled moving so regularly between the two thicknesses of fabric where it was and wasn't 'burnt out'. The burnt out areas are super fine and basically sheer. I have to wear a little black cami under this one!
My stretch twin needle worked great on both tops to finish the hem, cuffs and neckband. I turned up a slim hem twice to give some weight and body but turned up the cuff hems just once as I didn't want those little sleeves to end up so short they looked odd. I just stitched with the twin needle close to the edge and left it raw as you don't have to worry about knits fraying like wovens.
Apart from altering the stitches I used and adding a little piece of twill tape to the shoulder seams to stop them stretching out, I pretty much sewed these up following the same instructions as for a woven version. The major difference was of course the neck band as I didn't need to use a bias tape facing as my fabrics had stretch. I cut the band on the cross grain (so the stretch was running through it) and looked at the width of bands on other tops I own before settling on cutting them at 1.75" wide including seam allowance. After a bit of blog research I decided to make the band 7/8 of the length of the neckline. It needs to be shorter than the neckline opening as stretching the band out slightly as you sew will help it sit flat against the body when worn. I attached it in the same way I've attached every other knit neckband I've sewn and really feel like I've got this technique nailed now!
I'm sure this is the way that everyone else does it but following these steps has given me the best results:
- Sew together the two short ends of the band then fold it in half lengthways and press.
- Divide both the band and the neckline into four equal quarters and mark these with chalk or a washable pen.
- Pin the band to the right side of the neckline, aligning raw edges and lining up these marks. By dividing both pieces into equal quarters the stretch of the band ends up more evenly distributed around the neck.
- Sew the band to the neckline using a narrow zig zag stitch.
- Press the band up towards the neck and the seam allowances towards the body of the top.
- Stitch with a twin needle or zig zag stitch around the neckline, close to the seam line to secure the seam allowances in place.
I have previously finished the seam allowances at the neckline on my overlocker but with both of these tops I just trimmed it right down as close as I could get to the twin needle stitching. This is much less bulky and looks a lot better with the sheer burnout jersey.
It is well worth trying this pattern in a knit fabric in my opinion and it's got me thinking outside the 'recommended fabric choice' box looking at my other patterns now too. I think the key to why I love these is in the close fit around the shoulders so I don't feel swamped by them as I sometimes do when I try on oversized ready to wear tops. I'm glad I turned my head away from some more exciting and intricate sewing projects for a while to whip these up as they are the perfect additions to my summer wardrobe; comfortable, washable and infinitely wearable.


They look great - I have been thinking of trying the scout in knit fabric so this is interesting. I know what you mean about not being seeming exciting but I find making really wearable basic items for myself so satisfying and they fill so many gaps.
ReplyDeleteIt seems like a boring thing to blog about but I'm still really interested in tips for making things like t-shirts so I think it's worth it. And you're right, such satisfying items to sew!
DeleteUmm, are you sure about the Grainline seam allowance? All of my Grainline patterns have a 1/2" SA listed, not 3/8". I had the same problem when sewing my Archer shirt - totally stuffed up the collar, because I assumed the seam allowance was 5/8..
ReplyDeleteWhoops, you're totally right! See I can't even get it straight in my head when I'm writing about it! I'm going to amend that bit now to save anyone else the confusion!
DeleteGreat t-shirts. So nice to have a go-to pattern. I don't think I could have restrained myself at those fabric prices...beautiful bargains!
ReplyDeleteSo cheap for such lovely quality! Sewing this up with such success in a knit has made this pattern such a staple for me now
Deleteyou're like the twin needle queen! they look so great!
ReplyDeleteHaha! Thanks Rachel! I don't know what it is but suddenly me and my twin needle clicked!
DeleteThat is all the motivation I need to buy this pattern and get back to sewing after hiding under balls of wool all winter knitting! You must be very proud!
ReplyDeleteAh thanks! This would definitely be a great pattern to ease you back into sewing again, a really satisfying and fairly speedy project!
DeleteThese look so great! I love the Scout in a knit... I need to try this!
ReplyDeleteYou absolutely do! I can see you wearing these to death like me Sonja!
DeleteJust thinking of trying out Scout in knit fabric so thank you so much for this post - it's convinced me to give it a go as yours look super cute
ReplyDeleteGood thinking! It works out great in a knit! As you can see you get quite a different look depending on the fabric you choose
Delete