A Pair of Ogden Camisoles
I'm finally getting around to sharing with you what is possibly my favourite pattern of the summer. The True Bias Ogden Cami was released back in July alongside the Emerson Cropped Pant/Shorts. I bought it immediately as it was at a time when I was giving the holes in my handmade wardrobe a lot of thought and the one RTW garment I was still wearing repeatedly was little camisoles. This design was very close in style to my favourite Topshop cami so it was a no brainier of a purchase. Since then I've made these two, have got another to show you later this week as part of this month's Mood Sewing Network post plus I've been working on a hack of the pattern this week. I think that's worth the $10 and time assembling the PDF don't you?!

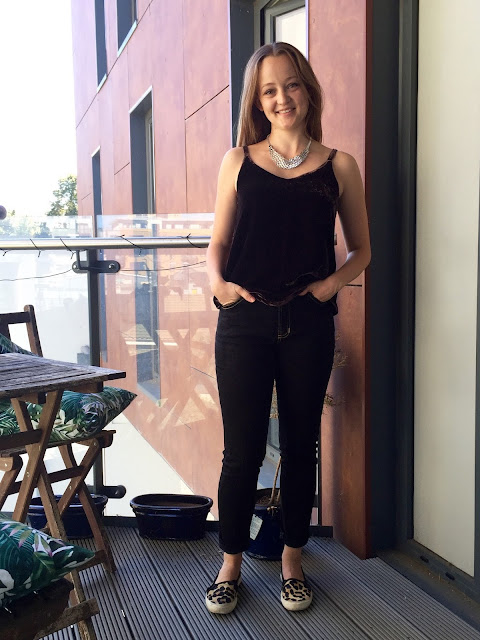
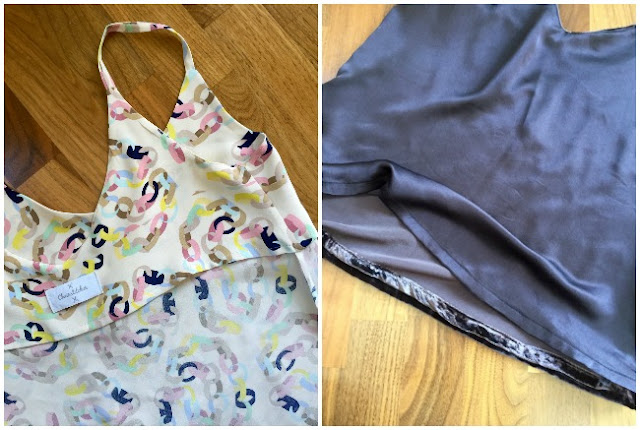
This is exactly the kind of design I need to be making more of for my wardrobe, minimalist and classic with a host of outfit opportunities. The simple design plus the fact that it needs less than a yard of fabric makes it the perfect garment to showcase a particularly special piece of fabric which is exactly what I did. I picked up a yard of this amazing paper chain print silk at Mood Fabrics in the garment district when I visited NYC earlier this year. The unusual print was what drew me to it initially but when I touched it I was sold. Its a luscious thick and heavy silk with a beautiful subtle sheen, similar in weight to a 4 ply crepe or silk morocain. It was a perfect match for this top as the delicate drape combined with the heavier weight skims the body in such a flattering way. Not to mention how luxurious it feels against the skin.

There was a weird line dissecting the paper chain print right in the middle of the yard I bought. It must just be where the pattern repeat starts again. I noticed it when I washed it but then completely forgot when cutting out so of course it has ended up right across my chest. Luckily the print is so busy it isn't all the noticeable. If any of you remember me saying a few posts ago about how there's always one thing not quite right with every garment; that's it with this one. Frustrating because I'm so delighted with this garment otherwise.

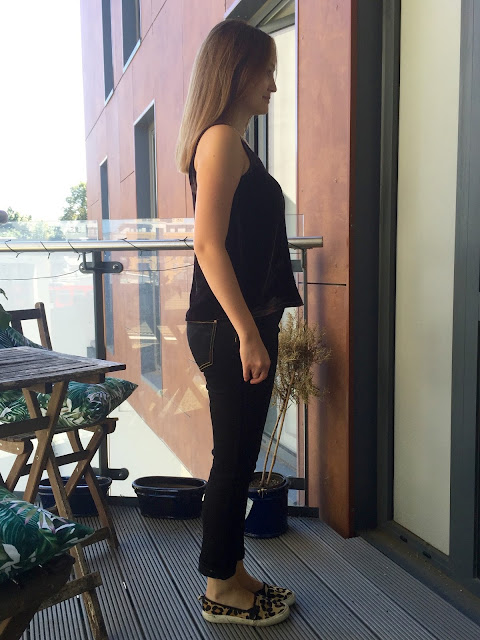
The second cami may look familiar to you as I was wearing it in my post about my first pair of handmade jeans. This one presented a slightly different challenge to the first as I decided to make it in velvet. I love all the velvet that's in the shops at the moment and the idea of wearing it as part of a more casual look to mix up the textures a bit. I chose this rich fudge brown rayon velvet so I could do just that; the jewel tones and brighter colours all seem a bit more glam to me. As the back of the velvet is not quite so nice against the skin I decided to fully line it rather than use the half lining/facing pieces that are provided with the pattern. I used a piece of delicate brown silk satin I for some reason had lurking in my stash. Some things are just meant to be!
Velvet might be a fabric some people shy away from because of the shifty pile but if you choose a good quality one and take your time you should be ok. The biggest problem I had with this one is how much it shed fluff everywhere when cut! I used plenty of pins to control it when sewing and pressed fairly lightly using another piece of velvet facing up against it underneath to protect the pile. Make sure you cut all your pieces facing in the same direction as the nap of the pile shines a different colour when brushed in opposite directions.
I cut the size 4 and made adjustments whatsoever with the exception of shortening the straps by 2". This is really easy to do as the perfect point to test the strap length is highlighted in the instructions. They are attached at the front then almost the entire neckline is sewn before you feed the straps through at the back and baste them in place so you can try the top on. With my first version I only shortened them by 1" to begin with but then realised when I finished the top that I still felt a little exposed at the front. It was easy enough to go back in and unpick them at the back to feed them through an extra inch. To begin with I thought that the strap pieces looked super short so couldn't believe I needed to take any length off but they actually begin higher up your chest and back than you think because of that beautiful curved neckline of the bodice pieces.

The instructions are super. Great illustrations and nice and thorough including techniques such as stay stitching and under-stitching to give you the best results. I was concerned about getting that neckline and the straps tidy and sitting right but it stays put perfectly when worn. It might look super simple to put together because of the minimalist design and low number of pattern pieces but it does require a bit of handling skill, especially if you're using a slippery or delicate fabric. The under-stitching along the neckline is a little fiddly and the whole neckline needs to be sewn very accurately to achieve the lovely shape. You definitely need to clip and trim those seam allowances throughly to get a clean finish. On both tops I chose to trim my seam allowances with pinking sheers; partly to prevent fraying but also because if you trim quite closely the zig zag edge can act almost like little notches in itself and allow the seam allowances to spread around the curves.

At the side seams I used french seams on the silk and also the satin lining of the velvet version. The velvet is too bulky to do a french seam on so I overlocked the seam allowances together to control the shedding. On both versions I pressed the seams on the shell towards the back and the facing/lining towards the front to reduce the bulk at the armhole that would be created by pressing them all the same way.
I did consider using my rolled hem foot for all the silk hems including the facing but I wasn't sure I wanted slightly fluted effect this often gives. Plus I've had a nightmare trying to rolled hem across french seams in the past and these were not the finest silk to persuade through that tricky little foot in the first place! I followed the instructions to hem by turning up by 1/4" twice. As the hemline is slightly curved you might find this made a little easier by stitching 1/4" away from the raw hem to begin with. This gives you a guide to press up along but the tightness of the stitches also helps you ease the fabric in along the curve.

As those of you who are aware of what the weather is like here in the UK at the moment these pictures were taken a little while ago! Bring back sandal weather please. Despite the winter chill that has descended these are still getting a lot of wear layered under cardigans and snuggly jumpers. Did you know that silk can be surprising warm? It has natural temperature regulating properties and as its so fine its the perfect winter under layer as it won't add much bulk. I think silk gets a bit of a bad rep sometimes for being difficult to care for and work with but I love it and use it as often as I can. Yes it's not all that cheap but its incredibly robust and you will produce garments which are in your wardrobe for years. Both of these have been washed and worn numerous times and look as good now as they did when I finished them. In case your interested I wash all my silks on a 30 degree delicate cycle in the machine and line dry. Just make sure to pretreat your fabric in the same way before cutting and if you're concerned maybe just wash a small swatch to begin with.

I feel like I could make these beauties in my sleep now and can definitely have one finished in a few hours. Every time I look through my stash now I see pretty much every fabric as the perfect Ogden Cami. I reckon the handful I've made so far will cover every eventuality for now though; surely the paper chain print is perfect for a New Year's Eve celebration!


This is exactly the kind of design I need to be making more of for my wardrobe, minimalist and classic with a host of outfit opportunities. The simple design plus the fact that it needs less than a yard of fabric makes it the perfect garment to showcase a particularly special piece of fabric which is exactly what I did. I picked up a yard of this amazing paper chain print silk at Mood Fabrics in the garment district when I visited NYC earlier this year. The unusual print was what drew me to it initially but when I touched it I was sold. Its a luscious thick and heavy silk with a beautiful subtle sheen, similar in weight to a 4 ply crepe or silk morocain. It was a perfect match for this top as the delicate drape combined with the heavier weight skims the body in such a flattering way. Not to mention how luxurious it feels against the skin.

There was a weird line dissecting the paper chain print right in the middle of the yard I bought. It must just be where the pattern repeat starts again. I noticed it when I washed it but then completely forgot when cutting out so of course it has ended up right across my chest. Luckily the print is so busy it isn't all the noticeable. If any of you remember me saying a few posts ago about how there's always one thing not quite right with every garment; that's it with this one. Frustrating because I'm so delighted with this garment otherwise.

The second cami may look familiar to you as I was wearing it in my post about my first pair of handmade jeans. This one presented a slightly different challenge to the first as I decided to make it in velvet. I love all the velvet that's in the shops at the moment and the idea of wearing it as part of a more casual look to mix up the textures a bit. I chose this rich fudge brown rayon velvet so I could do just that; the jewel tones and brighter colours all seem a bit more glam to me. As the back of the velvet is not quite so nice against the skin I decided to fully line it rather than use the half lining/facing pieces that are provided with the pattern. I used a piece of delicate brown silk satin I for some reason had lurking in my stash. Some things are just meant to be!

Velvet might be a fabric some people shy away from because of the shifty pile but if you choose a good quality one and take your time you should be ok. The biggest problem I had with this one is how much it shed fluff everywhere when cut! I used plenty of pins to control it when sewing and pressed fairly lightly using another piece of velvet facing up against it underneath to protect the pile. Make sure you cut all your pieces facing in the same direction as the nap of the pile shines a different colour when brushed in opposite directions.

I cut the size 4 and made adjustments whatsoever with the exception of shortening the straps by 2". This is really easy to do as the perfect point to test the strap length is highlighted in the instructions. They are attached at the front then almost the entire neckline is sewn before you feed the straps through at the back and baste them in place so you can try the top on. With my first version I only shortened them by 1" to begin with but then realised when I finished the top that I still felt a little exposed at the front. It was easy enough to go back in and unpick them at the back to feed them through an extra inch. To begin with I thought that the strap pieces looked super short so couldn't believe I needed to take any length off but they actually begin higher up your chest and back than you think because of that beautiful curved neckline of the bodice pieces.

The instructions are super. Great illustrations and nice and thorough including techniques such as stay stitching and under-stitching to give you the best results. I was concerned about getting that neckline and the straps tidy and sitting right but it stays put perfectly when worn. It might look super simple to put together because of the minimalist design and low number of pattern pieces but it does require a bit of handling skill, especially if you're using a slippery or delicate fabric. The under-stitching along the neckline is a little fiddly and the whole neckline needs to be sewn very accurately to achieve the lovely shape. You definitely need to clip and trim those seam allowances throughly to get a clean finish. On both tops I chose to trim my seam allowances with pinking sheers; partly to prevent fraying but also because if you trim quite closely the zig zag edge can act almost like little notches in itself and allow the seam allowances to spread around the curves.

At the side seams I used french seams on the silk and also the satin lining of the velvet version. The velvet is too bulky to do a french seam on so I overlocked the seam allowances together to control the shedding. On both versions I pressed the seams on the shell towards the back and the facing/lining towards the front to reduce the bulk at the armhole that would be created by pressing them all the same way.

I did consider using my rolled hem foot for all the silk hems including the facing but I wasn't sure I wanted slightly fluted effect this often gives. Plus I've had a nightmare trying to rolled hem across french seams in the past and these were not the finest silk to persuade through that tricky little foot in the first place! I followed the instructions to hem by turning up by 1/4" twice. As the hemline is slightly curved you might find this made a little easier by stitching 1/4" away from the raw hem to begin with. This gives you a guide to press up along but the tightness of the stitches also helps you ease the fabric in along the curve.

As those of you who are aware of what the weather is like here in the UK at the moment these pictures were taken a little while ago! Bring back sandal weather please. Despite the winter chill that has descended these are still getting a lot of wear layered under cardigans and snuggly jumpers. Did you know that silk can be surprising warm? It has natural temperature regulating properties and as its so fine its the perfect winter under layer as it won't add much bulk. I think silk gets a bit of a bad rep sometimes for being difficult to care for and work with but I love it and use it as often as I can. Yes it's not all that cheap but its incredibly robust and you will produce garments which are in your wardrobe for years. Both of these have been washed and worn numerous times and look as good now as they did when I finished them. In case your interested I wash all my silks on a 30 degree delicate cycle in the machine and line dry. Just make sure to pretreat your fabric in the same way before cutting and if you're concerned maybe just wash a small swatch to begin with.

I feel like I could make these beauties in my sleep now and can definitely have one finished in a few hours. Every time I look through my stash now I see pretty much every fabric as the perfect Ogden Cami. I reckon the handful I've made so far will cover every eventuality for now though; surely the paper chain print is perfect for a New Year's Eve celebration!


Very cute cami!!!! Love all of them!
ReplyDeleteThank you! They are just what my handmade wardrobe needed and have been getting a lot of wear
DeleteBeautiful Fiona! I think a simple pattern made well with top quality fabrics is worth its weight in gold. Definitely one to consider for summer sewing. x
ReplyDeleteAbsolutely do Jane, I could see you in a solid red version in some fabulous fabric or other! Can't beat a beautiful silk
DeleteThis is such a pretty pattern, and you've made the most of it! I love both your versions, but especially those paper chains. Perfect use of fabric!
ReplyDeleteThanks Kelly! it's unusual for me to be drawn to such a fun bright print for dressmaking purposes so I thought the simple camisole might balance that out. The pattern is great, I haven't finished with it yet!
DeleteThese are gorgeous! I have been on the fence since the Ogden Cami came out, but your versions have helped me decide to buy the pattern already and give them a shot. The velvet is such a good idea. As are all your construction and silk care tips. Thank you!
ReplyDeleteO don't be on the fence Susanna! It's a really great pattern! It does require some careful sewing to get that neckline and straps right but it's a nice challenge with beautiful end results
DeleteGorgeous! I've just bought this pattern, I'm wondering whether to use the facings or fully line, I'm worried that the facings might show through underneath, but I don't want to add unnecessary bulk especially if I tuck it into skirts. Do you notice any issues with the facing?
ReplyDeleteHi Alice! It depends on how fine your fabric is...if its a mid-weight you should be fine. If its quite delicate or sheer the facing might show through a bit or if it has a thickness to it you might want to think about how you hem the facing as the bulk of that hem would be what shows through. I really like the size of this facing though and think its sits really well.
DeleteHave fun sewing it up!
Lovely tops, beautifully made. I liked your suggestion of using pinking shears to trim the seams - I hadn't thought of doing that, but what a good idea!
ReplyDeleteThanks Janet! If the fabric will hold up well with just pinking its a great way of reducing bulk from a seam along a neckline. The zig zags sort of act like notches and allow some flexibility!
DeleteBeautiful cami's, I am having a bit of a nightmare printing the ogden, my first attempt was out of sync even tho the test square was correct, second attempt some of the pieces didnt match up, I dont think my hp printer is set right. I have ended up adding 1/4 inch to my size on pattern
ReplyDeleteO dear! I wonder what is going on? I haven't had any problems with the True Bias PDFs so far. I'm not great with technology but sounds like the printer settings are a bit off yes. Maybe try reinstalling? Although if the test square is right I would expect the pattern to be. Do persist though! Its a great little pattern
DeleteAppreciate the recommendation. Let me try it out.
ReplyDeleteBeautiful! I have made one Ogden and very pleased with it. I want to make another but the fabric is quite sheer so I need to line it fully. I am new to dressmaking, do I attach the lining in the same way as the pattern says to do the interfacing? So attached to the neckline only?
ReplyDeleteHi Harriet, hopefully you got my comment on Instagram but just wanted to reiterate it here in case you missed it! Yes you attach the lining exactly the way the pattern instructs you to attach the facing and leave it hanging free. The facing is essentially a shortened version of the lining
Delete