Christmas Velvet Slip Dress
Its Christmas week and appropriately enough I have this year's Christmas party dress to share with you! And making it was quite the adventure! I've been really enjoying all the velvet thats about this season and knew this was the route I wanted to go down this year. I'd also been drawn to the slightly nineties trend for strappy little slip dresses so decided to do two trends in one with a velvet slip dress! I feel like velvet is quite a statement in itself so pairing it with a simple style and silhouette makes it feel infinitely more wearable.

Just as I was formulating this plan Fabrics for Sale got in touch to see if I'd be interested in trying out any of their fabrics in return for a review. I knew after making a devore scarf for my Nan earlier this year that they stock a particularly lovely selection of velvets so it seemed like my dress was meant to be! The devores (velvets which have some areas of the pile burnt out to create a pattern) are particularly lovely and I was sorely tempted by this checked beauty. However, the final decision was this grey silk velvet which I couldn't be happier with. I love the way the sheen and nap of the velvet makes it shimmer like silver in reality and you can't beat the drape of silk. Perfect for a Christmas party dress!

I probably should have made my life a bit easier by either choosing a fabric that was more straightforward to handle or a pattern which was going to work right out of the envelope but no I went down the difficult route! My love for the True Bias Ogden Cami pattern is well documented (here, here and here) and as I loved the clean finish plus the shape and fit through the bust I decided it would be an excellent starting point. I traced off the camisole pieces onto a piece of paper and first of lengthened along the centre back and centre front lines as long as my metre of fabric would allow, enabling me to finalise a hem length once I had it on. Then I needed to extend the side seams to the same length but I didn't want to follow the line of the cami side seams right to the hem as they flare out slightly and I was after a straighter silhouette. I worked out that the width of the dress would need to fit around my widest point (the hips) with at least a couple of inches of ease. I followed the line of the side seam down until it reached that size and then drew a line straight down to the hem line.

As with my velvet version of the camisole I decided this would need a full lining rather than the facing that is provided with the pattern. This is really easy to do as you just use the same pattern pieces as the shell. The silk velvet was going to be nice and slinky so I was keen for the lining to match that feel and not have the body that a crispy acetate lining usually would. I asked for some help choosing something to match and a reply came back suggesting this silver polyester satin. It was a great choice as it is quite fine so doesn't affect the drape of the velvet. Big thanks to the team at Fabrics for Sale for all their advice!
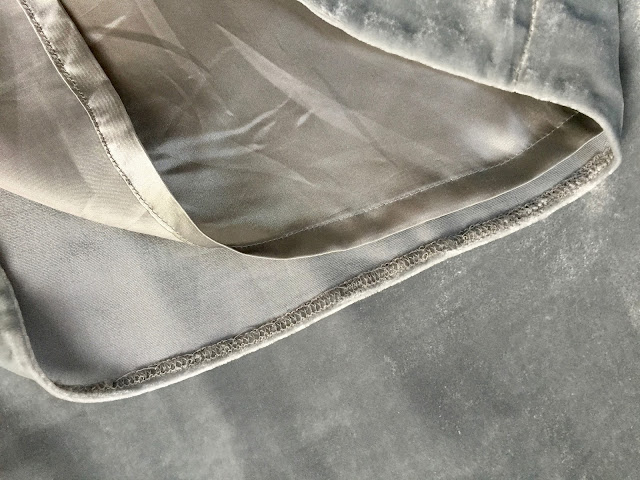
As well as hacking the pattern into a longer and slimmer silhouette I'd spotted the cute little velvet cami above on Pinterest a while back and wanted to try out the satin/velvet combo along the neckline. The lining was such a good match colour wise for the velvet that this was ideal for the border around the neckline. Drafting this was easy enough. I just drew the shape I wanted onto my traced pattern, cut along the line to give me my separate pattern pieces and added 5/8" seam allowances to both edges. I made my satin insets 1 3/4" wide plus seam allowance. As easy as it was to draft, it was equally difficult to sew! Sewing into those points and trying to get keep the seam-line neat and even was a nightmare. Both fabrics were prone to stretching out along bias cut edges and also slipped about on each other like crazy. I used plenty of pins, a short stitch length and took it really slow. There was a lot of going back and unpicking short sections to make it as neat as possible and a lot of patience was required! It would have been much easier to do a curved style line but it was worth the effort as I love that the shape mimics the shape of the neckline.

Despite thinking I'd been o so clever slimming down the amount of flare in the dress when I put it on after sewing up the side seams I wasn't happy with the shape. I thought a straight cut shift would look effortlessly chic but in reality that style looked a little strange and heavy on me in the velvet and I decided I needed more shaping through the waist. Taking a wedge out of the side seams to achieve this might have been a simple task in another fabric but in this shifty velvet it was a total nightmare! I drew on the alteration I wanted to make and carefully pinned back along the side seams to help hold everything in place but as soon as it got under the machine the pile started shifting about and my side seams turned into a hot mess. I fell down a rabbit hole of trying to rectify my mistakes until the dress got a time out slung over my dress form for a week. After all the work I'd put into sewing the neckline I didn't want to give up on it but I needed to not look at velvet for a while!

When I returned to it with a clear head I went right back and unpicked those side seams to make a fresh start of it. A much better approach that has resulted in nice smooth seams. I found a microtex needle worked best with both the velvet and lining and I reduced the pressure of my machine foot a little to protect the pile. I used a cool iron and pressed the velvet against another piece of itself, again to protect the plush surface from being flattened out. It would have been easy to do with this particular velvet as I found it to have a quite a thick pile, the cutting of which resulted in a fine coating of velvet fibres all over my room! The thicker the pile the trickier it is to sew and the longer fibres have more movement in them which means the fabric shifts about more as you sew.
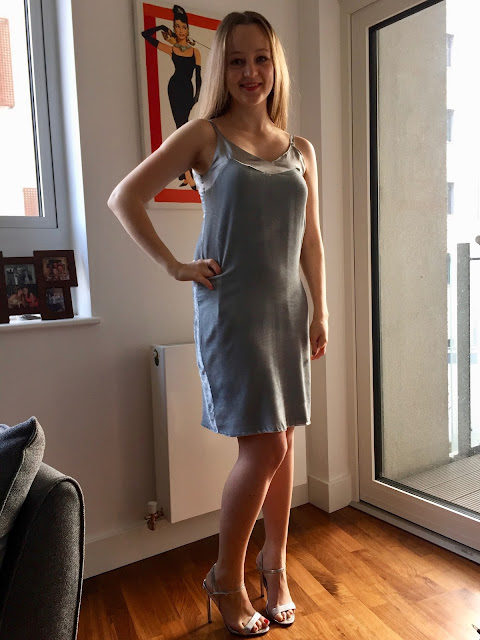
The straps are made from the lining fabric as I thought that would carry through best from the neckline and the subtle appearance of the satin strap suited the feel of the dress more than a chunkier velvet one. I pinked all the seams allowances around the neckline and finished the side seams on the overlocker; by this point I was looking for the easiest solutions at every opportunity! I machine stitched the lining hem but did take the time to hand stitch the hem of the velvet so it didn't show through to the right side. I wanted to keep as much of the length as possible so I overlocked the raw edge and just turned it up once by the width of the stitching.
All in all not the most pleasurable sew or my best work as perhaps a project involving silk velvet isn't the time to wield some creativity and attempt some fly by the seat of my pants pattern hacking but now I've got some distance from the sewing process I'm really glad I found the determination to see it through. I love the finished dress and have already made some happy memories in it wearing it to the Foldline Christmas party where velvet was a popular choice on the night. Have any of you tackled velvet for the festive season this year?

Just as I was formulating this plan Fabrics for Sale got in touch to see if I'd be interested in trying out any of their fabrics in return for a review. I knew after making a devore scarf for my Nan earlier this year that they stock a particularly lovely selection of velvets so it seemed like my dress was meant to be! The devores (velvets which have some areas of the pile burnt out to create a pattern) are particularly lovely and I was sorely tempted by this checked beauty. However, the final decision was this grey silk velvet which I couldn't be happier with. I love the way the sheen and nap of the velvet makes it shimmer like silver in reality and you can't beat the drape of silk. Perfect for a Christmas party dress!

I probably should have made my life a bit easier by either choosing a fabric that was more straightforward to handle or a pattern which was going to work right out of the envelope but no I went down the difficult route! My love for the True Bias Ogden Cami pattern is well documented (here, here and here) and as I loved the clean finish plus the shape and fit through the bust I decided it would be an excellent starting point. I traced off the camisole pieces onto a piece of paper and first of lengthened along the centre back and centre front lines as long as my metre of fabric would allow, enabling me to finalise a hem length once I had it on. Then I needed to extend the side seams to the same length but I didn't want to follow the line of the cami side seams right to the hem as they flare out slightly and I was after a straighter silhouette. I worked out that the width of the dress would need to fit around my widest point (the hips) with at least a couple of inches of ease. I followed the line of the side seam down until it reached that size and then drew a line straight down to the hem line.

As with my velvet version of the camisole I decided this would need a full lining rather than the facing that is provided with the pattern. This is really easy to do as you just use the same pattern pieces as the shell. The silk velvet was going to be nice and slinky so I was keen for the lining to match that feel and not have the body that a crispy acetate lining usually would. I asked for some help choosing something to match and a reply came back suggesting this silver polyester satin. It was a great choice as it is quite fine so doesn't affect the drape of the velvet. Big thanks to the team at Fabrics for Sale for all their advice!
 |
| Original image from Urban Outfitters - Silence & Noise Satin Inset Velvet Cami |
As well as hacking the pattern into a longer and slimmer silhouette I'd spotted the cute little velvet cami above on Pinterest a while back and wanted to try out the satin/velvet combo along the neckline. The lining was such a good match colour wise for the velvet that this was ideal for the border around the neckline. Drafting this was easy enough. I just drew the shape I wanted onto my traced pattern, cut along the line to give me my separate pattern pieces and added 5/8" seam allowances to both edges. I made my satin insets 1 3/4" wide plus seam allowance. As easy as it was to draft, it was equally difficult to sew! Sewing into those points and trying to get keep the seam-line neat and even was a nightmare. Both fabrics were prone to stretching out along bias cut edges and also slipped about on each other like crazy. I used plenty of pins, a short stitch length and took it really slow. There was a lot of going back and unpicking short sections to make it as neat as possible and a lot of patience was required! It would have been much easier to do a curved style line but it was worth the effort as I love that the shape mimics the shape of the neckline.

Despite thinking I'd been o so clever slimming down the amount of flare in the dress when I put it on after sewing up the side seams I wasn't happy with the shape. I thought a straight cut shift would look effortlessly chic but in reality that style looked a little strange and heavy on me in the velvet and I decided I needed more shaping through the waist. Taking a wedge out of the side seams to achieve this might have been a simple task in another fabric but in this shifty velvet it was a total nightmare! I drew on the alteration I wanted to make and carefully pinned back along the side seams to help hold everything in place but as soon as it got under the machine the pile started shifting about and my side seams turned into a hot mess. I fell down a rabbit hole of trying to rectify my mistakes until the dress got a time out slung over my dress form for a week. After all the work I'd put into sewing the neckline I didn't want to give up on it but I needed to not look at velvet for a while!

When I returned to it with a clear head I went right back and unpicked those side seams to make a fresh start of it. A much better approach that has resulted in nice smooth seams. I found a microtex needle worked best with both the velvet and lining and I reduced the pressure of my machine foot a little to protect the pile. I used a cool iron and pressed the velvet against another piece of itself, again to protect the plush surface from being flattened out. It would have been easy to do with this particular velvet as I found it to have a quite a thick pile, the cutting of which resulted in a fine coating of velvet fibres all over my room! The thicker the pile the trickier it is to sew and the longer fibres have more movement in them which means the fabric shifts about more as you sew.

The straps are made from the lining fabric as I thought that would carry through best from the neckline and the subtle appearance of the satin strap suited the feel of the dress more than a chunkier velvet one. I pinked all the seams allowances around the neckline and finished the side seams on the overlocker; by this point I was looking for the easiest solutions at every opportunity! I machine stitched the lining hem but did take the time to hand stitch the hem of the velvet so it didn't show through to the right side. I wanted to keep as much of the length as possible so I overlocked the raw edge and just turned it up once by the width of the stitching.

All in all not the most pleasurable sew or my best work as perhaps a project involving silk velvet isn't the time to wield some creativity and attempt some fly by the seat of my pants pattern hacking but now I've got some distance from the sewing process I'm really glad I found the determination to see it through. I love the finished dress and have already made some happy memories in it wearing it to the Foldline Christmas party where velvet was a popular choice on the night. Have any of you tackled velvet for the festive season this year?
 |
| Sally from Charity Shop Chic and I at the party |


Check out that pic of me and you!! Talk about glamour pusses :)
ReplyDeleteYou looked divine in this dress and I hope you get lots of wear out of it!
Could we be any more silver and sparkly?! Thanks Sally!
DeleteYou do indeed look divine, Fiona. I always enjoy seeing your quality work and reading the blog for tips, ideas, and just plain entertainment. Happy Christmas, and a Happy, Healthy, and Prosperous new Year to you and yours.
ReplyDeleteAh thank you so much! Comments like that mean the world to me, it's so wonderful to hear that my ramblings are enjoyed. Wishing you a wonderful Christmas and New Year too. Thank you for reading!
DeleteWow, what a beautiful dress! I was leaning toward the no-holiday-dresses resolution this year, but you're definitely making me reconsider... especially in velvet!
ReplyDeleteO yes go for the velvet! It needn't be as tricky as I made this for myself, you could do a simple little dress in stretch velvet which would be a lot easier to handle as it has a shorter pile! Thank you and Merry Christmas!
DeleteSo dreamy! Again kudos for handling what must have been pain in the butt fabrics and getting such a lovely result. I love the 90s feel and the inset neckline - worth the effort!
ReplyDeleteAbsolutely stunning dress! So beautiful! You look gorgeous, Fiona. Happy New Year to you!
ReplyDeleteVery beautiful dress. Velvet is trendy.
ReplyDelete