 |
| Just check out the effort I made to do this properly, drew out all pattern pieces and notches instead of getting the cutting out done as quick as possible! |
I've never bothered with a muslin before but have had problems with the fit of my finished items (just see my version of the Salme Patterns colour block t!). I decided it would probably be a good idea to make the effort on this project A) because I actually had an occasion to wear this to and didn't want to look silly in a dress that didn't fit, B) because I'd never worked with a Sewaholic pattern before so am not used to Tasia's sizing and C) because the fabric I wanted to use for the final dress was £6.50/m from Goldhawk Road and while that may not seem pricey to some is a lot for me who is still experimenting with cheap polyblends! However I still wrestle with the idea of using fabric to make something which is never going to be worn. I decided to make the muslin out of a plain black bargain piece from Rolls n Rems in Lewisham so I wouldn't mind if everything went horribly wrong but which I could wear if it somehow miraculously did fit!
 |
| Does that face say pleased?! |
And miraculously fit it did! I cannot emphasise enough how happy I am with this make and how much I LOVE this pattern! Tasia's instructions are fantastic, there's not too much reading to do but enough detail is included in the text and diagrams to explain clearly to a seamstress with little knowledge. I also made use of the sew-a-long resource which was brilliant for taking the make a little bit further with the additional options of adding stay-tape and different seam finishings. I wanted to make the effort to finish this dress well to make it something a bit special plus to make it last and Tasia's clarity and enthusiasm really spurred me on to do so, even with the muslin!
 |
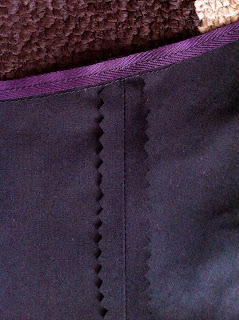
| More evidence of doing things properly - stay-tape inside the bodice and pinked seams which would eventually be enclosed |
The construction of the dress is SO cleverly thought out it made it a really satisfying make. Just from the way the dress is put together with the self-lined bodice meant half my finishing was done for me. I felt so chuffed with how neat my bodice was looking inside and out that when I made a start on the skirt I thought 'I've GOT to make this look as good too!'. I'm a bit daunted by the thought of fully lining something yet but I bound all my seams with bias tape to create a lovely tidy finish inside the skirt. I never thought I'd be bothered with this finish as it seemed like so much effort for each seam, twice along each side of the seam; but it actually didn't take that long and was very simple and satisfying.
 |
| Mmmm...bias bound insides! |
Once bodice, skirt and waistband were attached I had a bit of an issue with the waistband being slightly shorter than the other pieces. I've had this before when using interfaced pieces and am wondering if when I iron on the interfacing it all shrinks slightly?? Anyone had this problem before? I did preshrink my fabric...Anyway I trimmed down the edges of the skirt and bodice to match which I was concerned would make it too small but doesn't seem to have caused a problem.
 |
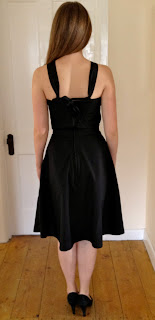
| Bumpy lower back |
 |
| Bumpy zip edge - but still very straight and even! |
I'm not completely happy with the zip but I've always found them difficult and it's an improvement on what I've managed before so for a wearable muslin it's fine. One aspect I did struggle with was hemming...I decided just to turn and press, then turn and press again then stitch round on the machine as I didn't mind the stitching showing, I do in fact quite like that feature if I can manage to do it neatly. However if I turned and pressed the recommended couple of inches because of the flare of the skirt I had real issues with getting the hem to sit flat as the inside folded up part was wider than the outside. I've never been sure what to do about this so does anyone want to shed some light on my stupidity with this?! In the end I just did a narrower hem and shortened it by more than I was going to as I already needed to take quite a chunk off to make it my preferred length as I've got quite short legs!
The fabric I've chosen for my final Lonsdale is a bit stiffer than this flimsy black polycotton, which I'm quite pleased about as I think it will give the bodice and nice stiffness and hold some shape in the fullness of the skirt. I'm really pleased I've practised all the finishing in advance too so I won't have any nasty surprises along the way. Plus I'm really relieved that it pretty much fits straight from the pattern so I don't need to start learning about adjusting patterns to fit quite yet! Lazy seamstress I know!


I love it! Well done you! I'm wearing my Lonsdale to my brother's wedding next week - can't wait!
ReplyDeleteGood choice!
DeleteYour Lonsdale looks great. The extra steps show.
ReplyDeleteI've been browsing your blog and love it. You had quite the summer!
Thank you! I have been very lucky with my summer I have to admit! Really pleased to have some time to get sewing again now though!
DeleteOooo!! It's gorgeous! I do like the bound seams, definately worth the time. Good luck with the next one. :)
ReplyDeleteThank you! I can't wait to show you all!
DeleteThat is too good to be called a muslin!! Lovely! I'd be smiling like that too... :)
ReplyDeleteI also have a curvy back, but I don't think the little bubble of fabric is from your centred zip- I think you're right that it needs a sway back adjustment to reduce the length. The weight of the zip in the excess fabric then maybe makes if pop out a bit more for you? (Have you tried concealed zips with the special foot for your machine?)
Also, you did what I would do for hemming a circle skirt- make smaller and double hem it! Gertie has a youtube video on it if you want to see how she does it.
I hope you're confident to cut into your "good" fabric now?! :)
Hi! I don't know if you'll see this comment, but...
ReplyDeleteI found your blog when I was searching Lonsdale dresses. Your dress is lovely, by the way. I just wanted to say, as well, that I'm so glad someone else is wondering about the whole interfacing/shrinking possibility! So many times now I have interfaced my waistbands and then found they are shorter than they should be. Including my in-progress Lonsdale, yesterday! I've wondered if the interfacing causes the shrinking, and now I'm pretty sure it does. Hmmm, maybe it's best to use sew-in or some silk organza. I always pre-shrink my fabric, too.
I'm off to have a look at the rest of your blog!
Thank you very much Alice!
DeleteI'm so glad to hear you've been thinking about the interfacing too, it always seems to happen to me and I don't know how to combat it! I've wondered if I was just buying poor quality interfacing but then how can your tell the difference?! Silk organza sounds like a lovely idea though, I'm going to give that a whirl!
How did you get on with your Lonsdale? It's such a great pattern.
Hi,
DeleteI thought I would chime in, in case you are still wondering... You need to pre-shrink interfacing, just like you would do with fabric. Either with the steam of a steam iron before use, or by putting it in warm water and letting it air dry. Hope it helps!
Thanks Katalin! I've since cracked using the interfacing, using some better quality stuff now too which helps!
DeleteI love your dress! It's beautiful!
ReplyDeleteThanks very much! The pattern is great, really flattering shapes and easy to fit
Delete