Gingham Silk Double Layer Camisole
I have been flying through the small mountain of fabrics I brought home with me from America! I'm really pleased that it's all getting used so quickly as it means I made some good choices and mostly stuck to my plan of only buying things when I knew what I would make with them. However, my latest garment actually uses one of my impulse buys. From the masses of silk prints they have at Mood Fabrics LA (seriously there are so many it's kind of overwhelming!) this blue and white gingham silk crepe managed to jump out at me as an obvious purchase. I love how the delicate colours, delicate fabric and delicate watercolour style of the print compliment each other and was particularly taken with how the blue lines fade in and out across the fabric, giving it a kind of hand painted look. It was one of the first bolts I pulled out in the store and a yard of it left with me despite only having a vague plan to make some sort of flowing top.
When I got home I had a root through my pattern stash for something suitable. I was tempted to make yet another silk Emmeline Tee or Sutton Blouse but my wardrobe is already kind of overflowing with these styles (see here, here AND here) so I decided it was time for something different. I thought my stash hunt had come up short but then remembered to have a look through the unprinted PDF patterns I have saved on my computer and I came across the Double Layer Camisole from Salme Patterns which Elisa ever so kindly sent me as a thank you freebie last year. I can't believe it's taken me this long to sew it up as it's a style I'd be drawn to in RTW and I was really excited about sewing it. I think lack of a suitable fabric last summer meant it got put on the back burner and then pretty much forgotten about saved on my computer once the colder weather kicked in.
The pattern is super quick to sew even in silk and I love that the neckline doesn't require any fiddly binding or facing, the second layer of the cami gives you the clean edge (which is under stitched to keep the inside layer from rolling out). There are bust darts to sew in the two front pieces, then you sew the side seams, followed by the neckline (attaching the straps as you go) and then hem! If sewn in a straightforward fabric I'd definitely agree with it's 'beginner' skill rating.
The fiddliest part was definitely those skinny straps. A loop turner was absolutely essential for getting these babies turned out to the right side and even then it was a struggle. Make sure you trim the seam allowances down as small as you dare to go. The delicate result is definitely worth the effort though. I often find patterns come up a little long for me in the upper chest/shoulder area so I made sure to pin my straps in place and check the length before sewing. I didn't want to have to unpick that entire neckline! It was worth the extra time as I did take a couple of inches off and getting the placement of the straps spot on was a little tricky as they need to meet the neckline right at the tip of the neckline curve.
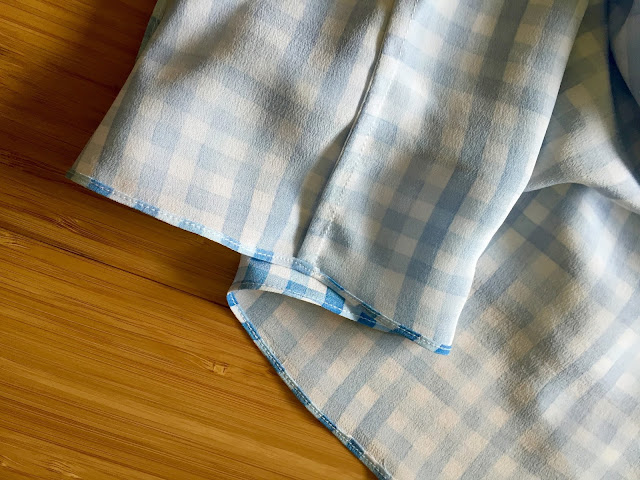
For such a simple style I actually had to draw on knowledge of a few techniques to get the best out of the silk. As well as under-stitching the neckline, I used french seams to finish the side seams and am really pleased with how narrow and delicate I got them this time. I feel like I've really nailed that technique now! I used the rolled hem foot on my machine to hem both layers, which worked out pretty well even over those french seamed side seams. The silk was pretty stable so simply I finished the raw edge of the neckline seam (which is concealed between the two layers) with pinking shears. I thought the zigzag of the pinking would have a softer edge than any other finish too which would help prevent it showing through on the right side as the silk is so fine.
The crepe texture of the silk and matte finish meant it had some grip when laid against itself which made it so much easier to handle than a satin. I cut the pattern pieces out on a rug which I always prefer to a smooth surface like a table top when working with a slippery fabric. I used lots of pins but made sure to keep them within the seam allowances as pin holes left a mark but I used a washable pen to mark my darts which didn't leave any kind of stain. I did need to use a fine sharps needle, silk crepe can be a real problem with skipped stitches! A lightweight and drapey fabric is definitely a good choice for this project, you definitely don't want anything too thick as you'll be wearing two layers of it and you want that tiered hem to have some nice movement to it.
I am pleased with my execution of this garment but I am wondering if it has perhaps turned out to be one of those which I like the idea of more than the reality. I do like the style but think I need to fiddle around with the pattern a bit to make it look how I want on my body shape. I cut the size 6 and I think made a bit of an error in assuming that such a simple style wouldn't need much in the way of adjustments and sewed up the pattern exactly as it is. It's not bad but I think the neckline is just a touch too wide for me and if I took a bit out of the centre it would sit flatter to the body in that area. I also think it looks a little tubular on me and could do with a bit more shaping through the waist, plus looking at it in pictures I'm wondering if it would be more flattering in a shorter length. These are all simple things to change next time though and I'm more than happy to wear this version as it is.
Despite these reservations the beautiful fabric has meant this top has become a wardrobe staple. I was wondering if it was a little silly of me to make this up just as the warmer weather has vanished but I this style and print is totally working layered under chunky, fluffy, snuggly cardigans and jumpers!
When I got home I had a root through my pattern stash for something suitable. I was tempted to make yet another silk Emmeline Tee or Sutton Blouse but my wardrobe is already kind of overflowing with these styles (see here, here AND here) so I decided it was time for something different. I thought my stash hunt had come up short but then remembered to have a look through the unprinted PDF patterns I have saved on my computer and I came across the Double Layer Camisole from Salme Patterns which Elisa ever so kindly sent me as a thank you freebie last year. I can't believe it's taken me this long to sew it up as it's a style I'd be drawn to in RTW and I was really excited about sewing it. I think lack of a suitable fabric last summer meant it got put on the back burner and then pretty much forgotten about saved on my computer once the colder weather kicked in.
The pattern is super quick to sew even in silk and I love that the neckline doesn't require any fiddly binding or facing, the second layer of the cami gives you the clean edge (which is under stitched to keep the inside layer from rolling out). There are bust darts to sew in the two front pieces, then you sew the side seams, followed by the neckline (attaching the straps as you go) and then hem! If sewn in a straightforward fabric I'd definitely agree with it's 'beginner' skill rating.
The fiddliest part was definitely those skinny straps. A loop turner was absolutely essential for getting these babies turned out to the right side and even then it was a struggle. Make sure you trim the seam allowances down as small as you dare to go. The delicate result is definitely worth the effort though. I often find patterns come up a little long for me in the upper chest/shoulder area so I made sure to pin my straps in place and check the length before sewing. I didn't want to have to unpick that entire neckline! It was worth the extra time as I did take a couple of inches off and getting the placement of the straps spot on was a little tricky as they need to meet the neckline right at the tip of the neckline curve.


love, love this fabric! excellent choice! also love your sewing techniques on this project, such a beautiful, clean finish! I personally think the wide neckline complements the flowy, longer style of the top, however it does look like taking a bit out of the center and decreasing the length from the waistline to hem would be nice adjustments for you! I'm towards the petite side and those seem like the changes I would make for me if sewing this pattern:)
ReplyDeleteThanks for your thoughts about the fit, it's good to hear that maybe I'm on the right track with the alterations for this, fit is such a minefield isn't it?! I'm definitely going to give the pattern a try again with a bit of tweaking
DeleteBeautiful top, the insides are as lovely as the outside.
ReplyDeleteThanks you, I am really proud of the insides on this one. Beautiful fabric deserves some beautiful handling doesn't it?!
DeleteSuch a good layering piece :) I hope you'll get a lot of wear out of it!
ReplyDeleteThanks Nilla! It has been getting some wear despite the drop in temperatures. I've decided I need a lovely fluffy soft grey wrap cardigan to wear with it!
DeleteThis looks beautiful! Such neatly done sewing on the inside! x
ReplyDeleteThanks Charlie. I think sewing with top drawer fabrics like this always really pushes me to do the absolute best with my finishing so I'm pleased with how it's turned out!
DeleteBeautiful job, I love reading your finishing techniques.
ReplyDeleteThanks Mags! I'm glad you like reading about all the details, I love reading that kind of thing in other bloggers posts so always try to talk about everything I've done
DeleteHi Fiona, this is lovely - such pretty silk, and precision work - I can see how it could easily become a favourite top, even in winter.
ReplyDeleteI think you're right that more shaping could result in a more flattering line; or perhaps you could even consider the effect of cutting it on the bias next time. In any case, thank you for the inspiration this time, Sally
https://sarsaparillasal.blogspot.com
I absolutely love the idea of cutting it on the bias Sally! Definitely going to give that a try next time, that might make all the difference. Thank you for the tip
Delete