Friday, 31 March 2017

March Indie Pattern Update


Another month of 2017 has flown by and the steady stream of beautiful and inventive new pattern releases shows no sign of letting up! I've got a list as long as my arm of projects I want to sew for my spring/summer wardrobe and a pile of fabric waiting to be cut. I always feel more excited about sewing for the warmer months but this year have a couple of jackets and trousers in the works too. Let's take a look at the new releases and news from the indie sewing pattern community in March and see what you'll be adding to your sewing queue!

New Pattern Companies


New Patterns


  • Kommatia had a busy month releasing, amongst others, PDF patterns for a boxy hooded sweatshirt, palazzo trousers and some high waisted skinny jeans. I'd love to build myself a wardrobe of their kind of basics.
  • One of my favourite pattern releases of the month, purely because it's such a unique idea, is the Leverett Hook and Eye Closure pattern from Orange Lingerie. Being able to make your own hook and eye sets for the backs of you bra eliminates one of the limitations you may encounter in making your perfect lingerie set. The pattern includes fully illustrated instructions for creating one, two, three or seven hook high sets...perfect for Norma's recently released Esplanade Bra.
  • Style Arc's March releases included the Elani Tunic and Lux Coat which is really appealing to me. It's an almost cape-like sleeveless cocoon shape with shawl collar. I'm also quite taken with their new Autumn Dress which is a shirt dress without the fuss; the cross over pleat at the back reminds me of the Victory Patterns Hannah.
  • Seamwork released one pattern with three variations this month instead of their usual two speedy basics. The Sonya shift dress is drafted from Colette's new block with various panelling and sleeve options. As I reported last month their format has changed slightly and now bonus pattern add ons are available in the members only area.
  • Named have yet again inspired me with the release of their Playground collection. It consists of eight patterns, two of which are two in one and I'm having a hard time picking which to buy! I think my favourites are the Helga Wrap Playsuit and Ronja Dungarees...what are yours?
  • Jeni Smith released the Hepworth Apron. It's a big practical design and I like the old fashioned workwear feel of the tabard style with wide straps crossing at the back.
  • I spotted the new release from Til the Sun Goes Down at the Knitting and Stitching Show a few weeks ago and am hoping I can find the time to make myself one for summer after seeing the samples made up in their beautiful viscose prints. The Beach Pyjama and Holiday Dress is inspired by designs from the 1930s and features a cross over front with curved bound edge which I fell in love with.
  • Kennis from Itch to Stitch released the Tierras Woven Joggers and Newport Top patterns. I spotted a tutorial she posted earlier this week for adding ankle zips to the joggers which is a lovely feature to make these a little more luxurious looking.
  • A big hit on Instagram, Victory Patterns released the Jackie Dress. My favourite part of this design, aside from the combo of fitted bodice and flowing skirt, is the high neckline fastening at the back with three buttons and rouleau loops.
  • After launching their first patterns a couple of months back Trend Patterns released the first in their basics line. TPC5 is a frilled hem top and TPC6 is a pleated front trouser which I have seen modelled in person and absolutely love the fashion forward and contemporary shape of.
  • Sew Different released a FREE pattern for an Artist's Smock. The wide funnel neck is really cool. It's only available in a size 12 and has no instructions as it's quite a basic shape but there is a page the website explaining how to adjust it.
  • New from Sophie Hines are the Arccos Undies. They are a simple and classic hip hugger style panty with forward sides seams perfect for showing off interesting combinations of contrasting fabrics.
  • The latest In The Folds pattern to be released as a free download with Peppermint Magazine is for a pleated skirt. A mainstay of any summer wardrobe.
  • Mimi G released a PDF Jumpsuit pattern which has a fab seventies feel with its patch pockets and collar with centre front invisible zip. You can choose to make it with a flared leg or slim cuffed trousers.
  • Made for Mermaids released the Mama Isabel Wrap Top, Mini, Dress and Maxi which is the adult version of their children's pattern of the same name. It's designed for knits and includes two bodice options, three sleeves and no less than six skirt styles to choose from!
  • One pattern which secured an immediate place in my pattern collection this month was Flint from Megan Nielsen. This pattern for wide legged cropped trousers or shorts is just the shape I have been looking to add to my wardrobe. I can't wait to figure out how the clever side tie or button fastening on the waistband works. She also launched the Rowan fitted tee or bodysuit which should cover every eventuality with three neckline options and sleeve lengths. 
  • Jenny from Cashmerette released the Dartmouth Top. This cross over jersey style is super flattering on all body shapes and the banded neckline is carefully drafted and constructed to prevent the dreaded gape.
  • New from Straight Stitch Designs is the Bryant; a bias cut knit dolman top with boatneck and two sleeve options. Perfect for lightweight knits the bias cut gives the style extra drape and I'm enjoying the dropped shoulder.
  • Deer & Doe launched their spring/summer collection comprising of three new designs. The Hoya Blouse, Goji Skirt and Shorts and Luzerne Trench Coat are all available in PDF as well as paper form for the first time. All the PDF patterns are available up to size 52.
  • Another lovely French release this month is the Austen Blouse and Dress from Dessine Moi Un Patron. The scalloped collar combined with drawstring waist is super cute and they've chosen some lovely fabrics for the samples.
  • Clearly another month when the blossoming French pattern industry hits it out of the park. Ready to Sew released the Jolene Dress and Blouse which is a classic shirt dress with gathering into the princess seams and lightly gathered skirt or peplum.
  • Pinda is a new pattern for slim utility style tapered pants from Waffle Patterns. I can see these styled well for casual or a more dressy look making use of the various pocket options.
  • This month's PDF release from Sew Over It is the Kimono Jacket. A great layering piece for the warmer months the expanse of fabric is a lovely way to showcase a beautiful bold print.
  • I love the flowing, floaty nature created by the gores in the new Daintree Skirt from Blank Slate Patterns. It's a half circle wrap skirt in a number of lengths and the curved front edge really adds to its romantic feel. They've also released the Fairelith Top which has a ballet neckline and raglan sleeves; the instructions even advise on how to adjust the neckline to cover your bra straps which is a great touch.
  • Sew This Pattern released the Daphne Day Dress which is a lovely fit and flare dress with some slightly more challenging features that would be great for an improving seamstress. the cut out back and exposed zip are great unexpected touches.
  • New from Sew Caroline is the Coffee Shop Dress; a shift style for knits. You can get its for free at the moment if you pre-order a copy of her book 'Sew Caroline Weekend Style' which is coming in April.
  • Hey June Handmade launched the Trevi Top and Dress which is a button back trapeze shape with high cut out shoulders. I'm really drawn to breezy swinging viscose styles for this summer so I've got my eye on this.
  • I was excited to discover Alina Sewing & Design Co. this month and was doubly excited when I spotted their latest release, the Hampton Jacket. It's a great pattern for a classic denim jacket and has been released alongside a full online sew-along.
  • Another new discovery for me in March is On The Cutting Floor. They just released the Cut Out Cardigan, Tank and Leggings set and as I'm really getting in to my activewear at the moment the unique design of the pull on top with deep v back and panelled leggings are really appealing to me. Also new from them just a few days ago is the Victoria Top and Dress.
  • Jennifer Lauren Handmade released the Juniper Cardigan. I've been enjoying a new found love for jumpers, sweaters and high necklines over the last few months but perhaps spring is a good time to turn back to the classic cardigan and this pattern provides plenty of scope for great layering pieces.
  • The new season patterns from Liesl & Co are the Classic Shirt and Soho Shorts & Skirt. Both satisfying projects and true wardrobe staples.
  • I've been meaning to try a Wear Lemonade pattern for a long while and how can I possibly resist the new Fiona Dungarees when we share a name?! I recently purchased a pattern for a classic pair of denim dungarees but would also love to make a softer version in a fabric with drape and this pattern with it's modern long slim straps and wide legs could be just the ticket.
  • I'm always impressed with the thought Pauline Alice puts into her designs so was eagerly anticipating her new collection of three patterns. The Botanic Trousers and Denia Blouse do not disappoint but I think my favourite of the lot is the Tello Jacket with its old workwear feel.
  • Tessuti released the Yuki Dress. It's a tunic dress with the main feature being the funnel collar with drawstring which hangs around the neck like a cowl.
  • A trend I'm keen on at the moment is mixing and matching clashing prints within a garment which is just what I'd like to try on the new 1306 dress from Iconic Patterns. This simple panelled a-line dress is the perfect canvas.
  • Sew Liberated released the Matcha Top. I really like the way the mandarin collar and gathered neckline highlight the collar bones in such a flattering fashion.
  • The Olympia Dress from Love Notions has a beautiful v shaped reverse shawl neckline and the flattering cut designed for jersey gives you a lot to play with with different lengths and weights of knit fabric.
  • Released just yesterday is the new Lily Dress and Blouse from CocoWawa Crafts. Available in both English and Spanish it's a cocoon style dress with raglan sleeves and cute sailor collar.
  • Last but by no means least the lovely ladies at The Foldline designed the Jenny Dress and Top to be released with this month's edition of Simply Sewing Magazine. Snap up your copy quick before it's too late!


Pattern Updates and Expansion Packs


  • The Janice and Jordan men's and ladies hoodies patterns from Patty Doo are now available in English with accompanying online video tutorial.
  • Paprika Patterns are now offering some of their range with French & German translations. The Jasper Sweater & Dress has both, the Jade Skirt and Zircon Sweater are available in French and the Opal Cardigan in German. They additional set(s) of instructions come as part of the pattern so if you already own them you can simply download the updated version.
  • Colette re-released their free Sorbetto Top pattern. It's now been drafted with their new blocks and is available in two new size ranges as well as including two new variations. The tunic features side seam vents and a high-low faced hem and another includes a new scoop neckline and short sleeves.
  • Also looking back across their older patterns to make improvements is Deer & Doe who have updated their free Plantain Tee pattern download. The fit has been improved with less flare as well as being updated to match the new PDF format and size range. More to follow!
  • Pattern Fantastique launched a free downloadable hack for their Celestial Dress pattern to make the design sleeveless. All you need is this one new pattern piece.
  • Sarah from Ohhh Lulu Lingerie has updated both her Lola and Jane pants patterns with additional sizes and improved instructions. The new Lola includes the option for cut outs over the hip and Jane now has fun add ons for hip ruffles, a rear keyhole openings and animal ear appliqué designs.


Sew-alongs


  • Not technically an indie pattern but I'm a big Gertie fan and love her designs for Butterick; she's running a sew-along on her blog for B6453 until mid April. If you'd like to get involved you can join the Facebook group here.
  • There is a sew-along happening at the moment over on the Cashmerette blog for the recently released Dartmouth Top.
  • Helen is running a sew-along for the new Helen's Closet Blackwood Cardigan pattern. I've been following along out of interest and has extremely through fitting information as well as tips on working with knits.
  • To celebrate the re-release of their Sorbetto pattern Colette are running a sew-along over on sew-alongs.com. This was one of the very first things I made so I'd be quite interested to revisit the pattern now!
  • Sew House Seven are set to begin a sew-along tomorrow (1st April) for their Bridgetown Backless Dress to accompany the #sewmystyle challenge.


Upcoming!


  • Heather Lou's announcement that she has a lining expansion pack for her Closet Case Patterns Kelly Anorak pattern coming soon has got me all indecisive as I was planning on underling mine but might now hold out and go for a lining instead!
  • I was very excited by the call for testers for the latest Itch to Stitch pattern as Kennis is looking specifically for more advanced sewers. I'm looking forward to checking out the details of the La Paz Jacket when it's released soon.
  • Thread Theory are currently testing their next menswear release. The new waistcoat pattern will fill an important gap in their collection of mens' wardrobe staples.
  • Designer Stitch put out a tester call for their Eleni Top, Tunic and Dress. It's an off the shoulder style with optional ruffles, flounces and sleeve styles. Very on trend for this coming summer.
  • I'm eagerly anticipating the release of Republic du Chiffon's next pattern; the Arlene Dress.
  • The Jermyn Street Shirtdress will be released by Hot Patterns in a couple of weeks and is a cracker of a design with all the classic features but interesting twisted front.


Other Exciting News


  • Something that really caught my eye this month was the launch of freesewing.org. The brainchild of Joost from Make My Pattern the site offers free patterns drafted to your measurements and is also open to contributions from the sewing community. A wonderful sharing platform.
  • The popular Avid Seamstress Day Dress, Sheath Dress and Raglan Adult patterns are all now available as PDF downloads as well as their original paper form.
  • I must wear my Megan Nielsen Dove Blouse at least once a week and am therefore very happy to report that it's now available to purchase in paper form. Her new look packaging is lush.
  • Melissa from Fehr Trade is writing a book all about sewing activewear which is set to release early in 2018. I can't think of a better person to write a book on this subject and as I've been getting really into my running again recently can't wait to get my hands on it!
  • The Bistro Dress is an old staple from Liesl & Co and has recently been released in paper format.

Phew I swear these get longer every month! As always feel free to add your contributions in the comments below. I'm hoping to squeeze a bit of sewing into my weekend and I'm sure you are too so I'll leave you with a bit of inspiration from the sewing community to get you off to a good start!


  • Lauren's amazing leather jacket is a modified version of the Closet Case Files Clare Coat pattern and made my jaw drop when I saw it! Such imagination and great sewing.
  • Devon's floral maxi BHL Kim Dress put me right in the mood for some summer sewing! I can't wait to wear bright flowing skirts again. She's put the perfect amount of volume in the skirt and I love the ties around the waist.
  • It's taking me forever to decide on my perfect combination of fabric and pattern for dungarees but Katie knocked it out of the park first time with the new Ronja's from Named. Such a great modern look on her.
  • Rachel's version of the new Luzerne Trench Coat is ace. I would never have thought to use denim for it but it gives great shape and keeps the look modern and interesting.
  • Lara's beautiful version of the True Bias Colfax Dress reminded me how much I liked the pattern when it was released. Isn't it great in a large scale print like this.
SaveSaveSaveSaveSaveSaveSaveSaveSaveSave

Saturday, 25 March 2017

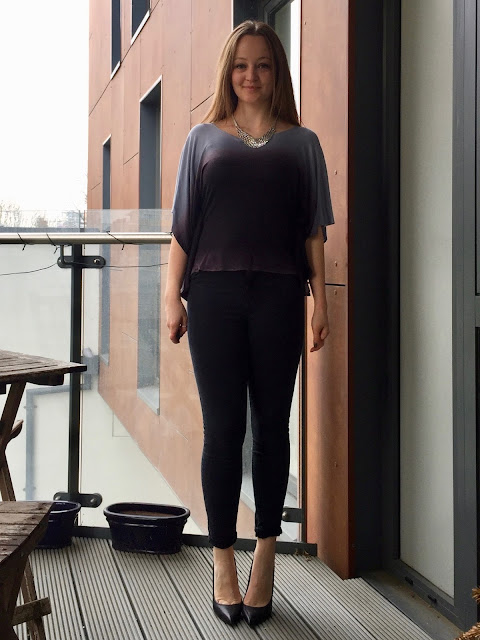
Ombre Jersey Batwing Top from Freehand Fashion

Today I'm sharing a super quick and satisfying project that's a little different to my usual sewing style. After all the intense and lengthy coat and dress making I've been doing recently the speed and ease of this really was a breath of fresh air. I love those fiddly projects with a thousand pattern pieces and techniques to work with but I think mixing in the odd super simple project helps to keep things fresh and enjoyable. This project was particularly great as the lack of a pattern and totally different construction processed made use of an entirely new part of my creative brain.

Diary of a Chain Stitcher: Girl Charlee Ombre Jersey Batwing Top from Freehand Fashion by Chinelo Bally

As I mentioned in a previous post I went to the Knitting & Stitching Show at Kensington Olympia with my mum a couple of weeks ago. We were keen to attend one of the events on the main stage and when I saw that the line up included Chinelo Bally from the Great British Sewing Bee and she was going to be demonstrating her impressive freehand cutting skills that seemed the obvious choice! I've admired Chinelo's sewing skills since watching her on the Bee back in 2014. After learning to sew following the step by step instructions of sewing patterns and believing accuracy was everything her method of drawing the shapes directly onto the fabric with only the measurements of the recipient as a guide absolutely blew my mind. I bought her book Freehand Fashion almost 18 months ago (and had the pleasure of getting it signed at the Ally Pally Knitting & Stitching event) but despite reading it cover to cover the method felt so unfamiliar to me that I hadn't yet taken the plunge with my chalk and scissors. Seeing Chinelo demonstrate the process of making the batwing top from scratch at the show completely changed that. It was definitely one of the highlights of my day and I left the demonstration feeling fired up to sew. Actually so fired up that I headed straight over to the Girl Charlee stand and bought this amazing ombre jersey to make my own version of the top!

Diary of a Chain Stitcher: Girl Charlee Ombre Jersey Batwing Top from Freehand Fashion by Chinelo Bally

This project has to win my record for the fastest from idea to final press. I threw the fabric in the machine pretty much as soon as I got in the door that evening and sewed it up the following evening...meaning it was finished almost within 24 hours! It definitely wins the award for speediest sew too. I actually had a really frustrating day of sewing on the Sunday as I was working with a new top pattern and a tricky fabric which didn't turn out anywhere near as lovely as I'd hoped. I have so little time to sew and I was feeling really disappointed about wasting it on a failed project. Turning to this little number in the evening was the perfect remedy. I actually managed to cut and sew the whole thing in the time it took my lasagne to bake! So under an hour. I was able to go to bed that night feeling like I'd achieved something that day. Talk about satisfying.

Diary of a Chain Stitcher: Girl Charlee Ombre Jersey Batwing Top from Freehand Fashion by Chinelo Bally

The method makes so much sense now I've done it but I have so much admiration for people like Chinelo who have the creativity and imagination to work this way without guidance. I need the steps to follow! It felt very much like I was winging it and I was going to end up with a less than perfect top but once I got into it the process was so liberating! It seemed so simple that I was thinking surely I must need to be doing something extra here; stabilising some seams, maybe finishing the neck with a band for strength rather than turning and stitching? Of course totally unnecessary. I put the top on and that flat piece of fabric was transformed into a beautifully draped garment with great movement. I sat down to look through the book again straight after finishing so I could pick my next project. I'm really curious about how this method works for a closer fitting garment in a woven fabric as it will be much less forgiving.

Diary of a Chain Stitcher: Girl Charlee Ombre Jersey Batwing Top from Freehand Fashion by Chinelo Bally

So let's talk about this amazing jersey. I'd already visited the Girl Charlee stand earlier that day and to be honest was desperate for an excuse to buy something but didn't have any projects requiring knit fabrics high up my sewing queue. I hadn't spotted this rayon on the first visit as when looking at the side of the bolt it looks like a solid! I've rarely come across ombre and was taken with the scale and monochrome tone of it. I thought the expanse of fabric involved in the batwing style would be a great way to show it off. It's a cotton/rayon blend which makes it cool and breathable as well as drapey and o so slinky smooth. Gosh I love rayon. I definitely recommend a similar lightweight and drapey knit for this design.

Diary of a Chain Stitcher: Girl Charlee Ombre Jersey Batwing Top from Freehand Fashion by Chinelo Bally

The jersey was a pleasure to work with as despite being so slinky it kept it's shape well which was a relief considering all the folding, marking and cutting that needs to be done with this method. I was concerned that things might shift about when I sewed up the side seams which are shaped based on your bust, waist and hip measurements. But plenty of pins and marking a clear line to follow with a washable marker made it easy. The neckline and hem are finished by overlocking the edge and turning it in and stitching so I was pleased that the fabric responded well to pressing and kept a nice crisp edge. Chinelo recommends using a twin needle in the instructions but I stuck with a straight stitch for a simpler finish as neither of these areas needed to stretch. I used a narrow zig zag to sew up the side seams and a stretch needle throughout.

Diary of a Chain Stitcher: Girl Charlee Ombre Jersey Batwing Top from Freehand Fashion by Chinelo Bally

I had a metre and a half of the fabric but probably could have got away with a metre for the length of this top. I bought a bit extra as I really wanted to get the ombre to sit in the right place and be even on the back and front. Working with the ombre didn't make the project too much tricker to be honest. I just made sure that when I folded the fabric to create the shoulder line that that fold ran through the exact centre of the paler section. I figured that using the darker section of the ombre across the waist area would be more flattering.

Diary of a Chain Stitcher: Girl Charlee Ombre Jersey Batwing Top from Freehand Fashion by Chinelo Bally

Of course when working with your own measurements you would expect a good fit but I was delighted with the amount of ease in this. It doesn't cling at all. Before I put it on I was concerned about the size and shape of the neckline. It looked really circular but when worn sits at that ideal just below the collar bone level with a nice width across the shoulders. I love it. Although things might look a little odd on the flat if you trust the method they really work on the body.

The method involves you marking your preferred length of top and length of sleeve on the folded fabric before cutting the neckline and shaping the hem then sewing up. Looking at the pictures I'm wondering whether I should have made it slightly longer but I prefer the shorter length to a tunic style with a batwing sleeve. I'm delighted with my sleeve length as it feels dramatic but still practical and comfortable. I love the drama of the full length sleeve made up in teal for the book in the picture above but I doubt I'd get much wear out of it...plus how does it work with a jacket?! Despite it being a real departure from my normal wardrobe choices I can see myself wearing this style a lot when the weather warms up; I'm taken with the idea of making it in a breezy linen knit. One of the things I love about this freehand method of making clothes is that it really allows you to be inspired by the fabric and how that will change a garment and work with the shape of the body. It might be a great way of getting creative with my stash and I'm looking forward to experimenting!

Diary of a Chain Stitcher: Girl Charlee Ombre Jersey Batwing Top from Freehand Fashion by Chinelo Bally

Thursday, 16 March 2017

How To Add Flat Piping to a Coat Lining

Diary of a Chain Stitcher: How To Add Flat Piping To A Coat Lining Tutorial

Firstly thanks so much for all of your lovely comments on my last couple of coat posts! Reading them really made me stop and think about how far my sewing has come since I made my very first top about five years ago. It was so lovely to look back and think about what me then would have thought about the possibility of me ever sewing something so complex! So thank you for making me realise how much I've improved!

A couple of people asked about how I applied the piping between the lining and facing on the coat, particularly about how I managed to keep it an even width all the way around that seam. So I thought I'd do a quick tutorial for you all as the method I used was pretty straightforward. This tutorial is for making your own piping from fabric rather than using a shop bought piping or bias, which might not be your ideal width and therefore need to be applied slightly differently.


  • First you need to cut bias strips of the fabric you are using to make your piping. They need to be on the bias so they have a bit of stretch in them and can easily be moulded around a curved edge such as your neckline.

Diary of a Chain Stitcher: How To Add Flat Piping To A Coat Lining Tutorial

  • The bias is at a 45" angle from the selvedge so use a set square to mark a line at that angle, I usually start from a corner. Extend this line right across your fabric. I've drawn mine out using a washable pen so it was clear in the pictures but you can use your preferred marking tool. These edges won't be hidden inside the seam once the piping is sewn in so you don't need to worry too much.

Diary of a Chain Stitcher: How To Add Flat Piping To A Coat Lining Tutorial

  • Next we are going to mark either side of your line at the width you want you bias strips to be. The trick to easily keeping your piping an even width when sewing it in is to make your bias strips the correct width. They need to be as wide as you would like your piping to be (mine is 3/8" which is quite wide), plus the seam allowance you are using to construct your coat (5/8" in my case), multiplied by two as you are going to be folding your strips in half to create the piping. So my strips were 3/8"+ 5/8"x 2 = 2". 

Diary of a Chain Stitcher: How To Add Flat Piping To A Coat Lining Tutorial

  • Mark a few points along the line and join them up with one long straight line. Repeat this process until you have enough strips to create a length of piping to match your seam(s), plus a bit extra to allow for the seam allowances where you join them together. 

Diary of a Chain Stitcher: How To Add Flat Piping To A Coat Lining Tutorial

  • Cut along the lines to create your bias strips.

Diary of a Chain Stitcher: How To Add Flat Piping To A Coat Lining Tutorial

  • Next we need to join all our pieces together. Lay the end of one strip on-top of another, right sides together and at right angles to one another, matching the raw edges.

Diary of a Chain Stitcher: How To Add Flat Piping To A Coat Lining Tutorial

  • Sew diagonally across this overlap as shown in the picture above. 

Diary of a Chain Stitcher: How To Add Flat Piping To A Coat Lining Tutorial

  • Trim down the seam allowances and press the seam open to give you a continuous strip. If you tug on either end you will now be able to see that there is some give/stretch along the length of the strip. The bias is sewn together diagonally in this way to preserve the stretch. If you join the pieces with a straight seam you will be limiting the stretch at this point. Repeat this step until all your pieces are joined together.

Diary of a Chain Stitcher: How To Add Flat Piping To A Coat Lining Tutorial

  • Fold your bias strip in half along the length of it (wrong sides together) and press with plenty of steam to get a nice and crisp folded edge.

Diary of a Chain Stitcher: How To Add Flat Piping To A Coat Lining Tutorial

  • To insert the piping we need to sandwich it between the facing piece and the lining when they are sewn together. Lay your piping on top of the right side of the facing, lining up the raw edges. Pin in place and baste at 3/8". Make sure you stop stitching where the pattern indicates where to stop sewing the lining. (The end of the piping will eventually be turned up and secured with the hem of the lining).
Diary of a Chain Stitcher: How To Add Flat Piping To A Coat Lining Tutorial

  • Now lay your lining piece on top of your facing piece, right sides together, exactly as you would is you were sewing this piece as usual with no piping. Align those raw edges, pin and stitch in place with your regular 5/8" seam allowance.

Diary of a Chain Stitcher: How To Add Flat Piping To A Coat Lining Tutorial

  • Open up your seam and press, pressing the piping towards the facing and the seam allowances towards lining. At this point you can under-stitch your lining to the seam allowances to keep everything flat but I found I didn't need or want to with my lovely silk charmeuse lining!
Diary of a Chain Stitcher: How To Add Flat Piping To A Coat Lining Tutorial

  • And voila! Neat and even piping. By giving your piping the same size seam allowance as your coat seams you omit any need to fiddle around trying to measure and pin piping in place because you can just line up all the raw edges and sew!


If you're feeling confident you can skip basting the piping in place and just pin and sew the facing, piping and lining together in one fell swoop. You don't need to be able to see your piping as you sew, you just need to keep those raw edges aligned and as long as you keep your stitching even your piping will remain at the desired width.

Making and applying corded piping is a very similar process but you'll want to use a slightly wider strip of bias to allow for the thickness of the cord. Once you've prepped you bias strips and folded them in half sandwich the cord into the fold and baste in place. Then use a zipper foot when you sew it on so you can get your stitching nice and close to the cording.

I hope you find this useful and it inspires you to add another special little touch to your projects! The extra effort was so worth it on my coat.

Monday, 13 March 2017

Mum's Charcoal Boiled Wool Cocoon Coat

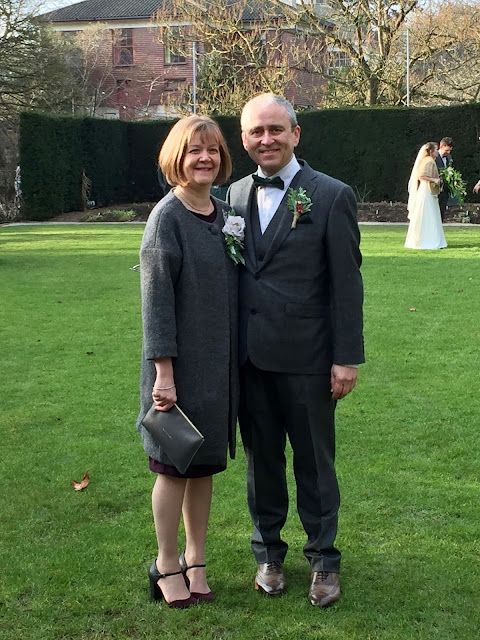
Two coat posts in two weeks! This one is slightly different in that it was for my Mum not me and was A LOT less involved and complex than the tailored coat which I posted last week. You may remember from my post a few weeks back that I made that emerald green silk dress for my step sister's wedding last month. Shortly after she got engaged my mum and I were at the Spring Knitting & Stitching Show last year and chatting away about our outfits when she spotted a coat she loved made up on one of the stands. Ten minutes later she'd somehow managed to get me to agree to make it for her and we were walking away with a copy of the pattern. Of course me being me with a thousand things on my 'to sew' list I didn't actually get around to making it until January but I must say mum was very patient and trusted that I'd get it done in time. For some reason she didn't have so much confidence in me finishing my own dress!

Diary of a Chain Stitcher: Little Woollie Cocoon Coat in Charcoal Boiled Wool from Dragonfly Fabrics

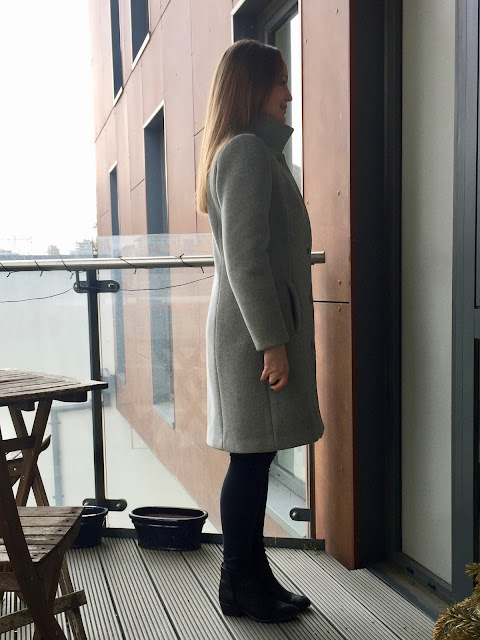
The stand we were on was Little Woollie, whose patterns I wasn't even aware of at the time. They have a shop in Bromley where I used to live and I remember spotting it opening on my way past to the train one morning! Back then they didn't sell patterns and most of their classes and stock focussed on knitting so the discovery was a delightful surprise. This is their Cocoon Coat which I love the style of. It's got a slightly sixties Jackie O feel which suits my mum so well; I could see instantly why she was drawn to it. At this point in time I had very limited experience with sewing outerwear but I felt like this was a pattern I could handle as it is a straightforward shape with limited structure because of those lovely dropped shoulders. Another deciding factor was that the sample at the show fit mum perfectly so I could plough on and make it with no alterations or fitting needed. Plus we're a very similar size and shape so I could try it on as I went! The sample was made in a beautiful soft pink boiled wool and although there was another brocade version I couldn't get the thought of boiled wool out of my head. It is the perfect fabric choice for this pattern as it is warm enough for a coat, has enough body to emphasise the shape of the coat but also has enough softness and movement to flatter.

Diary of a Chain Stitcher: Little Woollie Cocoon Coat in Charcoal Boiled Wool from Dragonfly Fabrics

The wool we eventually chose was this grey melange from Dragonfly Fabrics. I love that it's not one flat colour but has a slightly mottled appearance that gives it real depth. It's lovely and spongy and mum picked the shade straight out of the bunch of swatches that I showed her. Mum wanted this to be a coat she could also get some wear out of after the wedding so making it in a classic grey (her favourite colour) was ideal. I knew it was going to sew up beautifully as I'd already worked with it to make my petrol blue toaster sweater. You will end up with a fluff covered sewing room but your machine and iron will love it. They also helpfully sent me samples of their newer viscose blend boiled wool which is slightly lighter with a really gorgeous drape. I'd definitely recommend both of them and also to get some swatches so you can accurately assess those beautiful colours.

Diary of a Chain Stitcher: Little Woollie Cocoon Coat in Charcoal Boiled Wool from Dragonfly Fabrics

I cut the size 10 and had just enough fabric with 1.75m at 130cm wide. I knew from my previous boiled wool experience that it is prone to both shrinking and stretching out. I gave it a good steam beforehand to preshrink it (I knew it would never be washed, if anything dry cleaned so this was all it needed). Then I used my walking foot, a ballpoint needle and a narrow zig zag to sew it up with the exception of the under-stitching along the pocket openings and facing. The boiled wool has a certain amount of mechanical stretch in it which is why I chose to use the zig zag stitch. This style obviously doesn't require any stretch but I didn't want stitches popping as it was pulled on and off. Do be careful when pressing as it is very easy to stretch it out at this point too, but that malleability can really work in your favour sometimes as beautiful shapes can be created with a good steam over a tailor's ham.

Diary of a Chain Stitcher: Little Woollie Cocoon Coat in Charcoal Boiled Wool from Dragonfly Fabrics

There is so much about the design of this coat to love. It's got a clean and simple appearance but actually has a lot of clever details going on. Those bracelet length sleeves and the darts at the hem are beautiful and really make the design, giving it the perfect amount of shape. I thoroughly enjoyed making it as it is interesting enough to keep me amused but didn't involve anything too challenging. Even setting in the sleeves is pretty straightforward as the dropped shoulder means the armhole is quite square and there is limited easing involved. It's lucky that it is a very simple coat as I did find the instructions quite limited with very few illustrations. Perhaps I have just been spoiled by how thorough some indie designers are nowadays with their additional tips and advice but I think a bit of prior coat making know-how really helped.

Diary of a Chain Stitcher: Little Woollie Cocoon Coat in Charcoal Boiled Wool from Dragonfly Fabrics

One thing I did really like about the instructions was how thorough they are when it comes to interfacing. They have you interface the whole hem, facings and pocket openings. I also added a small square behind where the buttonhole and button would be for strength and also to prevent this area stretching out. Rather than cut straight strips I used my pattern pieces to cut interfacing for the hem as they are slightly shaped. I used a fairly lightweight cotton fusible throughout to match the softness of the wool.

The pattern does include instructions for fully lining the coat but also suggests that you could omit the lining and bind your seam allowances for a fun finish inside. We both really liked the idea of this and I think boiled wool lends itself to this technique so this is the road we went down. The way the description is worded on the envelope led me to except that instructions for binding would be included but there's just one line at the end with the suggestion. A little guidance on when and where to bind wouldn't have gone amiss but it wasn't a problem and I managed to figure it out on my own. I think I just expected a little more for the £18 price tag.

Diary of a Chain Stitcher: Little Woollie Cocoon Coat in Charcoal Boiled Wool from Dragonfly Fabrics

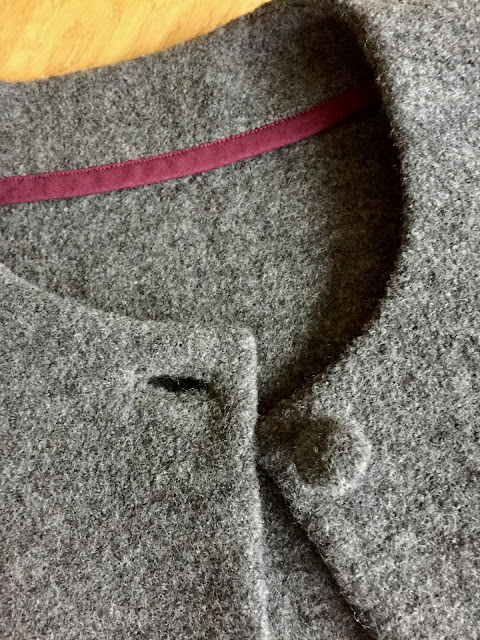
Mum's dress was a maroon/purple so I chose a binding to match. I love how that pulled it together as an outfit; those little touches are totally a reason to make your own clothes! I actually bought readymade cotton binding from MacCulloch & Wallis for once as I needed so much of it. In the end I didn't quite have enough but luckily had some similarly coloured fabric in my stash and made an extra bit which I used on the armholes! I did have a bit of trouble with bulk in the armhole seams and when I first finished it it looked a little awkward from the outside in this area, like the thickness of the seam allowance and binding was stretching out the wool. After mulling it over for a while I unpicked the binding and heavily graded down the seam allowances before restitching the binding. This made the world of difference and the sleeves hang much more naturally now. If you are making the lined version I would recommend grading and notching this seam.

Diary of a Chain Stitcher: Little Woollie Cocoon Coat in Charcoal Boiled Wool from Dragonfly Fabrics

It is so easy to get nice clean edges and shapes with boiled wool. The facing sits so beautifully once graded, under-stitched and pressed. I love the shape of the neckline and the classy single button fastening. I chose to go the extra mile and do a bound buttonhole as I enjoyed the process of making them so much on my coat. Again I used the method in Claire Schaeffer's Couture Sewing Techniques after doing and practice one first. It came out so great in this wool! I knew it needed a fairly big button to balance out the look but couldn't find anything I liked to complement the texture of the wool. I decided to try my first self covered button and couldn't be happier with the choice! I was worried that the wool might be too thick but again it moulded beautifully. My button is a touch smaller than the pattern calls for and I really like it.

Diary of a Chain Stitcher: Little Woollie Cocoon Coat in Charcoal Boiled Wool from Dragonfly Fabrics

I did quite a lot of hand stitching as it was such a special project. Also boiled wool is super easy to hand stitch as its so straightforward to catch a few fibres at a time without the stitching showing through to the right side! I stitched the hem, cuffs and facing down around the neckline with a herringbone stitch behind the binding where you can't see it. A herringbone stitch allows for a bit movement which means the whole coat will hang and move a little more naturally. I also caught the pocket bags down to the centre front with little swing catches to keep everything in place.

Diary of a Chain Stitcher: Little Woollie Cocoon Coat in Charcoal Boiled Wool from Dragonfly Fabrics

I am so very proud of what I achieved with this coat; proving yet again that working with quality fabrics and sewing for a loved one really makes you slow down and do the best job you can possibly do. Thinking about it there is only one tiny little thing that I am disappointed about in this. I followed the instructions to fuse a strip of interfacing along the pocket openings which is a great technique for adding strength at a stress point. However as I was making my version of the coat unlined you can see the interfacing in the seam allowance which rather spoils the effect of the beautiful binding. A very tiny detail that I can easily overlook at least! It made me really happy to see her looking so great and comfortable in it all day. It was lucky we chose the wool in the end as it was cold enough to snow the following morning! 

Sunday, 5 March 2017

Burberry B6385 Coat

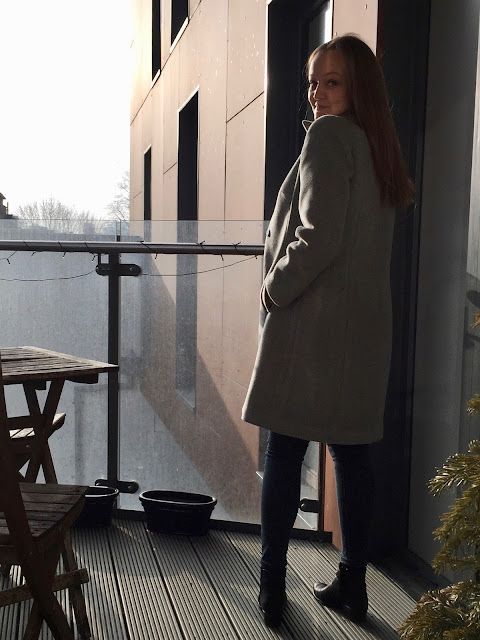
The idea of making this coat began around this time last year but the prospect of actually doing it was so daunting that I didn't start making it until winter really kicked in here in London in November. I finished it just in time to wear home for Christmas! I was at the Spring Knitting & Stitching Show with my mum last year (which coincidentally I did yesterday...has anyone else been? So much fun!) when I spotted a few bolts of to-die-for for coating lurking at the bottom of the Higgs & Higgs stall. Mum was laughing because apparently I just zoned in on what everyone else was missing down by their feet and made a beeline right in there on my hands and knees! I bought some gorgeous soft pre-washed grey denim from them this year that I can't wait to make into dungarees.

Diary of a Chain Stitcher: Butterick B6385 Coat in Grey Burberry Coating

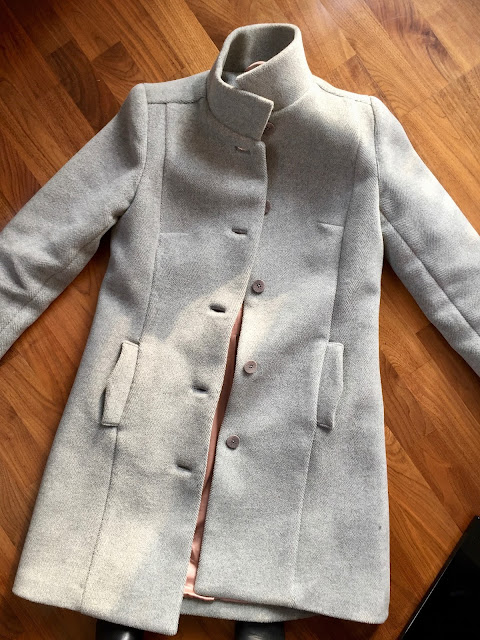
They had the fabric in a few pale neutral colours including a camel and cream but the soft grey stole my heart on sight. It looked glorious and as soon as I touched it I knew it was special. The reverse is smooth but the right side has a nap to it with a subtle herringbone woven in. When brushed one way it feels smooth and the other slightly rough. Its got a divine thickness and weight to it so I shouldn't have been surprised when I turned over the label and saw Burberry on the tag! The price tag of around £35/m caused a moment of deliberation as that made it a real treat but it was such a bargain for this quality of fabric that I was soon walking away with 2 metres.

Diary of a Chain Stitcher: Butterick B6385 Coat in Grey Burberry Coating

Then began the process of deciding on a pattern. I had a handful of coat patterns in my stash already, namely most of the Project Runway blue envelopes from Simplicity because I love the styles in that line and know I'm not the only fan. However, none of them were quite right for my super thick coating. As the fabric was special I wanted to make something classic which would last me many years so focussed on clean lines and what I knew I already liked in a coat rather than what was on trend this season. After a good google to find some reviews of it I eventually settled on Butterick 6385 from the Lisette range. I'm not a huge fan of the pink sample with rounded collar but view C with the stand collar is right up my street. I liked the simplicity of the lines, the two piece sleeves and the yoke and princess seam combination.

Diary of a Chain Stitcher: Butterick B6385 Coat in Grey Burberry Coating

The next step was accumulating as much information as possible about coat making. This part was totally overwhelming and I almost came to a grinding halt with all the decisions I had to make! There appears to be a variety of levels of 'tailoring' that you can get into, from the basic instructions included with the pattern to full on pad stitching horsehair canvas and applying twill tape along roll lines. I had been feeling like fusible interfacing was not a route I wanted to go down because dang it I was making a beautiful coat with beautiful Burberry fabric and anything other than super special treatment felt like a cop out. But after reading through my sewing books (I found my vintage Vogue, Singer and Simplicity sewing books to have the most useful and in depth information) I realised I didn't have a clue what I was doing and perhaps the world of full pad stitching needed to be worked up to when I had a better understanding of the rest of the inner workings of a coat. This was my very first after all, plus the first time I had worked with any fabric so bulky. I eventually settled on a process that stuck quite closely to the pattern instructions with a handful of tips and tricks accumulated from books and online tutorials thrown in.

Diary of a Chain Stitcher: Butterick B6385 Coat in Grey Burberry Coating

My first major decision was how to interface and where. I probably spent the most time looking into this and found the advice of Jen at Grainline Studio invaluable. I did a few samples using different weights of interfacing and opted for a light-mid weight one in the end which surprised me with such a thick wool. I really didn't want to affect the drape of the coating and this retained a lovely smooth drape. The main purpose of the interfacing in a coat is to prevent areas from stretching out rather then changing the body of the fabric. I'm really happy with my choice as I wouldn't want that front facing to be any stiffer than it is. When it came to placement I combined Jen's advice with these amazing fusing maps from fashion incubator. I interfaced all recommended pattern pieces as well as around the armholes, hem, cuffs and pocket openings from strength. These pieces were 2.5" wide and I used the pattern pieces as a guide to cut the right shape. Now its finished it has surprised me how soft the whole thing feels. In a coating this thick I expected it to feel quite stiff and structured but theres actually quite a bit of movement in it. I think I could have gone a bit further with adding internal structure and for a brief moment considered whether I should have interfaced the whole thing but I'm glad I didn't as I like the feel of the coating as is.
Diary of a Chain Stitcher: Butterick B6385 Coat in Grey Burberry Coating

The wool was wonderful to work with. The only trouble I had was with how heavy it got towards the end! I really did feel like I was wrestling with it and had to move everything off my desk and move the machine to one end so the desk could take the full weight of the coat. My machine was a little trooper as always and handled all that bulk with no complaints with a slightly thicker needle and occasional employment of my walking foot. I probably spent more time at the ironing board than the machine though! There is so much work to be done with steam to create smooth, flat seams and shape and this wool responded so well to it; it was amazing to see how it could be shaped and moulded. All the sewing tools in my arsenal came out for this; a tailor's clapper, ham and sleeve roll proved essential. Also invaluable were my Ernest Wright & Son appliqué scissors as every seam allowance needs to be heavily graded to reduce bulk.

Diary of a Chain Stitcher: Butterick B6385 Coat in Grey Burberry Coating

I knew this was going to be a time intensive project and it really was. The preparation and accumulating all the supplies actually seemed to take the longest and just cutting out took over five hours because of the numerous pattern pieces, marking everything with tailors tacks and the fact that you're cutting coating, lining and interfacing pieces for most of them! The thickness of the coating meant the pattern pieces became a little distorted if you tried to pin them so I drew around them with chalk. Although not as visible as the pile of a velvet I did need to carefully consider the napped surface. All the pattern pieces needed to be cut in the same direction and I had to be careful when pressing to apply only light pressure with the iron and only move it up and down not side to side on the fabric.

Diary of a Chain Stitcher: Butterick B6385 Coat in Grey Burberry Coating

I am so delighted with my bound buttonholes. I followed the method in Claire Shaeffer's Couture Sewing: Tailoring Techniques as the photographs and steps made complete sense to me. I also looked at advice from Colette in their Anise sew-along when it came to making the backs neat. I found making them a little terrifying as they have to be done so early on in the process and you are slicing into one of your biggest pattern pieces to make them so there is no room for mistakes! I was especially concerned because of the thickness of my fabric but actually found them more straightforward than anticipated when broken down into small steps.

Diary of a Chain Stitcher: Butterick B6385 Coat in Grey Burberry Coating

I wasn't sure about the buttons at first (which I bought from MacCulloch & Wallis near Berwick Street) but they've grown on me now. I wanted something fairly subtle but still inserting and thought these 1" corozo nut buttons fit the bill nicely with the pattern carved in. Once sewn on I thought perhaps they looked too small and delicate against the weight of the coat but I quite like them in the pictures. I think ideally I should have used a shank button to deal with the thickness of the fabric around buttonhole but I haven't seen anything I like. After making a coat for my mum which has a covered button (I'll be sharing this soon!) I thought this could be a great way to go but my coating is so thick it would be a nightmare to make them. Perhaps I should bite the bullet and get DM Buttons to make some for me.  I find button choices really difficult for my own clothes yet love picking them for costumes at work! Does anyone else struggle with this?

Diary of a Chain Stitcher: Butterick B6385 Coat in Grey Burberry Coating

I was worried about setting in the sleeves as this has never been one of my strengths and with this thickness of wool I thought it would be extra tricky. Luckily the sleeves are beautifully drafted and as this wool shapes so beautifully they both went in first time with no trouble. I did have this tutorial from Amity at Lolita Patterns on standby if I did have problems. It involves using tie interfacing to ease your sleeve head; has anyone else tried this method? I also used her method to draft my own backstay for which I used a piece of strong cotton calico. I referred back to my own post about placing the sleeve heads and shoulder pads in my Quart jacket and purchased these from MacCulloch & Wallis. I inserted these before attaching the lining for easier access...this step comes in a really strange place at the end of the instructions! Apart from this the instructions are really great by the way. Considering it was my first coat of this kind I didn't feel lost at all.

Diary of a Chain Stitcher: Butterick B6385 Coat in Grey Burberry Coating

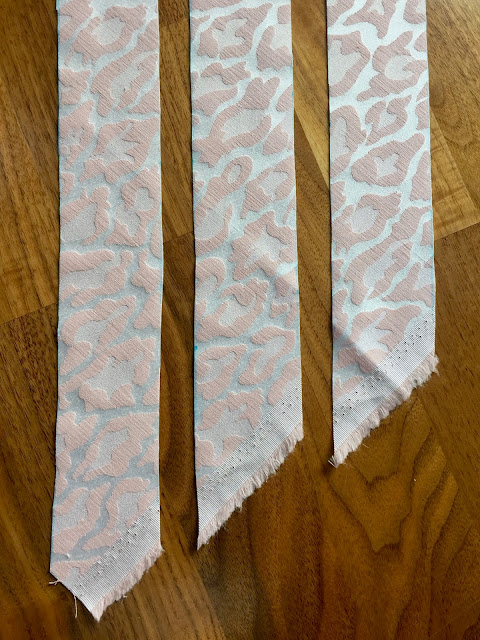
A coating this special needed a lining to match so I chose this amazing blush pink silk charmeuse from Mood Fabrics. I've always loved the combination of soft grey and blush but don't tend to wear a lot of pink so the lining on this was a great excuse to try it out. This slipperiest of silk satins was tricky to work with but worth the patience as it is wonderful to slide in and out off and also adds an extra layer of warmth without getting sticky. This coat is soooo warm. Honestly the cosiest coat I have ever owned. I've been out this winter in just this and a fine merino jumper and been totally comfortable when everyone else around me is shivering. Totally worth investing in those quality wools and silks. To elevate the lining I decided to add a flat piping around the seam where it joins the facing. I made my own with a jacquard in a similar pink from Rolls & Rems in Lewisham. Its actually a leopard pattern but I just wanted something with a bit of interest in it to break up the line between the solid grey and pink. I love how the combination of silvery ivory and pink in the brocade compliments both the wool and the silk. My piping is 3/8" wide. I also used this fabric to make a hanging loop which actually isn't included in the pattern. I just sewed together a little tube, turned it through to the right side and then pressed it flat then into the shape I needed before sandwiching it in the neckline seam.

Diary of a Chain Stitcher: Butterick B6385 Coat in Grey Burberry Coating

The pattern instructions have you leave the lining hanging free at the hem but wanted my insides all sealed in so bagged out my lining which is basically complete magic! You sew your assembled lining/facing piece and coat shell together all the way around, leaving jus`t a small gap and then pull the entire coat through that hole to turn it right side out. I found Heather Lou's tips for this in the Clare Coat sew-along the most useful and left my 'hole' at the hem of the coat rather than in the sleeve lining seam as I had so much bulk to wrestle through. As instructed I caught the lining to the shell at the underarm with a short swing catch (I love doing these!) and tacked the coat hem up the shell at the seam allowances. Doing this has made a huge difference to how the lining sits inside the coat and stops anything dropping down. Don't miss these steps! The only part I found a little confusing was what to do with the lining where it meets the facing at the hem. I think I'd over complicated it for myself by adding piping here too and ended up winging it with a bit of hand stitching to keep it tidy. I unpicked this part once to go back in and reduce bulk with more grading and trimming. The pressing stage after the lining was bagged seemed to take forever and for this I used a silk organza pressing cloth and whacked up the heat.

Diary of a Chain Stitcher: Butterick B6385 Coat in Grey Burberry Coating

If I'm brutally honest with myself I think I would prefer a slightly closer fit although this slightly more relaxed look is on trend right now. I think this problem stems from making my muslin in standard calico which is obviously a lot thinner and behaves quite differently. Following the measurements I cut the size 12 at the bust and graded out to a size 14 at the waist and hips. I could see there was room in the muslin but was pleased with the shape and I was concerned that in a thicker fabric the addition of lining, shoulder pads, interfacing e.t.c would eat up the ease and I wanted to be able to layer it over thick jumpers. However, my favourite RTW coat is much snugger, particularly through the sleeve and shoulder yet still fits comfortably over all my winter clothes. I should have been braver and gone for a closer fit. It might well be someone's ideal fit the way it is but it isn't quite how I imagined it.

Diary of a Chain Stitcher: Butterick B6385 Coat in Grey Burberry Coating

I shortened it by 2.5" to hit just above my knee. I took it off the hem as the waistline was hitting me at the right point. The sleeves I shortened by 1.5" taking 3/4" off at each lengthen/shorten line. I pinched out a little through the back at the waist as I prefer a closer fit in that area rather than a straight cut and love it. I took out just 1" in total spreading that equally across seams where the back joins the side back pieces. I think there's a bit of excess room in the upper chest and maybe I should have started smaller and done and FBA but the shoulders themselves fit nicely and the bust darts hit the right spot. Looking at the pictures I'm thinking maybe I should have reduced the collar depth slightly but in reality this seems comfortable. Again this was tricky to assess in softer calico!

Diary of a Chain Stitcher: Butterick B6385 Coat in Grey Burberry Coating

I don't mean all that to sound down on the finished article at all as I am delighted with it and it has been seeing a lot of wear including to Denmark and my step sister's wedding over my green silk dress! Making this was such a huge learning process in so many ways. I learnt a lot about working with heavy wools, a lot about structure and interfacing and a lot about the fit and shape of outerwear. I've got so much to take forward with me into my next tailored coat I think it would be an entirely different experience next time!

Diary of a Chain Stitcher: Butterick B6385 Coat in Grey Burberry Coating

Again I feel the need to congratulate you on making it to the end of possibly the longest post and most fact filled post I've ever written! Sewing geek right here. Hopefully you'll find some of the tutorials and information I gathered useful in making your own coats. I'd love to hear your opinions on tailoring and which methods you prefer. What experiences have you had?