
The idea of making this coat began around this time last year but the prospect of actually doing it was so daunting that I didn't start making it until winter really kicked in here in London in November. I finished it just in time to wear home for Christmas! I was at the Spring Knitting & Stitching Show with my mum last year (which coincidentally I did yesterday...has anyone else been? So much fun!) when I spotted a few bolts of to-die-for for coating lurking at the bottom of the Higgs & Higgs stall. Mum was laughing because apparently I just zoned in on what everyone else was missing down by their feet and made a beeline right in there on my hands and knees! I bought some gorgeous soft pre-washed grey denim from them this year that I can't wait to make into dungarees.

They had the fabric in a few pale neutral colours including a camel and cream but the soft grey stole my heart on sight. It looked glorious and as soon as I touched it I knew it was special. The reverse is smooth but the right side has a nap to it with a subtle herringbone woven in. When brushed one way it feels smooth and the other slightly rough. Its got a divine thickness and weight to it so I shouldn't have been surprised when I turned over the label and saw Burberry on the tag! The price tag of around £35/m caused a moment of deliberation as that made it a real treat but it was such a bargain for this quality of fabric that I was soon walking away with 2 metres.

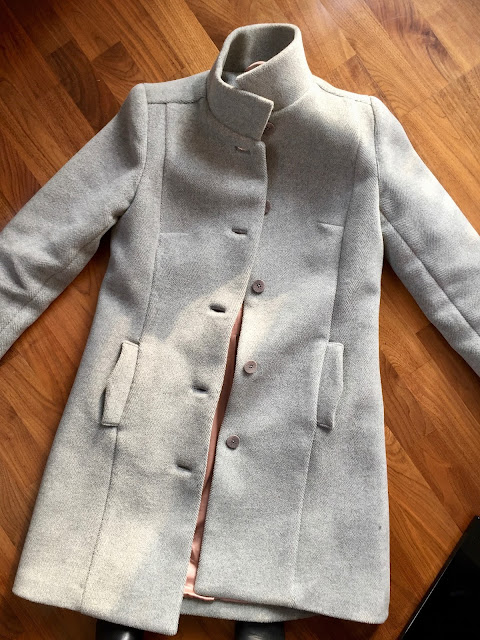
Then began the process of deciding on a pattern. I had a handful of coat patterns in my stash already, namely most of the Project Runway blue envelopes from Simplicity because I love the styles in that line and know I'm not the only fan. However, none of them were quite right for my super thick coating. As the fabric was special I wanted to make something classic which would last me many years so focussed on clean lines and what I knew I already liked in a coat rather than what was on trend this season. After a good google to find some reviews of it I eventually settled on Butterick 6385 from the Lisette range. I'm not a huge fan of the pink sample with rounded collar but view C with the stand collar is right up my street. I liked the simplicity of the lines, the two piece sleeves and the yoke and princess seam combination.

The next step was accumulating as much information as possible about coat making. This part was totally overwhelming and I almost came to a grinding halt with all the decisions I had to make! There appears to be a variety of levels of 'tailoring' that you can get into, from the basic instructions included with the pattern to full on pad stitching horsehair canvas and applying twill tape along roll lines. I had been feeling like fusible interfacing was not a route I wanted to go down because dang it I was making a beautiful coat with beautiful Burberry fabric and anything other than super special treatment felt like a cop out. But after reading through my sewing books (I found my vintage Vogue, Singer and Simplicity sewing books to have the most useful and in depth information) I realised I didn't have a clue what I was doing and perhaps the world of full pad stitching needed to be worked up to when I had a better understanding of the rest of the inner workings of a coat. This was my very first after all, plus the first time I had worked with any fabric so bulky. I eventually settled on a process that stuck quite closely to the pattern instructions with a handful of tips and tricks accumulated from books and online tutorials thrown in.
My first major decision was how to interface and where. I probably spent the most time looking into this and found the advice of Jen at Grainline Studio invaluable. I did a few samples using different weights of interfacing and opted for a light-mid weight one in the end which surprised me with such a thick wool. I really didn't want to affect the drape of the coating and this retained a lovely smooth drape. The main purpose of the interfacing in a coat is to prevent areas from stretching out rather then changing the body of the fabric. I'm really happy with my choice as I wouldn't want that front facing to be any stiffer than it is. When it came to placement I combined Jen's advice with these amazing fusing maps from fashion incubator. I interfaced all recommended pattern pieces as well as around the armholes, hem, cuffs and pocket openings from strength. These pieces were 2.5" wide and I used the pattern pieces as a guide to cut the right shape. Now its finished it has surprised me how soft the whole thing feels. In a coating this thick I expected it to feel quite stiff and structured but theres actually quite a bit of movement in it. I think I could have gone a bit further with adding internal structure and for a brief moment considered whether I should have interfaced the whole thing but I'm glad I didn't as I like the feel of the coating as is.

The wool was wonderful to work with. The only trouble I had was with how heavy it got towards the end! I really did feel like I was wrestling with it and had to move everything off my desk and move the machine to one end so the desk could take the full weight of the coat. My machine was a little trooper as always and handled all that bulk with no complaints with a slightly thicker needle and occasional employment of my walking foot. I probably spent more time at the ironing board than the machine though! There is so much work to be done with steam to create smooth, flat seams and shape and this wool responded so well to it; it was amazing to see how it could be shaped and moulded. All the sewing tools in my arsenal came out for this; a tailor's clapper, ham and sleeve roll proved essential. Also invaluable were my Ernest Wright & Son appliqué scissors as every seam allowance needs to be heavily graded to reduce bulk.

I knew this was going to be a time intensive project and it really was. The preparation and accumulating all the supplies actually seemed to take the longest and just cutting out took over five hours because of the numerous pattern pieces, marking everything with tailors tacks and the fact that you're cutting coating, lining and interfacing pieces for most of them! The thickness of the coating meant the pattern pieces became a little distorted if you tried to pin them so I drew around them with chalk. Although not as visible as the pile of a velvet I did need to carefully consider the napped surface. All the pattern pieces needed to be cut in the same direction and I had to be careful when pressing to apply only light pressure with the iron and only move it up and down not side to side on the fabric.

I am so delighted with my bound buttonholes. I followed the method in Claire Shaeffer's Couture Sewing: Tailoring Techniques as the photographs and steps made complete sense to me. I also looked at advice from Colette in their Anise sew-along when it came to making the backs neat. I found making them a little terrifying as they have to be done so early on in the process and you are slicing into one of your biggest pattern pieces to make them so there is no room for mistakes! I was especially concerned because of the thickness of my fabric but actually found them more straightforward than anticipated when broken down into small steps.

I wasn't sure about the buttons at first (which I bought from MacCulloch & Wallis near Berwick Street) but they've grown on me now. I wanted something fairly subtle but still inserting and thought these 1" corozo nut buttons fit the bill nicely with the pattern carved in. Once sewn on I thought perhaps they looked too small and delicate against the weight of the coat but I quite like them in the pictures. I think ideally I should have used a shank button to deal with the thickness of the fabric around buttonhole but I haven't seen anything I like. After making a coat for my mum which has a covered button (I'll be sharing this soon!) I thought this could be a great way to go but my coating is so thick it would be a nightmare to make them. Perhaps I should bite the bullet and get DM Buttons to make some for me. I find button choices really difficult for my own clothes yet love picking them for costumes at work! Does anyone else struggle with this?

I was worried about setting in the sleeves as this has never been one of my strengths and with this thickness of wool I thought it would be extra tricky. Luckily the sleeves are beautifully drafted and as this wool shapes so beautifully they both went in first time with no trouble. I did have this tutorial from Amity at Lolita Patterns on standby if I did have problems. It involves using tie interfacing to ease your sleeve head; has anyone else tried this method? I also used her method to draft my own backstay for which I used a piece of strong cotton calico. I referred back to my own post about placing the sleeve heads and shoulder pads in my Quart jacket and purchased these from MacCulloch & Wallis. I inserted these before attaching the lining for easier access...this step comes in a really strange place at the end of the instructions! Apart from this the instructions are really great by the way. Considering it was my first coat of this kind I didn't feel lost at all.

A coating this special needed a lining to match so I chose this amazing blush pink silk charmeuse from Mood Fabrics. I've always loved the combination of soft grey and blush but don't tend to wear a lot of pink so the lining on this was a great excuse to try it out. This slipperiest of silk satins was tricky to work with but worth the patience as it is wonderful to slide in and out off and also adds an extra layer of warmth without getting sticky. This coat is soooo warm. Honestly the cosiest coat I have ever owned. I've been out this winter in just this and a fine merino jumper and been totally comfortable when everyone else around me is shivering. Totally worth investing in those quality wools and silks. To elevate the lining I decided to add a flat piping around the seam where it joins the facing. I made my own with a jacquard in a similar pink from Rolls & Rems in Lewisham. Its actually a leopard pattern but I just wanted something with a bit of interest in it to break up the line between the solid grey and pink. I love how the combination of silvery ivory and pink in the brocade compliments both the wool and the silk. My piping is 3/8" wide. I also used this fabric to make a hanging loop which actually isn't included in the pattern. I just sewed together a little tube, turned it through to the right side and then pressed it flat then into the shape I needed before sandwiching it in the neckline seam.

The pattern instructions have you leave the lining hanging free at the hem but wanted my insides all sealed in so bagged out my lining which is basically complete magic! You sew your assembled lining/facing piece and coat shell together all the way around, leaving jus`t a small gap and then pull the entire coat through that hole to turn it right side out. I found Heather Lou's tips for this in the Clare Coat sew-along the most useful and left my 'hole' at the hem of the coat rather than in the sleeve lining seam as I had so much bulk to wrestle through. As instructed I caught the lining to the shell at the underarm with a short swing catch (I love doing these!) and tacked the coat hem up the shell at the seam allowances. Doing this has made a huge difference to how the lining sits inside the coat and stops anything dropping down. Don't miss these steps! The only part I found a little confusing was what to do with the lining where it meets the facing at the hem. I think I'd over complicated it for myself by adding piping here too and ended up winging it with a bit of hand stitching to keep it tidy. I unpicked this part once to go back in and reduce bulk with more grading and trimming. The pressing stage after the lining was bagged seemed to take forever and for this I used a silk organza pressing cloth and whacked up the heat.

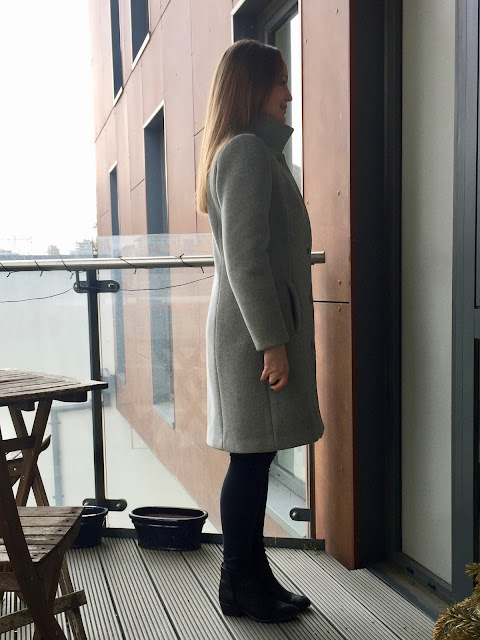
If I'm brutally honest with myself I think I would prefer a slightly closer fit although this slightly more relaxed look is on trend right now. I think this problem stems from making my muslin in standard calico which is obviously a lot thinner and behaves quite differently. Following the measurements I cut the size 12 at the bust and graded out to a size 14 at the waist and hips. I could see there was room in the muslin but was pleased with the shape and I was concerned that in a thicker fabric the addition of lining, shoulder pads, interfacing e.t.c would eat up the ease and I wanted to be able to layer it over thick jumpers. However, my favourite RTW coat is much snugger, particularly through the sleeve and shoulder yet still fits comfortably over all my winter clothes. I should have been braver and gone for a closer fit. It might well be someone's ideal fit the way it is but it isn't quite how I imagined it.

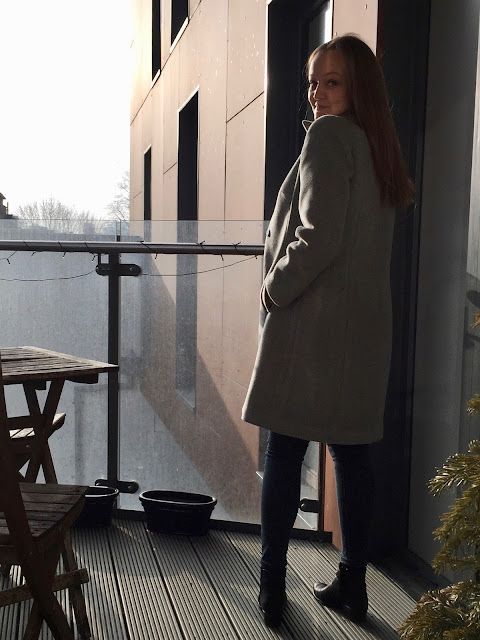
I shortened it by 2.5" to hit just above my knee. I took it off the hem as the waistline was hitting me at the right point. The sleeves I shortened by 1.5" taking 3/4" off at each lengthen/shorten line. I pinched out a little through the back at the waist as I prefer a closer fit in that area rather than a straight cut and love it. I took out just 1" in total spreading that equally across seams where the back joins the side back pieces. I think there's a bit of excess room in the upper chest and maybe I should have started smaller and done and FBA but the shoulders themselves fit nicely and the bust darts hit the right spot. Looking at the pictures I'm thinking maybe I should have reduced the collar depth slightly but in reality this seems comfortable. Again this was tricky to assess in softer calico!
I don't mean all that to sound down on the finished article at all as I am delighted with it and it has been seeing a lot of wear including to Denmark and my step sister's wedding over my green silk dress! Making this was such a huge learning process in so many ways. I learnt a lot about working with heavy wools, a lot about structure and interfacing and a lot about the fit and shape of outerwear. I've got so much to take forward with me into my next tailored coat I think it would be an entirely different experience next time!
Again I feel the need to congratulate you on making it to the end of possibly the longest post and most fact filled post I've ever written! Sewing geek right here. Hopefully you'll find some of the tutorials and information I gathered useful in making your own coats. I'd love to hear your opinions on tailoring and which methods you prefer. What experiences have you had?

They had the fabric in a few pale neutral colours including a camel and cream but the soft grey stole my heart on sight. It looked glorious and as soon as I touched it I knew it was special. The reverse is smooth but the right side has a nap to it with a subtle herringbone woven in. When brushed one way it feels smooth and the other slightly rough. Its got a divine thickness and weight to it so I shouldn't have been surprised when I turned over the label and saw Burberry on the tag! The price tag of around £35/m caused a moment of deliberation as that made it a real treat but it was such a bargain for this quality of fabric that I was soon walking away with 2 metres.

Then began the process of deciding on a pattern. I had a handful of coat patterns in my stash already, namely most of the Project Runway blue envelopes from Simplicity because I love the styles in that line and know I'm not the only fan. However, none of them were quite right for my super thick coating. As the fabric was special I wanted to make something classic which would last me many years so focussed on clean lines and what I knew I already liked in a coat rather than what was on trend this season. After a good google to find some reviews of it I eventually settled on Butterick 6385 from the Lisette range. I'm not a huge fan of the pink sample with rounded collar but view C with the stand collar is right up my street. I liked the simplicity of the lines, the two piece sleeves and the yoke and princess seam combination.

The next step was accumulating as much information as possible about coat making. This part was totally overwhelming and I almost came to a grinding halt with all the decisions I had to make! There appears to be a variety of levels of 'tailoring' that you can get into, from the basic instructions included with the pattern to full on pad stitching horsehair canvas and applying twill tape along roll lines. I had been feeling like fusible interfacing was not a route I wanted to go down because dang it I was making a beautiful coat with beautiful Burberry fabric and anything other than super special treatment felt like a cop out. But after reading through my sewing books (I found my vintage Vogue, Singer and Simplicity sewing books to have the most useful and in depth information) I realised I didn't have a clue what I was doing and perhaps the world of full pad stitching needed to be worked up to when I had a better understanding of the rest of the inner workings of a coat. This was my very first after all, plus the first time I had worked with any fabric so bulky. I eventually settled on a process that stuck quite closely to the pattern instructions with a handful of tips and tricks accumulated from books and online tutorials thrown in.

My first major decision was how to interface and where. I probably spent the most time looking into this and found the advice of Jen at Grainline Studio invaluable. I did a few samples using different weights of interfacing and opted for a light-mid weight one in the end which surprised me with such a thick wool. I really didn't want to affect the drape of the coating and this retained a lovely smooth drape. The main purpose of the interfacing in a coat is to prevent areas from stretching out rather then changing the body of the fabric. I'm really happy with my choice as I wouldn't want that front facing to be any stiffer than it is. When it came to placement I combined Jen's advice with these amazing fusing maps from fashion incubator. I interfaced all recommended pattern pieces as well as around the armholes, hem, cuffs and pocket openings from strength. These pieces were 2.5" wide and I used the pattern pieces as a guide to cut the right shape. Now its finished it has surprised me how soft the whole thing feels. In a coating this thick I expected it to feel quite stiff and structured but theres actually quite a bit of movement in it. I think I could have gone a bit further with adding internal structure and for a brief moment considered whether I should have interfaced the whole thing but I'm glad I didn't as I like the feel of the coating as is.
The wool was wonderful to work with. The only trouble I had was with how heavy it got towards the end! I really did feel like I was wrestling with it and had to move everything off my desk and move the machine to one end so the desk could take the full weight of the coat. My machine was a little trooper as always and handled all that bulk with no complaints with a slightly thicker needle and occasional employment of my walking foot. I probably spent more time at the ironing board than the machine though! There is so much work to be done with steam to create smooth, flat seams and shape and this wool responded so well to it; it was amazing to see how it could be shaped and moulded. All the sewing tools in my arsenal came out for this; a tailor's clapper, ham and sleeve roll proved essential. Also invaluable were my Ernest Wright & Son appliqué scissors as every seam allowance needs to be heavily graded to reduce bulk.

I knew this was going to be a time intensive project and it really was. The preparation and accumulating all the supplies actually seemed to take the longest and just cutting out took over five hours because of the numerous pattern pieces, marking everything with tailors tacks and the fact that you're cutting coating, lining and interfacing pieces for most of them! The thickness of the coating meant the pattern pieces became a little distorted if you tried to pin them so I drew around them with chalk. Although not as visible as the pile of a velvet I did need to carefully consider the napped surface. All the pattern pieces needed to be cut in the same direction and I had to be careful when pressing to apply only light pressure with the iron and only move it up and down not side to side on the fabric.

I am so delighted with my bound buttonholes. I followed the method in Claire Shaeffer's Couture Sewing: Tailoring Techniques as the photographs and steps made complete sense to me. I also looked at advice from Colette in their Anise sew-along when it came to making the backs neat. I found making them a little terrifying as they have to be done so early on in the process and you are slicing into one of your biggest pattern pieces to make them so there is no room for mistakes! I was especially concerned because of the thickness of my fabric but actually found them more straightforward than anticipated when broken down into small steps.

I wasn't sure about the buttons at first (which I bought from MacCulloch & Wallis near Berwick Street) but they've grown on me now. I wanted something fairly subtle but still inserting and thought these 1" corozo nut buttons fit the bill nicely with the pattern carved in. Once sewn on I thought perhaps they looked too small and delicate against the weight of the coat but I quite like them in the pictures. I think ideally I should have used a shank button to deal with the thickness of the fabric around buttonhole but I haven't seen anything I like. After making a coat for my mum which has a covered button (I'll be sharing this soon!) I thought this could be a great way to go but my coating is so thick it would be a nightmare to make them. Perhaps I should bite the bullet and get DM Buttons to make some for me. I find button choices really difficult for my own clothes yet love picking them for costumes at work! Does anyone else struggle with this?
I was worried about setting in the sleeves as this has never been one of my strengths and with this thickness of wool I thought it would be extra tricky. Luckily the sleeves are beautifully drafted and as this wool shapes so beautifully they both went in first time with no trouble. I did have this tutorial from Amity at Lolita Patterns on standby if I did have problems. It involves using tie interfacing to ease your sleeve head; has anyone else tried this method? I also used her method to draft my own backstay for which I used a piece of strong cotton calico. I referred back to my own post about placing the sleeve heads and shoulder pads in my Quart jacket and purchased these from MacCulloch & Wallis. I inserted these before attaching the lining for easier access...this step comes in a really strange place at the end of the instructions! Apart from this the instructions are really great by the way. Considering it was my first coat of this kind I didn't feel lost at all.
A coating this special needed a lining to match so I chose this amazing blush pink silk charmeuse from Mood Fabrics. I've always loved the combination of soft grey and blush but don't tend to wear a lot of pink so the lining on this was a great excuse to try it out. This slipperiest of silk satins was tricky to work with but worth the patience as it is wonderful to slide in and out off and also adds an extra layer of warmth without getting sticky. This coat is soooo warm. Honestly the cosiest coat I have ever owned. I've been out this winter in just this and a fine merino jumper and been totally comfortable when everyone else around me is shivering. Totally worth investing in those quality wools and silks. To elevate the lining I decided to add a flat piping around the seam where it joins the facing. I made my own with a jacquard in a similar pink from Rolls & Rems in Lewisham. Its actually a leopard pattern but I just wanted something with a bit of interest in it to break up the line between the solid grey and pink. I love how the combination of silvery ivory and pink in the brocade compliments both the wool and the silk. My piping is 3/8" wide. I also used this fabric to make a hanging loop which actually isn't included in the pattern. I just sewed together a little tube, turned it through to the right side and then pressed it flat then into the shape I needed before sandwiching it in the neckline seam.

The pattern instructions have you leave the lining hanging free at the hem but wanted my insides all sealed in so bagged out my lining which is basically complete magic! You sew your assembled lining/facing piece and coat shell together all the way around, leaving jus`t a small gap and then pull the entire coat through that hole to turn it right side out. I found Heather Lou's tips for this in the Clare Coat sew-along the most useful and left my 'hole' at the hem of the coat rather than in the sleeve lining seam as I had so much bulk to wrestle through. As instructed I caught the lining to the shell at the underarm with a short swing catch (I love doing these!) and tacked the coat hem up the shell at the seam allowances. Doing this has made a huge difference to how the lining sits inside the coat and stops anything dropping down. Don't miss these steps! The only part I found a little confusing was what to do with the lining where it meets the facing at the hem. I think I'd over complicated it for myself by adding piping here too and ended up winging it with a bit of hand stitching to keep it tidy. I unpicked this part once to go back in and reduce bulk with more grading and trimming. The pressing stage after the lining was bagged seemed to take forever and for this I used a silk organza pressing cloth and whacked up the heat.

If I'm brutally honest with myself I think I would prefer a slightly closer fit although this slightly more relaxed look is on trend right now. I think this problem stems from making my muslin in standard calico which is obviously a lot thinner and behaves quite differently. Following the measurements I cut the size 12 at the bust and graded out to a size 14 at the waist and hips. I could see there was room in the muslin but was pleased with the shape and I was concerned that in a thicker fabric the addition of lining, shoulder pads, interfacing e.t.c would eat up the ease and I wanted to be able to layer it over thick jumpers. However, my favourite RTW coat is much snugger, particularly through the sleeve and shoulder yet still fits comfortably over all my winter clothes. I should have been braver and gone for a closer fit. It might well be someone's ideal fit the way it is but it isn't quite how I imagined it.

I shortened it by 2.5" to hit just above my knee. I took it off the hem as the waistline was hitting me at the right point. The sleeves I shortened by 1.5" taking 3/4" off at each lengthen/shorten line. I pinched out a little through the back at the waist as I prefer a closer fit in that area rather than a straight cut and love it. I took out just 1" in total spreading that equally across seams where the back joins the side back pieces. I think there's a bit of excess room in the upper chest and maybe I should have started smaller and done and FBA but the shoulders themselves fit nicely and the bust darts hit the right spot. Looking at the pictures I'm thinking maybe I should have reduced the collar depth slightly but in reality this seems comfortable. Again this was tricky to assess in softer calico!

I don't mean all that to sound down on the finished article at all as I am delighted with it and it has been seeing a lot of wear including to Denmark and my step sister's wedding over my green silk dress! Making this was such a huge learning process in so many ways. I learnt a lot about working with heavy wools, a lot about structure and interfacing and a lot about the fit and shape of outerwear. I've got so much to take forward with me into my next tailored coat I think it would be an entirely different experience next time!

Again I feel the need to congratulate you on making it to the end of possibly the longest post and most fact filled post I've ever written! Sewing geek right here. Hopefully you'll find some of the tutorials and information I gathered useful in making your own coats. I'd love to hear your opinions on tailoring and which methods you prefer. What experiences have you had?
Wowsers!! Your coat is amazing, and that fabric is gorgeous! What a great find. This pattern is in my long list of coats to make, so it's lovely to see it made up.
ReplyDeleteI am all over this post, because it seems that I am all over coat making at the minute. I love the piping on the inside. Did you follow a tutorial on it please? I'm a bit weary if trying it myself in case I don't get an even depth on it. It's interesting to see how/where you used the interfacing. Using it at the pocket edges is a great idea (which I will remember!), and I haven't seen it used at the armholes before. My tailoring book - Tailoring: The Classic Guide To Sewing The Perfect Jacket - is currently right beside me as I type. I was doing some reading last night, as I'm hoping to get a jacket cut out today, but I need to alter the lining pieces first. There is so much info out there on tailoring, it's hard to know when to stop reading and just go for it!
Ah thanks so much Lynne! I felt so much pressure to make this great because the fabric was so amazing! I was thinking maybe I should have picked something less expensive for my first one but a special fabric makes me so much more patient and careful I think that works better sometimes!
DeleteI have been keeping my eye on your coat making! You've been making some lovely stuff. The piping was super easy, I can do a little tutorial on it actually. You just need to make sure its the right width and then you can line up the raw edges with your seam allowance to keep it even.
I'm off to check out that book now! I've read so much about tailoring in the last few months, it can be so overwhelming! Just trying to decide what techniques to use took me forever!!
I'm a newcomer to dressmaking so have absolutely no tips to offer but I know a lovely coat when I see one and yours is gorgeous, inside and out. Thank you for the work you put into your blog posts and for all the helpful references and links. I shall be following them up even though I'm a long way off coat making.
ReplyDeleteAh thank you so much for that lovely comment Allys! You may be surprised at how close to coat making you are, I always say if you break it down into small manageable steps you can do just about anything! I hope you enjoy your research
DeleteI have never made a coat in my life before; but this is one I would want for my first project. It is gorgeous. Those buttons are perfect, and the lining is just sheer glamour. Great job, Fiona! You can surely be proud.
ReplyDeleteO its so good to hear that you like the buttons! I keep going back and forth on them. The lining I have had no second thoughts about though, its so lovely! Thank you
DeleteI am loving it, you totally did justice to the fabric! I am thinking of starting with a simple pattern and an inexpensive fabric myself, athough... when we love the project we can do amazing things and learn much more, don't you think?
ReplyDeleteThanks! Doing justice to the fabric was all that was in my head the whole time I was making it! I think a simple pattern is a good place to start and this is a good one but totally agree that sometimes when its a special fabric it can turn out so much better as I am so much more careful and thoughtful
DeleteWow, that is a fabulous coat - so beautifully finished! I did make a coat once, but it didn't have buttons and buttonholes, so a bit of a cop out really.
ReplyDeleteThanks for your comment on my Cleo!
You're welcome, I loved that on you and the denim you chose was great! I don't think lack of buttons or buttonholes makes a coat a cop out AT ALL! There are so many other elements to it that it is a major achievement no matter what!
DeleteIt's beautiful Fiona, you've really done justice to that gorgeous fabric. I made a winter coat myself recently so I read every word of this post - I love reading about construction details! I also found the Clare sewalong posts really helpful when I was bagging my lining, they're so well explained. Enjoy wearing it as long as you can before the weather warms up! x
ReplyDeleteJane I totally ate up the post about your red coat because you posted it about the same time as I was making mine! The red is amazing on you and you did a beautiful job. I had no idea what I was letting myself in for diving into the world of tailoring research! So enjoyable though!
DeleteI've never wished for the cold weather to stick around before but almost want to for this
Absolutely gorgeous! I last made at coat in 1977 for my final year Home Economics project in high school! I recently found a copy of the pattern on ebay, which I was super excited about. Your coat has inspired me to make one again. Thank you for all the details and photos of your superb work!
ReplyDeleteO wow you so have to make it again now! That would be such a great story and fascinating to see how different you find it now! You're welcome, I'm glad you enjoyed the post
DeleteExcellent review Ms. Fiona. The coat is perfect and looks great on you.
ReplyDeleteI have used the tie-interfacing trick from Lolita Patterns -- the first time I did it I used flannel and the second time I did it I just used a bias strip of self-fabric. It's magic! It makes setting the sleeves so easy, plus it's a nice substitute for sleeve heads. The shoulders look so perky. I totally recommend it. There's a great description of it in this book: https://www.amazon.com/Tailoring-Classic-Sewing-Perfect-Jacket/dp/1589236092/ref=sr_1_1?s=books&ie=UTF8&qid=1488731585&sr=1-1&keywords=tailoring+the+classic+guide+to+sewing+the+perfect+jacket
ReplyDeleteO that's so good to hear Nissa! Next time I'm struggling with a sleeve I'll definitely give that a whirl. Do you think then you can do without sleeve heads if the tie interfacing makes the shoulders perky enough on their own?
DeleteThat's another book to add to my ever increasing list!
I've never used legit sleeve heads, so I can't really compare unfortunately -- i was happy enough with the results of just the bias strips.
DeleteSo. LOVELY! (Us shorties can find the fabric others miss, it's a perk :)
ReplyDeleteThanks so much Marcy. A new obsession has been born!
DeleteToo true about the height! Haha!
A compliment to you and a little advice for you. You outdid yourself with your beautiful coat. You learned a lot and the outcome is so pretty. Advice??...... wear that coat until it is threadbare. Enjoy your youth and cute, sweet size. You may never look this way again. Don't save it for special times, just wear it. You look adorable in it.
ReplyDeleteThis is one of the best comments I've ever had sissy! And you have totally inspired me to get as much wear out of it as possible. Thank you so much
DeleteFantastic for your first coat Fiona. The quality of the fabrics really shines through. I need this pattern having seen a few great versions of it!
ReplyDeleteThank you! The fabric is so beautiful isn't it, the perfect shade of soft grey.
DeleteIt is a fab pattern and great for a first coat as there's not too much detail to tackle and the instructions are very thorough
Beautiful!! I love the pink lining with the gray, and it really looks impeccably made.
ReplyDeleteI'm so pleased I finally had a way to combine blush pink and grey in a project, and in two such luxurious fabrics! So much fun. Thanks
DeleteI loved the tip about just drawing in the pattern lines with chalk instead of pinning. Both the weight and slipperiness of some fabrics can make them more challenging to cut, so this is a great idea for special fabrics. I know you said you felt like you spent more time at the ironing board than the sewing machine, but I think that is what makes your coat look so professionally made. I personally love the fit because I tend to wear a lot of bulky clothes in winter and prefer a looser fit for winter coats but I do understand that not everyone bundles up the way I do. Your wider collar does look so warm and cozy. Like everyone said, you really did justice to that lovely fabric. Super Great Job! I know you'll enjoy your coat for many years to come. And thank you for adding links to all the great coat making tips you used; it will be a great go to post for the future for all of us.
ReplyDeleteThat is all so good to hear Nadine! You've all boosted my confidence so much with your lovely comments! I hope I will wear it for many years, that was my hope with this style. All that time at the ironing board was definitely worth it!
DeleteOh my gosh FIONA. This coat, oh my gosh I'm actually obsessed. The pattern, the soft gray wool, the powder pink lining, everything is so gorgeous and SO well made. The bound buttonholes are honestly so impressive, so well done. I also love how the coat has a femininity to it but also is classic and easily wearable to different places. So impressed! Excellent job.
ReplyDeleteAh that's such a lovely comment thank you Haylee! I really wanted it to be something that I could wear for all kinds of occasions and for years so hearing that makes me so happy! These colours would look great on you!
DeleteBeautiful job, wow! Olive sleeve heads, they make such a difference don't they? The colour is so versatile and the stand up collar is snugly. You'll be glad of that extra room when you want to wear a jumper under.
ReplyDeleteO such a huge difference! I couldn't believe it the first time I used them, they add just the right amount of support to keep a beautiful shape. Yes I'm sure when it gets super cold I'll be wishing I had even more room! Thanks
DeleteBeautiful details - love the wool and buttons. Thanks for sharing all the facts!
ReplyDeleteThank you! And you're very welcome. Its so good to hear that the buttons were a good choice in the end. I have spent so long deliberating over them
DeleteOh I love your coat, it's fabulous. Thank you for going into all the details and tutorials that you used..This is so useful and makes a really interesting read. I am working up to attempt a jacket/coat so I know I'll find all the information useful. x
ReplyDeleteGo for it! If you take it nice and slow and step by step I'm sure you can do it. Its all just seams and pressing at the end of the day! Good luck and thanks
DeleteWow! What a lovely coat! The fabrics, the pattern, the fit, the finishing - everything is spot on! It was also great to read about how you did it - as my eldest daughter has asked me to make her a coat. I've never made one before, so I'm a bit daunted by it... Hopefully it will turn out ok.
ReplyDeleteThanks so much Anette! Don't be daunted, I was once I started reading all the information but if you break it down into little chunks you'll get there! What a lucky daughter
DeleteThe is absolutely amazing! The gray is glorious, and the lining is perfect. I am wild about this coat, Fiona. You have obviously once again paid a lot of attention to detail, and it shows. It truly is a beautiful coat, and it suits you so well. Congratulations!
ReplyDeleteThank you so much for that lovely comment. I'm pretty wild about it too! I'm glad you think it suits me, sometimes its hard to tell when you've been looking at something for so long and know all the ins and outs of making it!
DeleteMy good friend gave me a bundle of patterns yesterday which included 3 coat patterns. When I am ready to make one I will be coming back here to read all of your advice and hope I can do as good a job as you have. This is such a beautiful coat, lovely buttons too. Be proud of what you have achieved and enjoy wearing it
ReplyDeleteAh wow lucky you! Are they vintage or contemporary patterns? Thank you for your lovely comment. Its a very time consuming process but very satisfying and I hope you enjoy it
DeleteWooooow, Fiona! Amazing skills and perfect fabric choices. My boyfriend has a Gloverall duffel coat in a similar fabric (but navy blue), a kind of herringbone Melton, isn't it? Gorgeous. I agree, choosing buttons can be really tricky but I think yours are great. Basically I think it's all great! With our weather it's definitely worth having space for a big jumper underneath, as well, and the nice high collar. Congratulations!
ReplyDeleteO wow I bet this fabric would make an amazing duffel coat! I did consider that as I'd love to make the Grainline pattern but decided I wanted something I could dress up a little more ultimately. All the lovely comments about the fit, collar and buttons has made me feel so much more confident in my choices. Thanks so much
DeleteI think you are genius. The coat is stunning and I am in love with the lining. It looks so incredible finished and you wear it so great. Loved the post, too!
ReplyDeleteAh thank you! I'm very far from a genius and you'd know if you could have seen how confused I was getting during the process of making this! I'm glad you enjoyed the post
DeleteAbsolutely stunning coat looks amazing love everything about it. I would love to make one one day.
ReplyDeleteThanks so much Maria, I hope you do! Its a big challenge but really satisfying
DeleteBeautiful and inspirational! The coat and the lining together make me so happy!
ReplyDeleteAh me too Coleen! I love not only the combination of colours but the combination of those two textures too. It looks so luxurious! Thank you
DeleteWhat a yummy coat! And no, it doesn't look big. You might want to wear more than a fine merino sweater underneath at times, anyway:) so it's better to have more space.... the fabric looks wonderful and that shape is so stylish.
ReplyDeleteI made a coat many years ago in some black really heavy cashmere I bought in Hong Kong. Cutting it started off carpal tunnel problems so I haven't done another one since. I made the huge mistake of not looking at the year of publication of the envelope Burda pattern I finally found for it, and it ended up with huge shoulders! Took a lot of help from expert aunt to get them a little less ridiculous. Anyway, she taught me to always put in soft strips of fabric - woven cut on the bias or knit - to use as what we now call sleeve headers. ie, you can make your own:).... She also taught me to stitch lining to jackets and coats at the top of the sleeve as well as the bottom.... oh, and your buttons are amazing! Don't change them! Use a thicker thread to sew them on and give them a loose shank - use a matchstick to give the shank height and then wind the thread round and round the thread shank. You probably know all this anyway, you're so experienced....
Thank you so much for that lovely and helpful comment Francesca. Its so good to hear positive comments about the fit!
DeleteI agree that cutting the heavy coating can be hard on the hands! I actually gave up using my beloved Gingher shears and tried a pair of Kai that I have which were a bit more gentle on the handle.
I had heard about putting in the soft fabric strips as sleeve heads and may well try that again next time, maybe a flannel or something would be good. I might redo my buttons as I did do create a shank with the thread as you say but didn't have any button thread in any colour other than black...I think it might be worth the thicker thread so I can make a deeper shank
Thank YOU for the Kai recommendation...... I remain petrified that I'll end up with useless hands. Off to check out Kais.....
DeleteWhat an amazing achievement! This posts, with its notes and carefully documented references, is a gem. Thank you for sharing your experience with coat making. The finished garment looks wonderful!
ReplyDeleteThanks so much! I'm glad you found the post useful. I really enjoy looking back over what I've done and writing about it, I find it really helps me as well as being able to read posts like this about other people's projects! So much fun. I'm very proud of the coat
DeleteOh my goodness, this is so gorgeous!
ReplyDeleteThank you Anna! I'm really pleased with it and how the fabrics look together
DeleteReally really lovely Fiona, well done!
ReplyDeleteThanks so much Jenny! I drank up all of your coat making posts before I started so thank you for being so thorough writing about your beautiful coats. This sewing community of ours is what has taught me how to sew!
DeleteThat is one heck of a beautiful coat! It looks so luxurious and that lining is just gorgeous. I'm just starting my first coat project (at my current rate I should be finished it by next winter, ha) so I'll be checking back here for tips! ;)
ReplyDeleteThanks Mary! I'm very proud of it. The lining feels so amazing every time I put it on. Good luck with your project, they are very time consuming especially when it's your first and have all that research to do but so enjoyable!
DeleteIt's lovely , congratulations on taming that thick fabric, it looks beautiful, I love a bound buttonhole, perfect for this fabric.
ReplyDeleteI have some fab turquoise felted wool which is on the list for next winters coat , this pattern is a contender
I love a long post, sharing your experience helps the rest of us get there quicker !
Taming is just the Emma! It was certainly a challenge for me, having never done anything like it before but it did press so beautifully when my tailors clapper got involved!
DeleteI'm so proud of those bound buttonholes. I was quite daunted by them but now can't wait to be able to use some again!
I totally agree about long detailed posts, I read so many of them before making this and loved it!
Good luck with your turquoise wool, sounds glorious!
Fiona I love both your coat and your sewing geekiness! Your blog is my favourite because of the level of detail :) X
ReplyDeleteHaha that's a fantastic comment Helen! I'm very proud of both! I can't get enough of reading about sewing techniques. I'm so so pleased to hear you enjoy it as much as I do. Thank you!
DeleteYour coat looks amazing! Well done!
ReplyDeleteI hate trying to find buttons for my projects and often cover my own. I was going to try DM Buttons for the Francine jacket (Sew Over It) I've just made, but - take note! - it's no good going to them near London Fashion Week! I ended up not only covering my own buttons, but making bound button-holes. In many ways I think they're nicer than a keyhole button hole, but I didn't really have time to do them!
O I've been before when he's really busy but never just before fashion week! I can't even imagine the chaos! A brilliant reason to push you to try bound buttonholes though and they are so beautiful I'm sure they turned out better than any buttonhole sewn at DM would!
DeleteThank you
Wow ! I'm just about embark on this coat project (just finished the cutting out and yes, I think its taken me about 5 hours too !) and your blog has been so helpful. Lots of links for me to follow up before I go any further. Many thanks.
ReplyDeleteThat's really lovely to hear Mary as picking up on tips and advice from people who have already made the pattern is one of my favourite things about reading blogs. So happy that my experience could help you!
DeleteI hope you've been enjoying the process
This is utterly beautiful & phenomenally inspiring!
ReplyDeleteAh thank you so much! I'm really proud of it
DeleteThis is amazing! I'm just about to get started on mine... A little late lol. I've had the fabric since November! Do you remember how much fabric you needed to make the piping?
ReplyDeleteIt always takes a while to get motivated to sew a coat! There's still plenty of winter left! I hope you enjoy making it
DeleteI can't remember now, it wasn't a huge amount. You could probably get away with as little as quarter of a metre but a half metre would make it easier as you'll be able to get longer strips out of it and have fewer joins. A fat quarter would probably be ideal!
Ok. Thank you thank you thank you. I’ve been reading every blog I can find about this pattern. I’m a teacher on holiday break and Armed with your wonderful directions and guideposts, I’m about to tackle this beautiful coat with some gorgeous wool. Wish me luck.
ReplyDeleteSorry about my delayed response but I hope your coat project was a huge success! It is a real challenge but a great and satisfying accomplishment. Glad you hear you enjoyed the post and I hope you found it useful!
DeleteHi Fiona! I'm re-reading this with much attention now that I'm planning on making this coat myself! Thanks for including so much detail and all the link love :) I hope mine turns out half as great as yours.
ReplyDeletexoxo April
Brilliant! It is a big project but so enjoyable! Can't wait to see what fabric you've chosen and the finished garment. I'm sure it is going to turn out beautifully
DeleteI am SO happy I found this, I'm just about to start this project myself having never made a coat (I work mostly with stretch fabrics so tailoring is not in my comfort zone!) I love that you've given links to the specific tailoring techniques you used where the pattern instructions fall a little short, this is EXACTLY what I need. Thank you for taking so much time to share your journey making your coat (which is stunning by the way, better than any of Butterick's photographs of it!)
ReplyDeleteO good luck with your first coat! It is such a satisfying thing to make.
DeleteThanks so much for the lovely comment, I'm glad my ramblings might be useful! I hope all the tips and tutorials are helpful. This was my first real tailoring project too and the resources I found on the internet were invaluable.
I hope you enjoy the process!
Hello, nice project indeed, but I encourage you to use more traditional ways of construction and craftsmanship, which means, making buttonholes by hand and SEWING the interfacing inside the Coat front. They're lots of tutorials on the web about padding, shoulder construction and making the buttonholes by hand, but, if you're interested, I'd be also in disposition to give you some links and addresses, references.
ReplyDeleteYours sincerely
Arthur
Thanks Arthur. I made this quite a few years ago now when I was first dabbling in the world of outerwear so I took the easier construction route suggested by the pattern to ease myself in! I’d definitely like to try techniques like pad stitching whenever I need to make myself another coat in future. Thanks for being so forthcoming with the info!
Delete