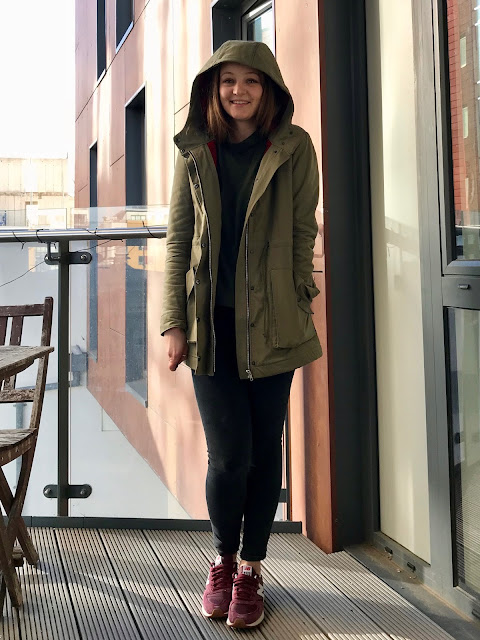
I've had this coat finished for a while but I had to give myself some space from it before I could blog about it as the task of writing it up seemed almost as epic as the construction! The completion of this has been a long time coming as I have wanted to make a Kelly Anorak ever since Closet Case Patterns released the pattern way back in October 2016. I've ever so slowly been assembling supplies and making tentative progress since then. I knew this was going to be a big and fairly challenging project with lots of new skills to learn so I think with not much time to sew over the last 18 months I developed a bit of a 'big project' block! I never lost interest in making it though and now its finished I'm kicking myself for not making it sooner as it has already been a valuable addition to my wardrobe despite the weather being probably too cold for it.
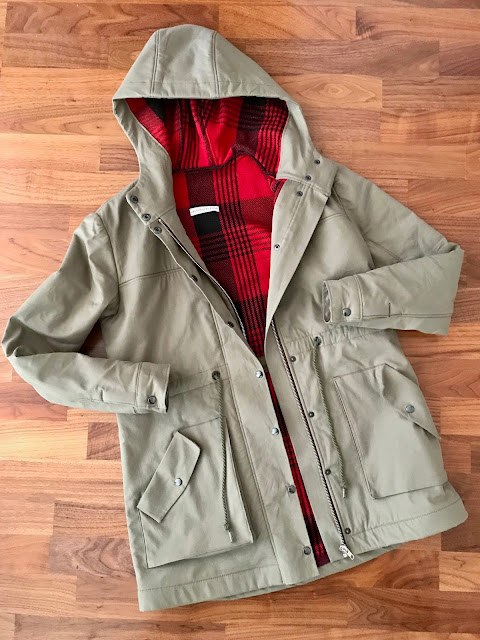
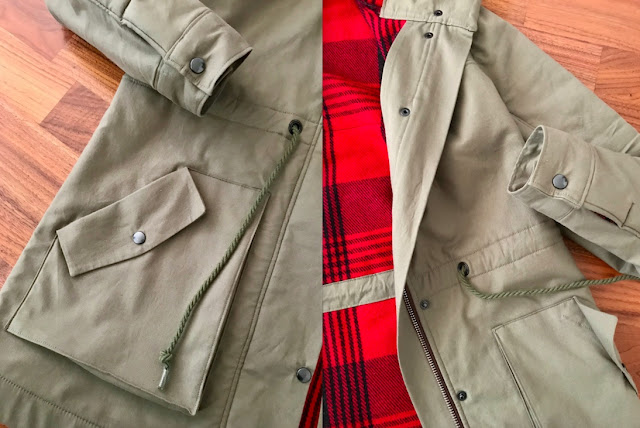
I've wanted a classic army green anorak/parka style coat for a long time and actually bought the cotton twill for the shell way back in April 2016, before the Kelly was even released. I had in mind the Papercut Patterns Waver Jacket as I'd seen some lovely versions of this being sewn. I changed my mind as all the extra details and hardware on the Kelly lured me in. I found the cotton in Mood Fabrics when I was in NYC on holiday. It is a nice mid weight and isn't waterproof but has a slightly crisp coated feel and has held up well in any rain showers I have been caught in so far. The red plaid underlining is a wool flannel and also came from Mood but was bought online at a much later date. Both fabrics no longer seem to be available as this was SUCH a long time ago! I'd had this fabric pinned for some time but didn't know what to make with it when shortly after the Kelly release Heather Lou posted about how she underlined one of the samples in a checked flannel and I loved how this looked. I thought my combo of army green and red plaid would look really cool and timeless. Also, living in the UK, adding a layer of warmth to a raincoat sounded like a very good idea!
To give me an added motivation to get this made I added it to my 2017 #makenine challenge grid on Instagram, then treated myself to the paper pattern at the spring Knitting & Stitching show. It is my first time using a paper version of a Closet Case pattern and I absolutely loved it. It has a sturdy envelope with beautiful illustrations, a decent instruction booklet with a clear, clean layout and pattern printed on to tissue. I actually got the pattern cut out the weekend following the show (no mean feat when you consider there are 19 pattern pieces many of which needed cutting in interfacing or underlining too!) and was ready to get sewing! But I got crazy busy with work and could only snatch the odd hour of sewing time here and there which didn't seem the right way to get stuck into this kind of project. Before I knew it it was summer and in the heat I couldn't find the motivation to sew a jacket underlined in wool flannel. Then I got busy again and suddenly it was the end of the year and my pattern pieces had been waiting in a little pile under my desk for over 8 months. I took a bit of time off in January to get back on top of life and that solid bit of clear sewing time was what I needed to finally put needle to fabric. I sewed the anorak up over the course of a week with a couple of quick and satisfying knit projects in the middle to break up the intense concentration needed for this.
Shortly after I'd cut my pattern the lining expansion pack was released! I did kick myself a little but now I'm really glad I went with the underlining as the wool flannel makes it so warm and cosy and I love the effect of the bright red plaid used this way. Heather Lou has done a good tutorial on how to underline this pattern if you'd like to do the same; its very straightforward and just involves cutting particular pattern pieces from the underlining fabric as well as the shell and basting them together before construction. She suggests using something more slippery for the sleeve so you can get your arm in and out easily but I stuck with my wool flannel and have had no trouble. You can choose to use both underlining and lining together if you'd like the warmth but the finish of a full lining.
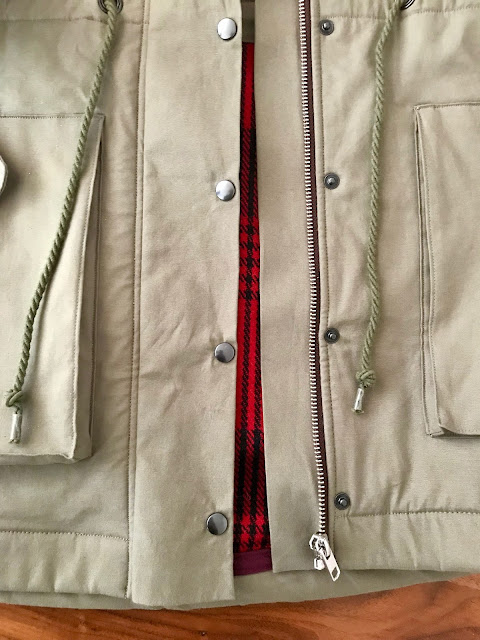
Keeping the project on the back burner for so long did give me plenty of time to get all the notions together, of which there are many! The cost of these can really add up but are worth it as they make the finished coat look so professional. I got my metal zip from John Lewis on Oxford Street as they tend to have a good variety and I like that they are returnable if it turns out to be the wrong length! My snaps and grommets are Prym brand so they work with the tools I own (I love using this tripod tool and a hammer rather than the vario-pliers as it gets them set in really firmly and doesn't need to be used near an edge). I bought them from MacCulloch and Wallis. I also got the olive green drawstring cord and lightweight fusible woven interfacing from them. I chose the lightweight as I wanted to keep this nice, soft and malleable and the thick wool flannel was already adding a fair amount of structure to the shape.
Closet Case Patterns do sell a hardware kit for this pattern which is good value for money and would save you the faff I had of trying to hunt down all the bits and pieces in the same colour. The hardware kit includes cord stoppers for the ends of the drawstring and spring cord locks which secure the tie in place at the waist. I'm just tying it and using knots and tape at the moment so I'd love to get hold of these as I think it would finish the jacket off beautifully. I haven't been able to track any down in the dark pewter finish I chose. Does anyone have any ideas?
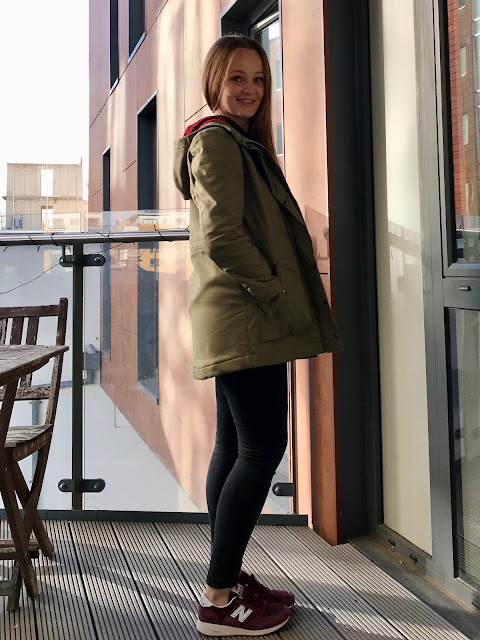
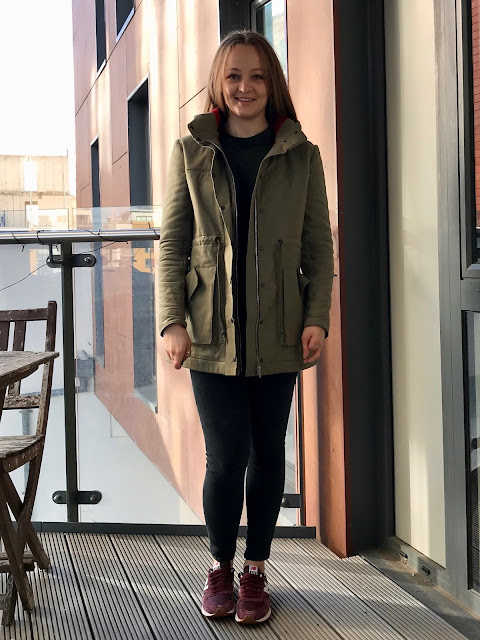
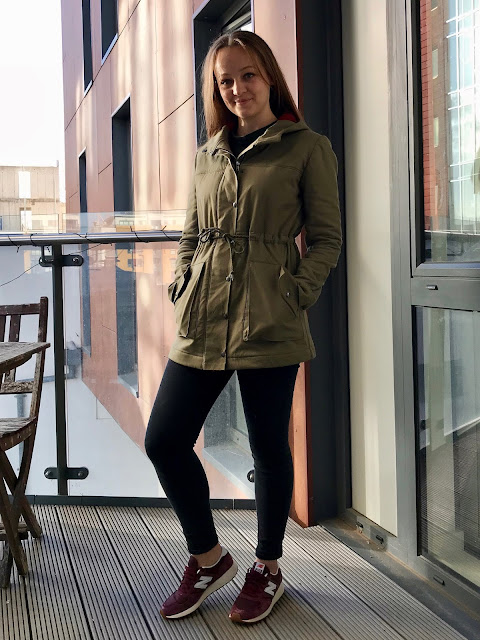
I cut the straight size 6 which is pretty much spot on my measurements aside from a tad smaller in the hip. I probably should have graded up a size in that area as I could stand to have a little more room around the bum when its done up but it doesn't overly bother me. It has quite a neat fit in general, especially as the wool flannel I underlined it with is fairly thick. If you're going to underline yours and are between sizes I'd defiantly go for the larger size as there is less ease than you would find in a commercial pattern. I love how snug it is around the shoulders in particular as I don't like feeling overwhelmed by a coat. The sleeve length is spot on and the coat itself feels shorter than I expected which I like as its bit more modern and youthful. If you're tall I'd give the length of the pattern pieces a quick measure and check that against yourself. When I've got the drawstring pulled in tight the coat is just covering my bum.
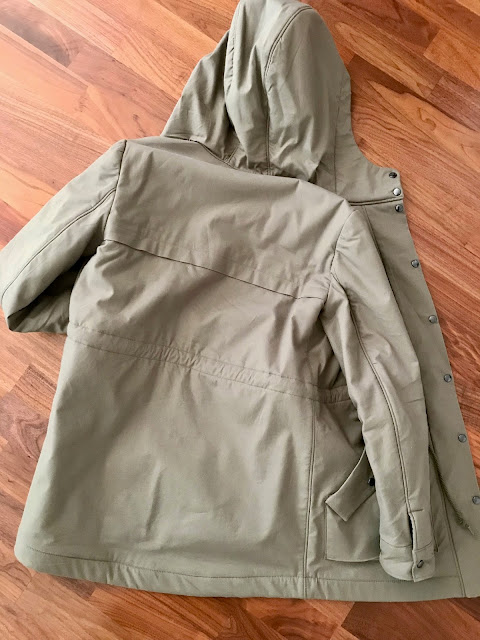
I really like the slim sleeve and slight shaping in the body which can be exaggerated by pulling the cord tighter. Many people have commented on the lovely shape of the hood and this is defiantly one of may favourite things about the coat. It is a good size and just sits really comfortably on the head. When you've got the coat fully done up with the poppers you feel well covered and like it won't go anywhere and when not worn it holds a nice shape on the back too. I think I like a three-piece hood as much as I like a two-piece sleeve! Which incidentally this pattern has FYI.
I also love the front fastening with the placket that poppers over the zip and guard behind. Its surprisingly straight forward to put together and as well as being really functional against the cold and wet is one of the many features that elevates the garment above looking handmade.
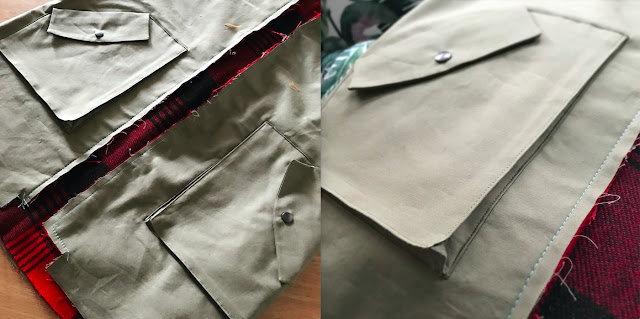
The trickiest element of the construction (aside from topstitching down the assembled sleeve seams which is just plain fiddly) I found to be the gusseted pockets. It was the only time I didn't feel confident in what I was doing when following the instructions. I'm so proud of them now through! I've not sewn anything like these before and found it hard to visualise what I was trying to do. It requires some very accurate stitching. I heavily relied on the sew-along to reassure myself I was doing it right. The sew-along is really thorough and packed with great tutorials to help you with the many aspects of making this that might be new to a lot of people such as how to install grommets (new for me!) and how to install snaps. It only went live on the website in January so its a good job I held off for so long on making it hey?!
The pattern instructions themselves are impeccable. There is A LOT to the construction of this coat and some quite complex aspects to put together with lots of pattern pieces. Although the sewing process felt long I didn't feel confused or lost at all (with the exception of those pockets which are a real mind bender!) and by carefully following each step I achieved beautiful results. With a design this involved there is a lot of potential for things to go wrong but the pattern is so well drafted and thought out that I had no issues with pieces not quite matching up at markings and notches. I can't even begin to imagine the patience Heather Lou must have had when drafting and testing this!
It is a really satisfying project to tackle but it did test my patience purely because it takes so long! When I'm sewing I break everything down into parts to make the project seem more manageable and achievable. For example with a simple tee I'll be thinking 'ok I've just got to sew the shoulder seams, do the neckband, sew side seams, set in the sleeves and hem it'. With this project that didn't really work as firstly there were SO many of those little steps on that list and then each little step took a really long time! I spent a good few hours just on trying to make those pockets perfect. I've learnt to relax my 'perfect' over my years of sewing and focus instead on the enjoyment of making. But with something I'm investing as much time and money into as this I REALLY want it to be as good as it can be and will get the stitch ripper out more than usual.
Hammering in those snaps and eyelets at the end sure was therapeutic. Although it was probably the most stressed I have ever felt about setting in hardware. Once those babies are hammered in there is no getting them out. I really didn't not want to ruin all that work I was so proud of by getting a snap positioned wrong!
The instructions are so good you don't need to be a hugely experienced sewer to take this on but I'd definitely recommend having some confidence in your swing skills before you tackle it. Heather Lou expertly steers you through how the garment comes together so you don't need to fall back on prior knowledge of this but you do need to be able to stitch accurately and handle a number of layers of fabric at the same time. Some elements of this were a lot more straightforward than I imagined but some parts were really fiddly. There's a lot of visible stitching and topstitching which you'll want to be as neat as possible.
I think it will be a long time before I'd want to tackle this time consuming pattern again but I did love making it and it feels like such an accomplishment. There were so many new to me elements of this it was really satisfying to see it come together. I am tempted to make a lightweight fully waterproof version at some point as I've seen some great fabrics recently and Heather Lou has done some brilliant tutorial posts on how to work with waterproof fabrics and seal your seams with tape. Its always these new skills that lure me in to trying out a pattern or project!






Wow, Fiona, this is amazing! Perfect khaki colour, and warm and protective but sleek. It looks so perfectly finished, and wool flannel interlining, yummy..... I admire your patience. Lost mine at the moment, I really want to make a parka-ish jacket but will probably stick with my Waver plan.... in fact I'm in the process of fit-testing the Waver by using the pattern to make a wool dressing gown - yes yes I know, it's March:D......
ReplyDeleteIf you had to want to waterproof this one, which would be worth it because it is such a stunner, there are a couple of products around. Seasalt sell something you put in the washing machine with the item. And yesterday I got an interesting email from the cotton patch about a product you paint on called Odicoat Olcloth Adhestive glue. Oh, and Thread Theory have otter wax which is also applied by hand.
Making a dressing gown out of a coat pattern is such a great idea! I'd love to know how you get on with Waver, it was my original plan and I'm still really interested in it. The Kelly is a really big project and does require some patience but is so satisfying in the end!
DeleteThank you so much for the waterproofing tips! I think I've actually got a sachet of some wash in stuff somewhere, I must look it out. Although I'm so proud of this I'd be terrified of ruining it and I'm not sure how the wool flannel would react to that kind of treatment! Maybe I could try the paint on stuff on a scrap of the shell fabric. Showerproof is fine for me at the moment though and its been doing a great job!
The absolute most perfect Kelly anorak I've yet to see! I love it!
ReplyDeleteAh wow Justine what a compliment! With a project this big I wanted to choose some classic fabrics that I knew I'd still like in at least a few years time. I'm intending to get a lot of wear out of this!
DeleteThis is amazing! It's so beautiful and professional. You should be really proud. It looks great on you. Your hard work really paid off.
ReplyDeleteThanks very much, I am really proud of it but it was a lot of hard work!
DeleteThis is amazing! It's so beautiful and professional. You should be really proud. It looks great on you. Your hard work really paid off.
ReplyDeleteThis is a beautiful anorak. It looks so RTW and has all the bells and whistles. You should be extremely proud because it looks very professional. I know what you mean about adding the hardware at the end being a nail biter. You got all the snaps in just right and it looks fantastic.
ReplyDeleteThanks Becca. I love how all the little details of this pattern make it look so ready to wear. No one that has seen it has believed me when I say I made it!
DeleteI was so relieved when the snaps were in haha!
Beautiful Kelly! I think when Heather Lou designed this pattern she must have had your make in mind :) Just perfect!
ReplyDeleteah what a lovely thing to say Kathleen! Thanks so much. I'm really delighted with it
DeleteLooks awesome, I love it! It is my dream to make one of these.
ReplyDeleteGo for it! If you break it down into small chunks it is totally doable!
DeleteThanks Sarah
This is so nice! I wish I would have lined mine; it looks more professional this way. I love how you used flannel for your lining.
ReplyDeleteO I think it would have a lovely professional finish with or without lining and I'm sure yours is beautiful Shirley! This is just underlined so you still see all the seams and things inside. I'd actually really like to make a nice lightweight unlined one!
DeleteThis is gorgeous! I have just finished making my Kelly anorak which has a stripy lining, although I love the flannel on yours!
ReplyDeleteOoo stripey lining sounds brilliant! Can't wait to see yours! What a project to take on hey?! You must feel really proud!
DeleteOh that is a lovely jacket! The lining seems very cosy.
ReplyDeleteI saw drawcord stoppers in the Merchant and Mills online shop whilst shopping for linen and bag hardware today - they have both chrome and antique brass versions.
Krista
O that is a fantastic tip thanks so much Krista! I'm off to check that out now.
DeleteThanks, it sure is cosy!
What a great anorak! Work very accurate, I love to look at your products!
ReplyDeleteThanks very much! Glad you enjoy the blog! It took a lot of patience to make sure everything was accurate on this one!
Deletefabulous jacket!
ReplyDeleteThanks very much!
DeleteJust lovely. Immaculate construction and perfect fit. And love the fabrics together. Worth the wait and the work!
ReplyDeleteIt certainly feels it Evie, I'm absolutely loving wearing this now!
DeleteI'm really proud of the construction and so delighted with the fit. Heather Lou's drafting is fantastic. Can't sing the praises of this pattern enough
I love this and now I want one! A brilliant detailed post too, I love the combination of colours you used. x
ReplyDeleteIt is a big of a long post isn't it?! It was such a huge sew I couldn't stop typing once I started!
DeleteDo make yourself one, the pattern is brilliant!
You did a great job!
ReplyDeleteThanks Linda, I'm really proud of it
DeleteWow! What a brilliant job you did! The jacket looks so smart and will be perfect in spring, autumn, and those random chilly summer days. The hood really is a nice shape - I've been thinking of using the Cascade duffel coat pattern to make a lighter jacket, but the hood on that is very wide at the front and won't stay up in windy British weather... Also the 37 pieces of that pattern make me hesitate to start on it again!!
ReplyDeleteI've never owned a jacket like this and have suddenly realised how incredibly useful and brilliant it is going to be! Wish I'd got my act together and made it sooner!
Delete37 pattern pieces?! I thought this one was huge! The hood is certainly one of the best things about this pattern, it fits so nice and snuggly on the head and I love that it fastens right up to the chin for really bad weather!
Thanks!
ReplyDeleteWe are all feeling the love here Fiona, it is fabulous and inspiring me to have a go. I'm coming to the conclusion that my favourite patterns are Heather's, the drafting is so good and the fit and style perfect. I've just finished my Kalle and didn't think I would like the style but I love it.
ReplyDelete