I can't remember which image I saw that inspired this top. I possibly spied it on Pinterest or while I was scrolling through Instagram. All I can remember is that I couldn't find a sewing pattern for it! Again I'd limited my options by wanting to make it last minute before holiday so it had to be a PDF download but it sort of surprised me as I felt sure I'd seen many boxy little button up tops with v-necks around. Anyway, admitting defeat I turned to my pattern stash to see what I could use as a starting point.
The closest to the vision in my head was the Kalle Shirt & Shirtdress from Closet Case Patterns. I've made a maxi length version of this before which incidentally I also wore a lot on holiday and got a lot of compliments on! This time around I started with the cropped length of the pattern and I cut the size 8 as before. I'm sort of between the 6 and 8 on my top half and could probably stand to go down to the smaller size but I'm happy with the relaxed look of this. It sits nicely across the shoulders and doesn't shift about.
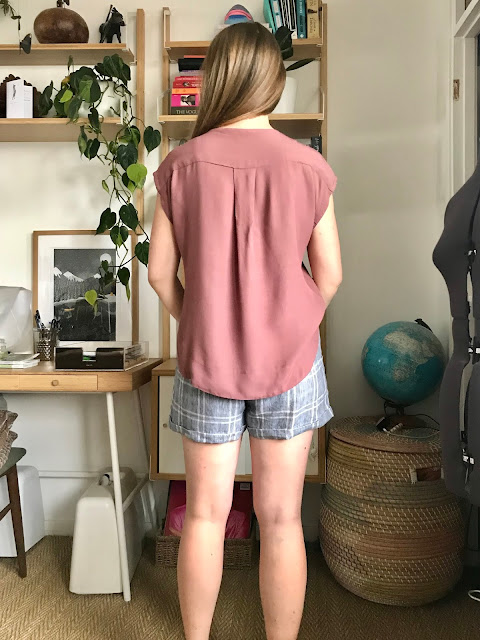
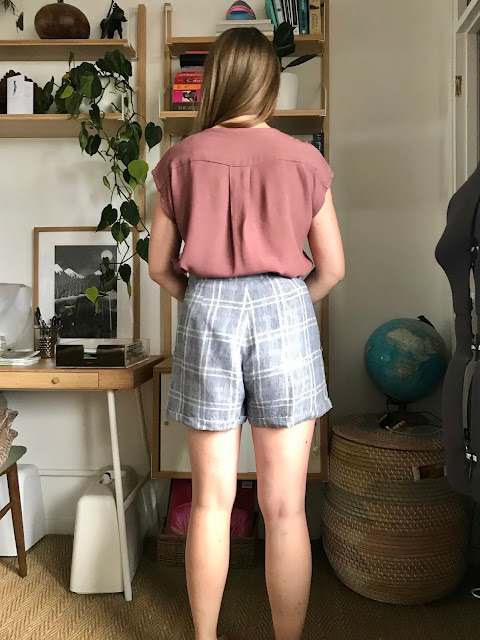
My first pattern hacking step was the lengthen the shirt by 5cm using the lengthen/shorten lines on the pattern. I decided to do this after seeing Lauren's version and liking how that added bit of length looked. I wanted to have the option to tuck the top in to high waisted bottoms which I now can. I also reduced the size of the centre back pleat in the same way as Lauren by shifting the pattern piece over the edge of the fold of the fabric by 1". This is a really easy way to reduce the roominess of the top without sizing down and potentially ruining the fit across the shoulders.
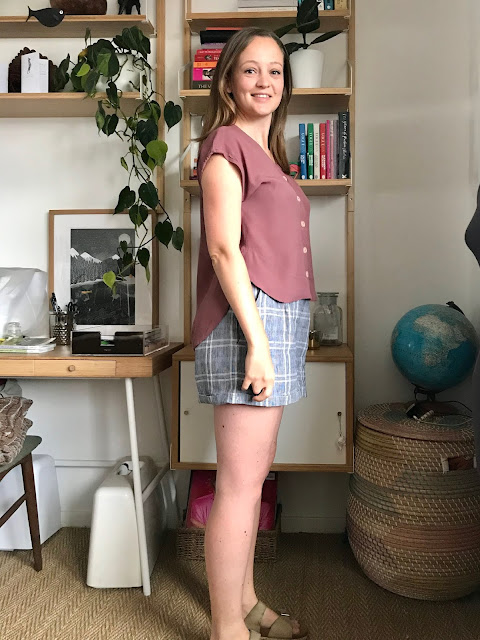
Next to create the v-neck I set aside the centre front placket, collar and stand pattern pieces and drew a straight line on my front pattern piece from the edge of the neckline at the shoulder down to the centre front. I used a pattern piece from the Sutton Blouse as a guideline for how deep to go. I think I could have got away with a couple of inches deeper as this is quite modest but very wearable! I then drafted a facing for the new neckline and centre front by tracing the shape of the front edge from the front pattern piece and making it 2" wide (including 5/8" seam allowance) all the way along. The back of the neckline remained the same shape and would now be finished using the yoke so there was no need to draft a facing for that.
When constructing this new neckline and centre front finish I first attached the facings along the centre front, under-stitched them and pressed them back to the wrong side. I then attached the back of the top to the front following the burrito method in the instructions. This means the whole front including the facings is sandwiched between the yoke pieces giving a clean finish. When 'burritoing' the yoke and front together sewing the shoulder seams I continued right the way along the back neckline, sewing the two yoke pieces together wrong sides together. I then turned the top to the right side through an armhole opening and the back neckline was finished neatly along with the shoulder seams. I wasn't 100% sure it would work (sometimes these trial and error methods of bagging out have resulted in a tangled loop of fabric!) but luckily it did and I'm so pleased with the clean interior finish.
Rayon and viscose are my absolute favourite type of fabric to wear; it so perfectly suits a whole variety of garments. It is not that easy to come by in good wearable prints so whenever I see it in a print or solid colour that I love I can't resist it and my stash has been growing! I've been adding the solid colour rayon crepes from The Fabric Store to my orders for a little while now and have a nice array of them in my stash. I tend to order just a metre or metre and a half as I see them all as little sleeveless tops or camis but recently I've been drawn to various styles of big billowing sleeves which require rather more fabric...Anyway for this top I decided to use the vintage rose colour, of which I had a metre and thought was a nice modern neutral to pair with other garments.
Rayon crepe like this can be a little shifty to work with particularly when cutting. I often cut it out on carpet rather than a smooth table surface or wooden floor as it has a little grip to keep it in place. To help keep everything on grain when you lay your pattern pieces out I often pin the selvedges together - if you're working on carpet you can even pin into it! Working with a rotary cutter can also help cut accurately as cutting with sheers lifts the fabric off the cutting surface slightly and can distort your pattern pieces. When sewing up be careful not to stretch it out and make sure to stay-stitch where required. Use lots of fine pins and keep your pins within the seam allowance if possible so as not to mark your delicate fabric.
As the fabric was only 126cm wide and I had only one metre I had to play pattern piece tetris and omit the sleeve cuffs from the original pattern. This was a design choice I was considering anyway and I'm pleased with the resulting look. I only had teeny scraps of fabric left when I finished cutting. I could have chosen to leave off the hem facing and chose an alternative finishing method but I love the dramatic curve of the hemline which is only possible because of that facing. A regular turned and stitched hem which wouldn't work around such tight corners and a rolled hem wouldn't give the same weight and structure as the facing which emphasises the shape.
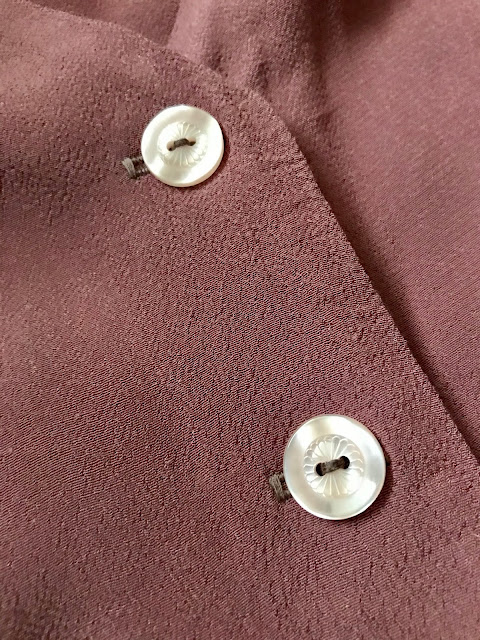
I've been trying to use buttons from my button box rather than buying new as I have so many. There were a few I tried out and I was initially after a more organic natural looking button but these one out in the end as they tie in tonally with the pink very nicely. Size wise they're spot on. I love a statement button. As I can just about get the neckline over my head without unfastening the top I faked the buttonholes. I love the automatic buttonhole function on my machine (the Brother Innov-is F420). However it creates such beautiful buttonholes I can hardly bear to cut them open! For these I sewed the buttonholes on the machine (so quick and easy!) then hand sewed the button on top, right through both layers.
This weight of rayon crepe is perfect for this oversized style of top, it hangs well without clinging and has beautiful movement. I can see me making a few more of these perhaps with different shaped necklines, a square hem and with sleeve cuffs to use up some of those small cuts of viscose lurking in my fabric hamper. Plenty of time to sew at the moment anyway. Stay safe and healthy everyone.


This is such a good idea for a hack! It looks really lovely, I like that the back details of the kalle are still there too.
ReplyDeleteThe back details are one of my favourite things about the pattern! I love burritoed yoke and the tidy inside finish
DeleteThank you!
The Roberts Collection jumpsuit top would be the pattern you were looking for :) (Well, for the v-neck button front)
ReplyDeleteBut I'm also one to improvise and it's always fun to get a hack right. Love the rose colour - the whole top looks very wearable
O thanks for the tip! I completely forgot about that pattern but think it is one I could get a lot of mileage out of!
DeleteLovely top. Thanks for sharing. Can I recommend a buttonhole chisel cutter to take the fear out of cutting them open. It was a game-changer for me.
ReplyDeleteGreat tip thank you! I've toyed over getting one of those for a long time...maybe it is time to invest! My only worry is how long they stay sharp for? I don't think they can be sharpened?
Delete