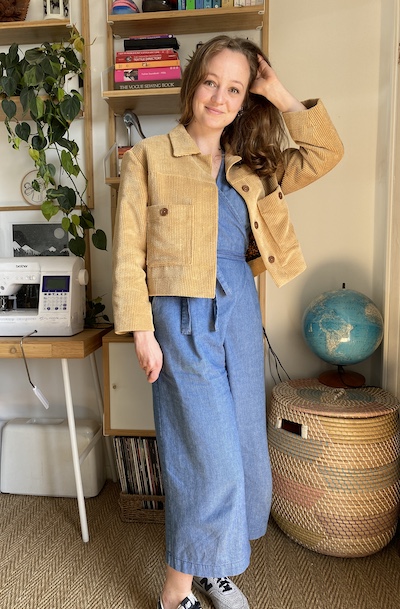
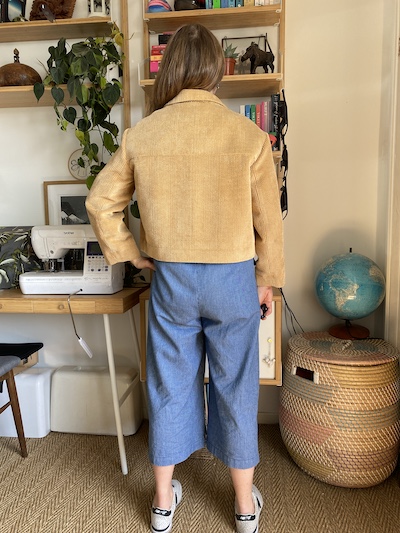
I've been mulling over a plan for this jacket since last summer and when the weather finally started to heat up for spring (although it doesn't seem to have 100% made up its mind yet here in the UK!) I decided it was about time I got on and made one. I adore my Hampton Jean Jacket and it gets so much wear during three seasons of the year but I could do with a jacket of this type that I can wear with all the denim and blue items I have in my wardrobe. I also really love making outerwear so any excuse really!
I'd spotted some really gorgeous corduroy jackets popping un amongst the sewing community and loved the idea of adding some texture to an outfit with a plush and fairly chunky corduroy. For a while I toyed with the idea of a fun colour, however, I felt something fairly neutral would be the most useful. I plumped for a golden beige in the end as a brighter alternative to a black or navy. Here I'm wearing it over my first Zadie Jumpsuit but I also particularly love this colour over my dusky pink Blanca Flight Suit. The fabric came from 1st For Fabrics. It was my first time ordering from them and I was so impressed by the speed of delivery, quality of the fabric and value for money. They've got a large variety of fabrics at very reasonable prices.
The real debate came when it came to picking a pattern...it seemed like there were so many good options out there! I tried to make a shortlist and then conducted an Instagram poll for a bit of guidance from people who had made these patterns before. The Stacker Jacket from Papercut and the Ottoline from Merchant & Mills were the clear favourites, although the Ilford, Nenuphar and Paola were popular too. I went with the Stacker in the end as I preferred the cut and details of it for making in corduroy and also have had great experiences working with Papercut Patterns in the past (not that I haven't with M&M I just haven't tried them yet!)
I went with my bust measurement and cut the size 3. The only alteration I made was to shorten the body of the jacket by 2" to match the length of my Hampton as I love that. If you're going to shorten the pattern make sure you shorten all the lining pieces and the pocket pieces too as these cross the lengthen/shorten line. Once I'd made these adjustments to the pattern pieces I got it out of just 1.25m of the corduroy...well I did until I remembered that corduroy has a nap and I needed to recut a. couple of my smaller pieces the other way up! Fabrics with a nap have a pile like velvet which changes appearance slightly when you brush your hand over it. When brushed in one direction it generally looks quite matte and in the other looks more shiny, The colour can also change; looking richer and darker in one direction and paler in the other. This means you want to cut all your pieces facing the same way on the fabric so that they don't look different when sewn up next to each other.
A few reviews mentioned it being a little tight across the shoulders and recommended sizing up for ease in this area. I chose not to as I don't have particularly wide shoulders and it looked like it had a fairly relaxed boxy cut. It is indeed perhaps a fraction snug across my shoulders, nothing restrictive but it definitely 'fits' if you get what I mean. It is absolutely fine for me but I would (like the many others I ignored!) recommend sizing up if you want room in that area. One more comment I would make on the fit is that the sleeves are quite short. I really like the bracelet length but I'm not tall at 5ft 3" so would recommend adding a bit of length if you want full length sleeves or have long arms.
The corduroy was lovely to work with...apart from shedding bits of fluff all over the place from the cut edges like any fabric like this does! Even though all the raw edges are concealed inside I overlocked all my seam allowances because of this. I used a medium weight fusible woven interfacing where necessary and with hindsight sort of wish I'd interfaced my patch pocket pieces too as this corduroy is quite soft and I feel like they might sag a little with extended use.
One thing to bear in mind when working with corduroy is not damaging the pile when you press it. I avoid ironing directly on to the right side of the fabric so I don't crush the pile or get any shiny patches. Either iron with another piece of the fabric on top or face down with a piece of the fabric underneath. I had quite a big piece of the fabric left over after cutting so covered my ironing board with it (face up) while working on this project. If you press the fabric against itself it allows the fabric to sink into something soft when you apply pressure rather than being squished flat against the hard board. You can get velvet pressing boards for this purpose which are covered in lots of little needles but I've never seen the need to invest in one.
The exterior of the jacket came together remarkably quickly which is extremely satisfying and I felt like I'd be finished with it before long but it is the guts which take the time! It is one thousand percent worth it though as the finish on the inside is BEAUTIFUL. Those mitred corners of the facing at the centre front bottom corner are not only a sight to behold but amazingly straightforward to achieve. The facings are grown on to the main body pieces so the lining is assembled, then attached to those facings before the whole jacket is bagged out though a side seam of the lining.
Speaking of lining, you don't need a huge amount so I rummaged through my stash to see what I could use. There were a few options but I was excited to have found a use for this Lady McElroy giraffe print cotton poplin that I've had for a little while. I love to use a fun expected lining! This design is printed in panels so I thought carefully about the placement of my pieces so the bottom border of the panel roughly matched up along the hem. I had just about enough of it with a bit of creative piecing for the sleeves. I was concerned that I should have used something more slippery for the sleeves, for ease of getting the jacket on and off but this hasn't bothered me at all even over jumpers.
The wooden buttons were harvested from an old skirt which I'd thoroughly worn out before it was taken to textile recycling. I didn't think I'd want buttons on my pockets to begin with (I like easy access to them) so don't actually have buttonholes! The buttons are purely decorative, sewn directly to the pocket. The label is from set by Kylie and the Machine. Now I've worn this a bit (a lot actually!) I think I'd add a hanging loop if I made it again. The only other change I might make is to topstitch around the collar as there is topstitching elsewhere on the jacket and i can't decide if it looks odd without it.
I loved every step of making this and how it has turned out...good job too as my Mum has requested an identical one for her birthday! Is making outwear a favourite for any of you too?


I’ve only made one coat, and whilst it is probably my proudest sewing achievement, it was also a massive undertaking, and it has kind of put me off making another! However, I have fabric ready and the pattern cut out for the Tessuti Oslo... so hopefully soon!
ReplyDeleteA coat certainly is a massive undertaking! But I kind of live the lengthy process. This kind of jacket is much more manageable.
DeleteI’ve made the Olso and absolutely loved it! It is fairly straightforward for a coat so I hope you enjoy it!
This is a great garment! The lining is wonderful too! I have a jacket in my head future too, eyeing stash fabric I've had for a while. Thanks for the post.😊
ReplyDeleteThank you! What pattern are you thinking of using for your jacket?
DeleteGiraffe-print lining?! – I love this detail. Outerwear is absolutely the most satisfying thing to sew, and I really like the way this jacket will go with anything and everything.
ReplyDeleteI am finding it goes with anything and everything! I’m so pleased that I went with this colour now
DeleteAnother outerwear sewing fab hooray!
Hi Fiona! I love your version of the Stacker jacket! I’m onto my second version, made in corduroy inspired by you. However, I struggle with setting in the sleeves. Do you find there is too much fabric in the sleeve head? I can’t avoid puckering no matter what I do. This happened last time, too. Should I remove a wedge at the top? Any advice would be very helpful and I’m very grateful for your thoughts on this.
ReplyDeleteHi! Thank you, I’m really pleased with it.
DeleteI read on a few reviews that other people had trouble with the sleeve head but I didn’t have a problem with it when I came to it. I just think it takes a little patience and easing in. Have you tried adding a long basting stitch around the sleeve head and pulling on it to shape the head slightly (like you would when gathering). It tightens things up and makes it a little easier.
If you do want to try an adjustment I haven’t done anything like that but I imagine you’d slash the top of the sleeve head vertically and close it up to reduce the length of the sleeve head, taking out a wedge like you say.
Remember when you’re pinning it in. Place that you’re matching up the stitching line on both pieces rather than the raw edges
I hope that helps!
Thanks so much for your advice, it's very helpful. I did add the basting stitch, but I guess I just have to give it another try. Next time I'll remove some of the excess before I cut the sleeve pieces I think.
DeleteWhat a beautiful garment. I so appreciate your post as I have Stacker Jacket in cord on my project list here in the Southern Hemisphere where the temperatures have dropped!
ReplyDelete