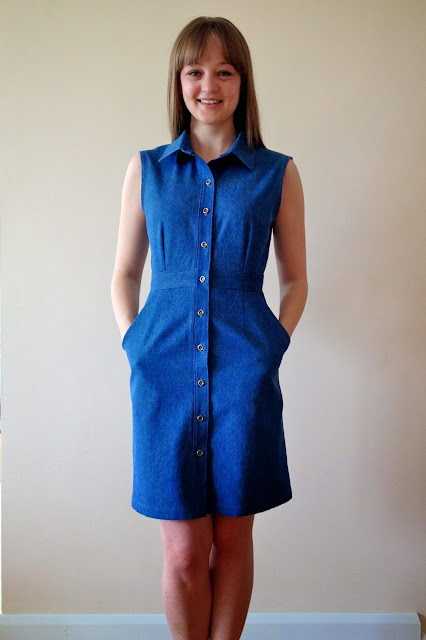
Bias Cut Plaid Shift Dress
I could have predicted it; a big old ‘look who’s back!’ post in Feb and then here we are already in April with only my third post of the year. I did warn you it may be more sporadic than it once was! To give myself some grace, there has been a DIY frenzy going on in my new sewing space which hasn't left time for much else. Next week I’m having a long overdue operation on my hand so there will be plenty of time for dictating blog posts and easing back into slightly more gentle hobbies after that.

I haven't mustered up the enthusiasm to take photos of anything I've made so far this year, so instead I'm sharing one of my most successful projects of last year and some photos I took back in January. I use the word successful quite loosely as the process of making this dress was not straightforward! It was hard-won but I got there in the end and have worn it loads.

This dress was inspired by a number of dresses that Len Blake has made and looks so great in. I particularly loved her plaid one and the use of the plaid cut on the bias, so when I saw this linen on Fabric Godmother I knew immediately what I wanted to do with it! It's a lovely weight for a dress like this, lightweight with great movement but not so fine that it's sheer. It sewed and pressed beautifully and has washed really well, still looks good as new after 10 months or so of regular wear. Unfortunately, given that I think it was deadstock and I made this dress nearly a year ago, it's all sold out but I did spot that Merchant & Mills have some really gorgeous check linens in at the moment. Apologies to your bank balance.

The pattern is the Robin Dress from Liam Patterns. It looks like it should have been fairly simple to sew, right? On first attempt it did come together very nicely but then I put it on...and it was way too big!
I know my body and the common adjustments I need to make fairly well nowadays. So for a straightforward design like this I don't toile and instead pay close attention to the measurement charts and fit info and take some flat measurements of the pattern pieces to assess if any tweaks are needed. Perhaps with a new-to-me pattern company I should have been a little more cautious! Alarm bells should have rung when I went to check the finished measurements to see how much ease was built in. Instead of the usual bust, waist, hip. measurements the only finished measurements listed were for the size of the armhole, the depth of the neckline and the width of the hem. Unusual and not hugely useful. Particularly when some of those measurements (for the boat neck) were incorrect.
I plumped for the sizes corresponding to my measurements (8 at the bust and 10 at the waist and hip and hoped for the best, figuring the stretch in the bias gave a bit of wiggle room. I cut the midi length at the full length, I usually have to shorten but no length measurement was given so I played it safe.

My next problem came with the PDF. I wanted the length of view B but the necklines of view C. It's a big PDF with 70 pages and the diagram at the start isn't labelled or numbered so it took me some time to figure out which pages I needed to print. It's also not a layered PDF so it felt like I was printing a lot of pages I didn't need. I would have been great to have a list in the instructions detailing which pages to print for which view. Maybe I've just been spoiled by really great indie patterns in the past!
Once I finally had it printed the pages didn't line up correctly. I had to offset the pages by about 1/2" to get the lines to flow across the sheets - perhaps this is where my later fitting issues stemmed from?!


First I removed the facing to enable me to make the adjustments needed. I then took the shoulders up by and inch on the double. This helped straight away. I quite often shave off a little length at the should as I'm quite short between the shoulder and bust. Lifting the garment here often helps correct other fit issues as it brings the bust/waist/hip point up to sit in the right spot. After doing this I took the side seams in by 1/2" on the double all the way from the armhole to the hem - so 2" total! I had initially attempted some alignment across the side seams which would have been more pleasing to the eye, but the amount I had to take the side seams in rather scuppered that plan.

I'm much happier with the fit now, it skims the body but doesn't cling. It is still a little too big across the shoulders/upper chest as there wasn't anything I could do to bring in the width of the boat neck without adding a seam or unsightly dart down the front. It doesn't bother me when I'm wearing it but I feel like the neck could sit a little flatter. If the finished measurements included in the instructions for the neck were correct I could have made that adjustment at the start.

If I made a dress like this again (which I may well do as it's such an easy to wear, versatile style) I think I'd use binding as a facing to finish the neckline and armholes. I remember when I completed it I considered shortening/shaping the facing as it felt a little bulky but it obviously hasn't bothered me enough to actually change it. I had originally constructed it beautifully with french seams e.t.c but as you can see above I resorted to 'whatever the overlocker is threaded in will do' when I remade it!


I haven't mustered up the enthusiasm to take photos of anything I've made so far this year, so instead I'm sharing one of my most successful projects of last year and some photos I took back in January. I use the word successful quite loosely as the process of making this dress was not straightforward! It was hard-won but I got there in the end and have worn it loads.

This dress was inspired by a number of dresses that Len Blake has made and looks so great in. I particularly loved her plaid one and the use of the plaid cut on the bias, so when I saw this linen on Fabric Godmother I knew immediately what I wanted to do with it! It's a lovely weight for a dress like this, lightweight with great movement but not so fine that it's sheer. It sewed and pressed beautifully and has washed really well, still looks good as new after 10 months or so of regular wear. Unfortunately, given that I think it was deadstock and I made this dress nearly a year ago, it's all sold out but I did spot that Merchant & Mills have some really gorgeous check linens in at the moment. Apologies to your bank balance.

The pattern is the Robin Dress from Liam Patterns. It looks like it should have been fairly simple to sew, right? On first attempt it did come together very nicely but then I put it on...and it was way too big!
I know my body and the common adjustments I need to make fairly well nowadays. So for a straightforward design like this I don't toile and instead pay close attention to the measurement charts and fit info and take some flat measurements of the pattern pieces to assess if any tweaks are needed. Perhaps with a new-to-me pattern company I should have been a little more cautious! Alarm bells should have rung when I went to check the finished measurements to see how much ease was built in. Instead of the usual bust, waist, hip. measurements the only finished measurements listed were for the size of the armhole, the depth of the neckline and the width of the hem. Unusual and not hugely useful. Particularly when some of those measurements (for the boat neck) were incorrect.
I plumped for the sizes corresponding to my measurements (8 at the bust and 10 at the waist and hip and hoped for the best, figuring the stretch in the bias gave a bit of wiggle room. I cut the midi length at the full length, I usually have to shorten but no length measurement was given so I played it safe.

My next problem came with the PDF. I wanted the length of view B but the necklines of view C. It's a big PDF with 70 pages and the diagram at the start isn't labelled or numbered so it took me some time to figure out which pages I needed to print. It's also not a layered PDF so it felt like I was printing a lot of pages I didn't need. I would have been great to have a list in the instructions detailing which pages to print for which view. Maybe I've just been spoiled by really great indie patterns in the past!
Once I finally had it printed the pages didn't line up correctly. I had to offset the pages by about 1/2" to get the lines to flow across the sheets - perhaps this is where my later fitting issues stemmed from?!

The assembly instructions were ok; fairly sparse and with some grammatical errors but if you've got some sewing experience to rely on it comes together. The one thing I did find odd is that there is marking on the pattern for the bust dart which I assumed indicated the tip of the dart - but the instructions tell you to sew 2cm beyond the mark. I wasn't entirely clear what I was supposed to be doing here as the illustrations showed a dart sewn in the regular fashion. The double ended ended dart on the back was marked with just a line and instructions to 'start 2cm above the top mark and stitch down and out 1cm from the centre mark' I understood it but a beginner would have struggled and it all felt a little inaccurate.
Writing this now it feels like a combination of all of the above could have resulted in my poorly fitting first attempt. It was big in every direction. It got put in the naughty corner for a while until I could face coming back to fix it! I don't even have any photos of what a mess it was, I was so frustrated by the whole process.
Writing this now it feels like a combination of all of the above could have resulted in my poorly fitting first attempt. It was big in every direction. It got put in the naughty corner for a while until I could face coming back to fix it! I don't even have any photos of what a mess it was, I was so frustrated by the whole process.

First I removed the facing to enable me to make the adjustments needed. I then took the shoulders up by and inch on the double. This helped straight away. I quite often shave off a little length at the should as I'm quite short between the shoulder and bust. Lifting the garment here often helps correct other fit issues as it brings the bust/waist/hip point up to sit in the right spot. After doing this I took the side seams in by 1/2" on the double all the way from the armhole to the hem - so 2" total! I had initially attempted some alignment across the side seams which would have been more pleasing to the eye, but the amount I had to take the side seams in rather scuppered that plan.

I'm much happier with the fit now, it skims the body but doesn't cling. It is still a little too big across the shoulders/upper chest as there wasn't anything I could do to bring in the width of the boat neck without adding a seam or unsightly dart down the front. It doesn't bother me when I'm wearing it but I feel like the neck could sit a little flatter. If the finished measurements included in the instructions for the neck were correct I could have made that adjustment at the start.

If I made a dress like this again (which I may well do as it's such an easy to wear, versatile style) I think I'd use binding as a facing to finish the neckline and armholes. I remember when I completed it I considered shortening/shaping the facing as it felt a little bulky but it obviously hasn't bothered me enough to actually change it. I had originally constructed it beautifully with french seams e.t.c but as you can see above I resorted to 'whatever the overlocker is threaded in will do' when I remade it!

The autumnal colours of the fabric lend themselves well to styling with boots, tights and knitwear too so I'm happy this this has become a dress I can reach for year round. All in all this project was a good lesson in patience and not giving up on a project that's not going the way you hoped! It also taught me not to dive in and trust the drafting and instructions of every new sewing pattern company that pops up. Anyone else feel that choosing patterns from designers you haven't used before (when there are now so many patterns available online!) is a bit of a minefield? I've been thinking a lot about this lately and will be back with some more on that subject soon.


It's a gorgeous dress despite everything you had to go through with the pattern. I think I've been quite cautious and gone for brands others have already used. Maybe I need to be braver!
ReplyDeleteI think maybe I need to do the opposite and be more cautious! Haha! I think I've got used to a really high standard of drafting and in depth, well thought out instructions - we're very spoilt by a lot of pattern companies in fact!
DeleteWhat a beautiful dress, I do wish I had your patience when working on a challenging project. Good luck with your surgery and recovery.
ReplyDeleteThank you very much!
DeleteIt didn't feel like I had much patience when I was frustrated in the moment! I think wanting to save the lovely fabric from going to waste is what motivated me in the moment
It certainly is a lovely dress! Frustrating journey, even for an experienced sewing like you! Good luck with your surgery. Heather in Colorado
ReplyDeleteThanks very much Heather.
DeleteI suppose we can't expect every sewing project to go smoothly can we!
Well done for persevering for what should have been an easy and quick make. Did you reach out to the designer at all? I think the fact that the pdf pages don’t align, that you end up printing unnecessary pages and that the pattern isn’t layered is unforgivable and sounds like it’s a pattern company to avoid
ReplyDeleteGorgeous dress that looks great on you! Glad you found the energy to remake it to fit you so well. You have been missed in the blogasphere! Hoping to see more posts, and very good wishes on your hand surgery.
ReplyDeleteFantastic dress! (in the end) I'm going to go through my stash of mags and envelopes and see if I can find something similar enough to just copy it that way. Different colours though, mine won't be an exact copy... I'm pretty sure there should be some 90s patterns that are nearly identical.
ReplyDelete