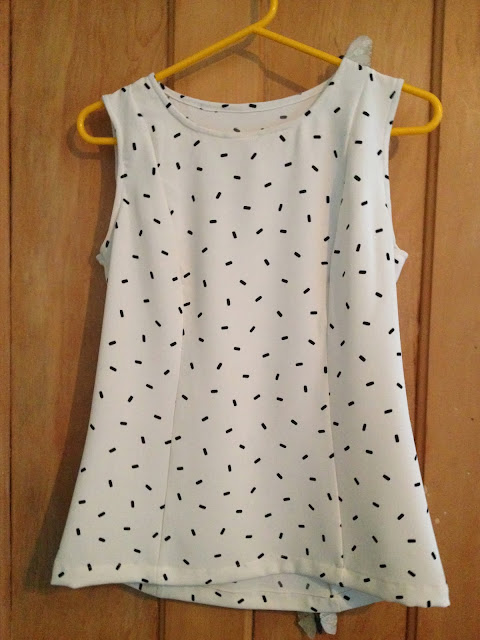
There has been a sewing frenzy going on around here for the last few weeks but I haven't been able to show you a lot of it. Expect a post early in 2014 full of the crafty gifts I've been working on this Christmas! I was itching to get back to sewing some clothes for myself but running out of hours before heading home for Christmas. I cut out a Papercut Patterns La Sylphide dress which has been in the works for ages, determined to make it up in time for the end of the sew along but was forced to admit to myself that it just wasn't going to happen before Christmas. I'm using a rather special piece of fabric too so decided rushing it would be a big mistake. I was desperate to finish one last project before the end of the year though so rescued this blouse which had actually been discarded in a corner as a sewing disaster.
It's a Sewaholic Pendrell made using some polyester crepe I got in UK Textiles on Goldhawk Road a while back. It was pretty pricey for a poly at around £10/m (I can't remember exactly!) but it was just too beautiful to resist. It's gorgeously soft to touch and has a lovely drape, it actually feels very similar to a wool crepe. Plus the print is perfect, simple enough to make up lots of different outfits but still interesting. I attempted to haggle but the shopkeeper was having none of it, telling me it was a Japanese crepe and that's why it was so expensive. If this story is true I may have to look further into these Japanese fabrics, I seem to remember hearing some very good reports about double gauze from somewhere!
Anyway, my disaster had nothing to do with the pattern or the fabric but rather my decision to combine the two and use view A of the pattern with the tulip style draped sleeves. The line drawing of this design grabbed my attention as soon as I received the pattern (it was a gift from my Mum which she picked up in Pins and Needles NYC during a trip she took to the Big Apple in the summer, wasn't it a great choice?! Thank you Mum!). I was delighted with the top all through making and it looked drop dead gorgeous on the hanger as you can see in this pic which you might have spotted if you follow me on Instagram.
However on me it was a totally different matter. In a fabric with this much body those lovely sleeves had far too much volume and stuck out around my shoulders in a style slightly reminiscent of an American Football player. Plus Sewaholic patterns are drafted for pear shaped ladies so the intention of these sleeves is to balance the width of the hips. It's a genius idea but I'm only slightly pear shaped and have a bit of a chest so those voluminous sleeves combined with my proportions were just all wrong. I think there's a chance the style might work with sleeves in a much lighter weight, perhaps in a chiffon matching the main fabric, and I kind of love that idea!
I actually completed this (with sleeves) back in September but it hung around waiting for it's problems to be rectified for so long purely because I couldn't bear to unpick my hard work! It was fairly obvious to me that the blouse would be beautiful without the sleeves, it's such a flattering pattern with those princess style seam lines over the bust and skims the body ever so comfortably. So all I needed to do was unpick the seams where the sleeves were attached and stitch them back up. However those sleeves with the many many pleats had taken SOME time, probably about half of the time it took to make up the entire blouse in fact!
 |
| Pleating the Sleeves |
As I normally do with any kind of darts or pleats I used tailors tacks to mark the tips, snipped a notch at the ends and then drew on the fold lines with tailors chalk. quite the lengthy process when there's 16 of these lines on each sleeve piece. I then took a considerable time pleating these together and making sure the spacing looked even. Don't get me wrong it's totally worth the effort because the finished effect of the draped sleeve is gorgeous, but the thought of unpicking all that was too much to bear!
When the memory of it's making was a distant enough thought and I summoned up the courage to unpick those sleeves it was actually quite a straight forward alteration to make. I had of course made it more difficult for myself by using french seams throughout initially. Although I love the clean finish of the french seams I think if I made this pattern again I'd try another method as because those central seams run directly over the bust any extra thickness in the seam allowance is a bit noticeable, particularly in this fabric which has some body. I think I might also go down a size if making again. I chose to cut a 6 (Sewaholic size) as I came up between sizes and was nervous about getting the top on and off with it's lack of fastenings if it did end up a little snug. I can pull this on and off with ease and think I could probably benefit from it being slightly more figure skimming so will try the 4 next time.
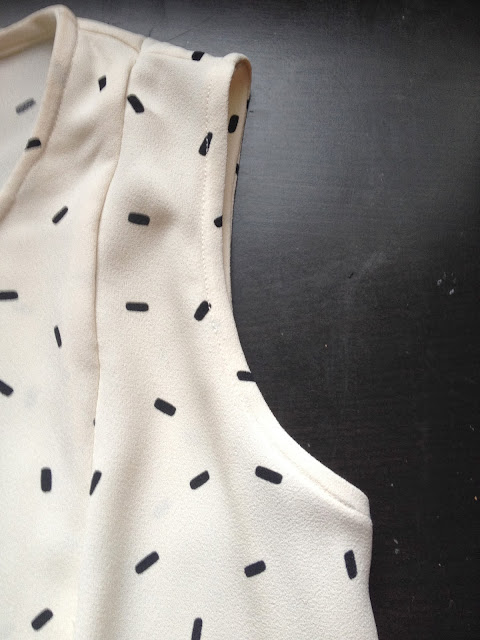
Yet again this is another pretty much perfect pattern from Tasia. The more Sewaholic patterns I use the more I realise at how good she is at understanding and designing for women's bodies and curves. As well as the style lines of the seams I love the extra long body length of this design, great for wearing with low waisted trousers or securely tucking in. The instructions were simple and thorough as usual and I love how the binding of the armholes and neck turned out.
 |
| Armhole Binding |
I'll definitely be making this pattern up again, maybe even as a base to try out my own ideas. It's such a classic and flattering cut, I think I need many more simple wearable items like this in my hand made wardrobe!


Good save! I too, hate picking out all my hard work, but this one was worth that effort. The fabric is pretty and the cut is gorgeous on you!
ReplyDeleteThank you! I've got a fair bit of wear out of it already so it's definitely feeling worth all that work and then undoing!
DeleteThis is a lovely fabric. I'm glad you worked up the nerve to fix it, but I am gutted on your behalf that the sleeves didn't work out. They look beautiful! Merry Christmas!
ReplyDeleteThey do look so beautiful on the hanger don't they?! I was so disappointed the first time I put it on! The fabric was a real find, one of those one's you can't resist buying even though it doesn't have a purpose yet!
DeleteThat fabric does look beautiful, and the finished blouse is lovely! Well done for actually getting round to unpicking it - it's so hard isn't it, you almost just want to keep it whole so you can admire all your hard work every so often! I look forward to seeing all your other makes!
ReplyDeleteThank you! It was so difficult to undo those sleeves, I was so pleased with the finish of them and how they looked on the hanger but forced myself to turn it into something wearable and much more practical
DeleteThis is lovely! It was well worth all the unpicking. The fabric is gorgeous, and I am in awe of your bias bound armholes, they are so neat!
ReplyDeleteThanks Lynne! I love a bit of bias binding and the loveliness of this fabric made me really try my best to get it just right!
DeleteThis top is so cute! I'm so glad you were able to save it!
ReplyDeleteThanks Sonja! It's not the version I was drawn to as it seemed so simple but the style lines are actually gorgeous, more to come!
DeleteThis is so lovely, and the fit is beautiful on you. Definitely worth the extra work revisiting!
ReplyDeleteThank you! It does seem worth it now and the fabric is dreamy to wear!
Delete