Thoughts on Sleeve Heads and Shoulder Pads
I posted my Electric Blue Biker Jacket version of the Pauline Alice Quart Coat a few weeks ago and said I'd be back to talk in more detail about the construction of the shoulders and sleeve heads. The shaping of these is probably the one aspect of the jacket that I'm most proud of. Which is surprising as they were the one element of construction that I was most concerned about! After setting in the sleeves themselves (probably my least favourite sewing technique but which went smoother than I ever imagined because of the beautiful crepe's response to shaping with steam) there was the question of how to tackle the sleeve heads and shoulder pads. I did a lot of research and experimentation so I thought you might be interested to read about that here.
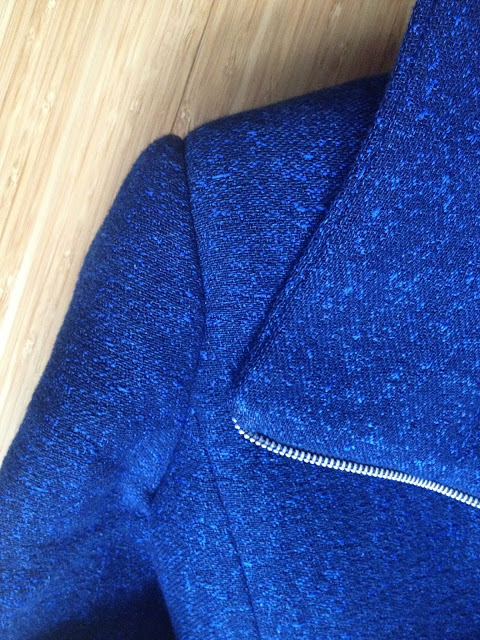
It was my first real experience of inserting either of these elements and I was slightly concerned about how extreme the effect of using both of them might be but after trying on the jacket before, after sleeve heads and then after shoulder pads I can say that they really make a noticeably beautiful difference. Sleeve heads on their own are like magic; filling and lifting the top of the sleeve slightly so it sits level with the shoulder instead of hanging limply down from the seam. This really effects how the whole sleeve hangs around the arm.
I bought my supplies from Macculloch & Wallis which is generally a failsafe option for any good quality haberdashery supplies, if a little on the expensive side. Their new store on Poland Street in Soho is pretty great by the way, so much more roomy and days to navigate plus closer to all the fabric shops on Berwick Street! They also have an online shop if you are based outside of London and need something a little unusual. This is what I bought for my sleeve heads. It comes on a roll so you can cut it to the length that you need. This does mean that they are rectangular though and a lot of the advice I could find online used shaped versions. I might try drafting my own next time as I came across a great post from Poppy Kettle about how she drafted her own using the sleeve pattern piece to give her the shape.

There were so many shapes and sizes of shoulder pads available at MacCulloch and Wallis I was a little overwhelmed! After trying out lots on my shoulders and weeding out the moulded and raglan options I'm fairly certain these are the pads I went for. They are actually surprisingly inexpensive and I'm glad I went to the effort of a special trip to buy these rather than the covered ones they sell in packs in John Lewis and some fabric shops. I think these provide a much better shape. The covered ones are more suited to using in dresses e.t.c when the pad is not concealed within the construction of the garment. Despite being really happy with these I might attempt to make my own from cotton batting next time as I found loads of tutorials on that when looking for advice on how to put them in!
I did a lot of research into how to insert both items and actually found it tricky to find clear instructions on either. It was the positioning I was most confused about rather than how to attach them; should the shoulder pad extend into the seam allowance of the armsyce and therefore into the head of the sleeve or should it butt up against the seam line? In the end I used a trial and error method to see which I thought looked best and left it butted up against the seam. Please fell free to tell me if I've got this completely wrong!
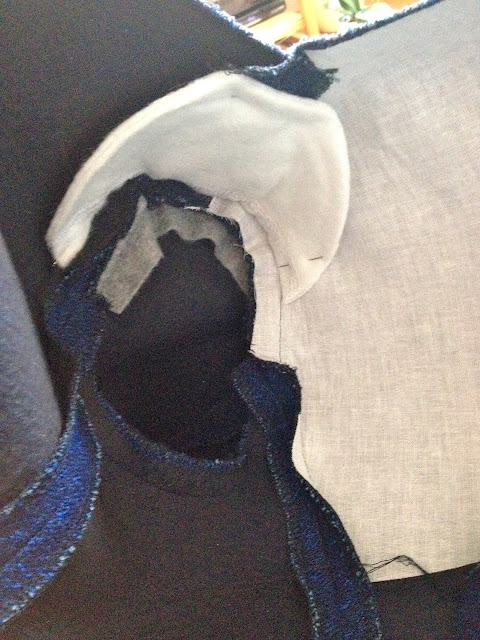
With the sleeve heads I took the advice of Clare Shaeffer in her book 'Couture Sewing - Tailoring Techniques' which I was lucky enough to receive from my brother last Christmas. I used 8" of sleeve head in each armhole, aligning the folded edge of the sleeve head with the edge of the seam allowance and positioning it so that there was 3.5" in front of the shoulder seam and 4.5" behind. I was still feeling remarkably unconfident that I was doing this correctly as when the seam allowance is pushed into the sleeve head it means you end up with a double layer where it folds back on itself (technically triple as the sleeve head already has a folded edge) and this combined with the seam allowances seemed rather a lot but looking at the fullness of the finished shoulder I'm sure I've got it right!

I hand stitched both the pads and heads in by hand after pinning them in the correct position and trying the jacket on. I stitched along the stitched line that was already there on the sleeve head, which was lined up with the armhole stitching line; just with a simple running stitch. The shoulder pad I loosely tacked in along the straight edge at the armhole and then at the shoulder seam closest to the neck. My research said that it was important not to stitch the pads in too firmly as they need to be able to move within the jacket to sit right on the shoulders.
What are your experiences with sleeve heads and shoulder pads? Have you got any tips or preferences to share with me?

I bought my supplies from Macculloch & Wallis which is generally a failsafe option for any good quality haberdashery supplies, if a little on the expensive side. Their new store on Poland Street in Soho is pretty great by the way, so much more roomy and days to navigate plus closer to all the fabric shops on Berwick Street! They also have an online shop if you are based outside of London and need something a little unusual. This is what I bought for my sleeve heads. It comes on a roll so you can cut it to the length that you need. This does mean that they are rectangular though and a lot of the advice I could find online used shaped versions. I might try drafting my own next time as I came across a great post from Poppy Kettle about how she drafted her own using the sleeve pattern piece to give her the shape.

I did a lot of research into how to insert both items and actually found it tricky to find clear instructions on either. It was the positioning I was most confused about rather than how to attach them; should the shoulder pad extend into the seam allowance of the armsyce and therefore into the head of the sleeve or should it butt up against the seam line? In the end I used a trial and error method to see which I thought looked best and left it butted up against the seam. Please fell free to tell me if I've got this completely wrong!


I hand stitched both the pads and heads in by hand after pinning them in the correct position and trying the jacket on. I stitched along the stitched line that was already there on the sleeve head, which was lined up with the armhole stitching line; just with a simple running stitch. The shoulder pad I loosely tacked in along the straight edge at the armhole and then at the shoulder seam closest to the neck. My research said that it was important not to stitch the pads in too firmly as they need to be able to move within the jacket to sit right on the shoulders.
What are your experiences with sleeve heads and shoulder pads? Have you got any tips or preferences to share with me?


Thanks for a peek into the process. I've made shoulder pads, but never with a sleeve head. Learn something new everyday! Your coat sleeves are perfect.
ReplyDeleteThanks Justine! I highly recommend the sleeve heads for the extra shaping and support they provide!
DeleteYour jacket turned out great! Shoulder pads and sleeve heads are a must for any tailored looking jacket. Even if you think you don't need them it makes a big difference.
ReplyDeleteFor a sleeve head you center it over your sleeve cap seam allowance and stitch it to the seam allowance, just parallel to the join seam, but very close.
For shoulder pads- extend 1 cm past the shoulder seam. Tack by hand at 4 positions- near the sleeve cap to the shoulder seam allowance, at each pointy end to armhole seam allowance (can be on the seam itself) and then the back end of the shoulder pad (towards the neck area).
Perhaps there are more couture methods, but this is what I have done for RTW suits and is quick and easy.
Those are great tips thank you so much! That kind of straightforward explanation was all I was looking for during my googling!
DeleteSuch gorgeously neat work! I've used sleeve heads twice before, on my pinstripe Burda jacket and my 'Dream Coat'. I didn't use special stuff though. I fashioned them out of some leftover brushed cotton as the vintage instructions said to use some soft wool fabric and that's the closest I got. Worked a treat though! I also peeked the pads a little bit over the seamline. :-)
ReplyDeleteOoo good to know! I'm definitely going to try making my own next time rather than splashing out! I was so apprehensive this time about even putting them in that I was too scared to make my own!
DeleteWow Fiona. Great work. What i can tell you is that my aunty Bi taught me to put headers in any jacket that had a set in sleeve, even without a pad, and she never bought anything - she liked to use a piece of soft jersey, doubled, or a piece of soft fabric that she would cut into a shaped piece, also doubled, cut on the bias (important) - and her jackets were always masterpieces. So that's what I do, and it always turns out great.
ReplyDeleteA soft piece of jersey sounds like a really interesting idea! Those are great tips Francesca, thanks so much. I'll particularly remember the cut on the bias gem!
DeleteIs it possible to attach the header if the garment doesn't have any lining?
DeleteIt certainly is as it is sewn to the seam allowances of the main body of the jacket rather than the lining. However you probably wouldn't want to leave them uncovered as they look quite raw and unfinished so I would recommend either lining or perhaps covering the headers themselves in a lining or even your fashion fabric to keep everything look neat and tidy inside
DeleteThat's a very impressive jacket. Thank you and the other commentees for the great tips. I have a biker jacket in my queue and found this post very useful.
ReplyDeleteThanks Debra! There's some great tips here in the comments so I hope you find them useful for your jacket, good luck!
DeleteReally informative poor thanks. I've made shoulder pads but never used a sleeve head, I will try next time and I'm saving your post to help. Do love your jacket, the zip looks especially impressive!
ReplyDeleteThanks mags, I love how the silver zips look against the blue! The sleeve heads make such a huge difference, even without the shoulder pads so definitely give them a try next time
DeleteSuch a helpful post. I've learn something new from you. Thanks for sharing! ;)
ReplyDeleteO great! I hoped it would be helpful to people if I just laid out exactly what I did and left it open to commenters to leave their advice as I had such a hard time finding any info!
DeleteReally interesting post! I've drafted sleeve heads out of cotton batting, which worked pretty well, but I think I've used shoulder pads twice and didn't love how they turned out. I'll be sure to reference this post if I try again!
ReplyDeleteI'm definitely going to try using cotton batting next time. You should give shoulder pads another chance, I was pleasantly surprised with these!
Delete