Mum's Charcoal Boiled Wool Cocoon Coat
Two coat posts in two weeks! This one is slightly different in that it was for my Mum not me and was A LOT less involved and complex than the tailored coat which I posted last week. You may remember from my post a few weeks back that I made that emerald green silk dress for my step sister's wedding last month. Shortly after she got engaged my mum and I were at the Spring Knitting & Stitching Show last year and chatting away about our outfits when she spotted a coat she loved made up on one of the stands. Ten minutes later she'd somehow managed to get me to agree to make it for her and we were walking away with a copy of the pattern. Of course me being me with a thousand things on my 'to sew' list I didn't actually get around to making it until January but I must say mum was very patient and trusted that I'd get it done in time. For some reason she didn't have so much confidence in me finishing my own dress!

The stand we were on was Little Woollie, whose patterns I wasn't even aware of at the time. They have a shop in Bromley where I used to live and I remember spotting it opening on my way past to the train one morning! Back then they didn't sell patterns and most of their classes and stock focussed on knitting so the discovery was a delightful surprise. This is their Cocoon Coat which I love the style of. It's got a slightly sixties Jackie O feel which suits my mum so well; I could see instantly why she was drawn to it. At this point in time I had very limited experience with sewing outerwear but I felt like this was a pattern I could handle as it is a straightforward shape with limited structure because of those lovely dropped shoulders. Another deciding factor was that the sample at the show fit mum perfectly so I could plough on and make it with no alterations or fitting needed. Plus we're a very similar size and shape so I could try it on as I went! The sample was made in a beautiful soft pink boiled wool and although there was another brocade version I couldn't get the thought of boiled wool out of my head. It is the perfect fabric choice for this pattern as it is warm enough for a coat, has enough body to emphasise the shape of the coat but also has enough softness and movement to flatter.

The wool we eventually chose was this grey melange from Dragonfly Fabrics. I love that it's not one flat colour but has a slightly mottled appearance that gives it real depth. It's lovely and spongy and mum picked the shade straight out of the bunch of swatches that I showed her. Mum wanted this to be a coat she could also get some wear out of after the wedding so making it in a classic grey (her favourite colour) was ideal. I knew it was going to sew up beautifully as I'd already worked with it to make my petrol blue toaster sweater. You will end up with a fluff covered sewing room but your machine and iron will love it. They also helpfully sent me samples of their newer viscose blend boiled wool which is slightly lighter with a really gorgeous drape. I'd definitely recommend both of them and also to get some swatches so you can accurately assess those beautiful colours.

I cut the size 10 and had just enough fabric with 1.75m at 130cm wide. I knew from my previous boiled wool experience that it is prone to both shrinking and stretching out. I gave it a good steam beforehand to preshrink it (I knew it would never be washed, if anything dry cleaned so this was all it needed). Then I used my walking foot, a ballpoint needle and a narrow zig zag to sew it up with the exception of the under-stitching along the pocket openings and facing. The boiled wool has a certain amount of mechanical stretch in it which is why I chose to use the zig zag stitch. This style obviously doesn't require any stretch but I didn't want stitches popping as it was pulled on and off. Do be careful when pressing as it is very easy to stretch it out at this point too, but that malleability can really work in your favour sometimes as beautiful shapes can be created with a good steam over a tailor's ham.

There is so much about the design of this coat to love. It's got a clean and simple appearance but actually has a lot of clever details going on. Those bracelet length sleeves and the darts at the hem are beautiful and really make the design, giving it the perfect amount of shape. I thoroughly enjoyed making it as it is interesting enough to keep me amused but didn't involve anything too challenging. Even setting in the sleeves is pretty straightforward as the dropped shoulder means the armhole is quite square and there is limited easing involved. It's lucky that it is a very simple coat as I did find the instructions quite limited with very few illustrations. Perhaps I have just been spoiled by how thorough some indie designers are nowadays with their additional tips and advice but I think a bit of prior coat making know-how really helped.

One thing I did really like about the instructions was how thorough they are when it comes to interfacing. They have you interface the whole hem, facings and pocket openings. I also added a small square behind where the buttonhole and button would be for strength and also to prevent this area stretching out. Rather than cut straight strips I used my pattern pieces to cut interfacing for the hem as they are slightly shaped. I used a fairly lightweight cotton fusible throughout to match the softness of the wool.
The pattern does include instructions for fully lining the coat but also suggests that you could omit the lining and bind your seam allowances for a fun finish inside. We both really liked the idea of this and I think boiled wool lends itself to this technique so this is the road we went down. The way the description is worded on the envelope led me to except that instructions for binding would be included but there's just one line at the end with the suggestion. A little guidance on when and where to bind wouldn't have gone amiss but it wasn't a problem and I managed to figure it out on my own. I think I just expected a little more for the £18 price tag.

Mum's dress was a maroon/purple so I chose a binding to match. I love how that pulled it together as an outfit; those little touches are totally a reason to make your own clothes! I actually bought readymade cotton binding from MacCulloch & Wallis for once as I needed so much of it. In the end I didn't quite have enough but luckily had some similarly coloured fabric in my stash and made an extra bit which I used on the armholes! I did have a bit of trouble with bulk in the armhole seams and when I first finished it it looked a little awkward from the outside in this area, like the thickness of the seam allowance and binding was stretching out the wool. After mulling it over for a while I unpicked the binding and heavily graded down the seam allowances before restitching the binding. This made the world of difference and the sleeves hang much more naturally now. If you are making the lined version I would recommend grading and notching this seam.
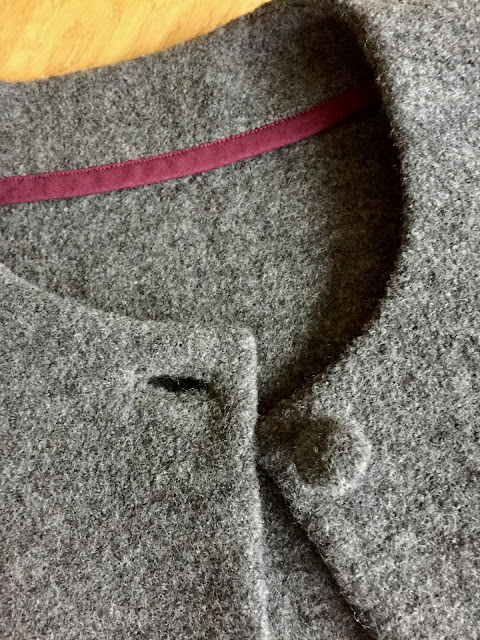
It is so easy to get nice clean edges and shapes with boiled wool. The facing sits so beautifully once graded, under-stitched and pressed. I love the shape of the neckline and the classy single button fastening. I chose to go the extra mile and do a bound buttonhole as I enjoyed the process of making them so much on my coat. Again I used the method in Claire Schaeffer's Couture Sewing Techniques after doing and practice one first. It came out so great in this wool! I knew it needed a fairly big button to balance out the look but couldn't find anything I liked to complement the texture of the wool. I decided to try my first self covered button and couldn't be happier with the choice! I was worried that the wool might be too thick but again it moulded beautifully. My button is a touch smaller than the pattern calls for and I really like it.

I did quite a lot of hand stitching as it was such a special project. Also boiled wool is super easy to hand stitch as its so straightforward to catch a few fibres at a time without the stitching showing through to the right side! I stitched the hem, cuffs and facing down around the neckline with a herringbone stitch behind the binding where you can't see it. A herringbone stitch allows for a bit movement which means the whole coat will hang and move a little more naturally. I also caught the pocket bags down to the centre front with little swing catches to keep everything in place.
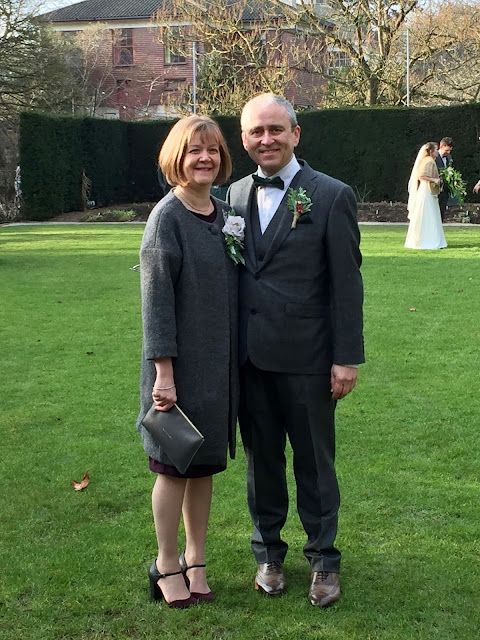
I am so very proud of what I achieved with this coat; proving yet again that working with quality fabrics and sewing for a loved one really makes you slow down and do the best job you can possibly do. Thinking about it there is only one tiny little thing that I am disappointed about in this. I followed the instructions to fuse a strip of interfacing along the pocket openings which is a great technique for adding strength at a stress point. However as I was making my version of the coat unlined you can see the interfacing in the seam allowance which rather spoils the effect of the beautiful binding. A very tiny detail that I can easily overlook at least! It made me really happy to see her looking so great and comfortable in it all day. It was lucky we chose the wool in the end as it was cold enough to snow the following morning!


So simple, but so elegant! I love the binding contrast.
ReplyDeleteThanks Heidi! Those are the perfect words to describe this design. The contrast binding is what really makes it I think
DeleteFiona, you should be proud! Your mum looks lovely in that coat, and so fashionable. It turned out beautifully. I bet she is proud of you, too. How lucky your mum is to have a daughter so thoughtful and so talented. Well done!
ReplyDeleteAh thank you that is such a lovely comment! I am really proud of myself for making this..there's something about being able to make something special for someone you care about that is really wonderful.
DeleteWhat a kind and loving thing to sew your mother a beautiful coat. I am sure she will think of her amazingly talented daughter every time she wears it. Sam the Aussie
ReplyDeleteThank you so much Sam, that's such a lovely thing to say! It made me feel so good to see her wearing it on the day
DeleteThis coat is really lovely! I especially love the binding
ReplyDeleteThanks Anna, I think the binding might be my favourite bit too! It's a shame she can't wear it inside out!
DeleteJust saw the teensy tiny little thumbnail of your Mum and immediately knew whose blog it was - you're so alike! What a stunning coat, the perfect storm of great pattern suited to the body and great fabric, needless to say great sewing skills too. Won't show my Mum, you'll make me look tardy!
ReplyDeleteHaha we are very alike indeed! I'm seeing it more and more nowadays! Yes I was so pleased with how the fabric worked with this pattern, it really emphasises the lovely cut and shape. Thank you
Deletelooks fab and i love the seam binding :)
ReplyDeleteThanks Helen! Me too. It was the perfect thing to tie everything together as an outfit
DeleteBeautiful coat, with lovely details.
ReplyDeleteThanks Kathy! It's a great design. I love those dropped sleeves, hem darts and the big single button
DeleteThis is gorgeous! Your mum and I share a style. I love those classic clothes, and this is something she will wear forever. What a lovely thing to do for a loved one. Now I need to make a coat for me! Boiled wool sounds like a good first coat fabric.
ReplyDeleteIt is a real classic isn't it?! It's got a slightly sixties vibe but yet feels so contemporary now. Hopefully the colour will also mean it sees a lot of wear. I definitely recommend this type of coat in boiled wool for your first one. It gives great shape and isn't too complex. Thank you!
DeleteHey there, just wanted to say thank you for your review of our coat pattern, it was really fair and we have taken on board all of your comments for future improvement. The cocoon coat was our very first pattern and we absolutely love the design, so we are chuffed to bits that you do too. You have sewn it beautifully, I love the contrast binding. We would like to send you another of our patterns to try, so email me your address & I will pop it in the post. homemade@littlewoollielondon.co.uk kindest.
ReplyDeleteHi Trudy, thanks so much for taking the time to read my post and comment! I'm glad you found it a fair review, it's a fantastic pattern which I found really straightforward to follow the instructions for. I didn't know it was your first design, that's amazing!
DeleteYou're on such a winning streak at the moment, Fiona! Yet another incredibly tasteful and expensive-looking garment. So good!
ReplyDeleteThanks Nina! I've been sewing some big old complicated time consuming projects so I'm so happy that they have turned out just as I imagined and that the hard work is showing through. I love a sewing challenge!
Delete