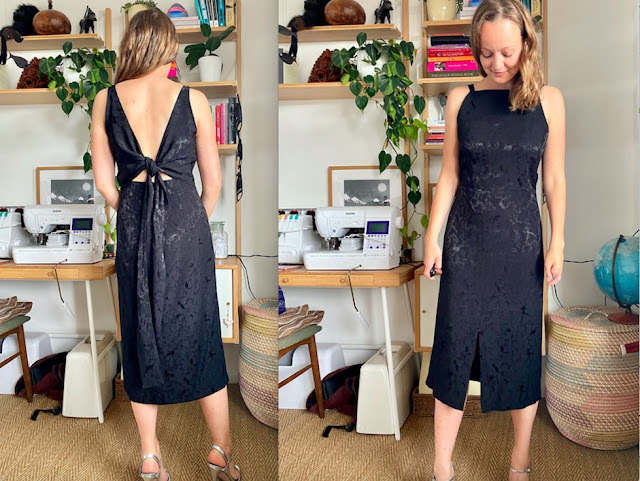
Black Lichen Jacquard Axis Dress
Papercut Patterns describe the Axis Dress as their ode to Audrey Hepburn. When I picked this combination of fabric and pattern I certainly had high hopes for creating the kind of failsafe little black dress which would become the perfect choice to wear to so many events for years to come. Have I succeeded? I'm delighted to say I think so! This dress is absolutely going to be my go-to for all kinds of occasions. It feels modest whilst still a little sexy. Dressed up but understated. Interesting but o so timeless and chic. I just love it.
I've sewn this up in black viscose jacquard from The Fabric Store. I know a lot of people when they hear 'jacquard' or 'brocade' think of heavier, stiff upholstery fabrics but this jacquard is like liquid. This dress works great in a fabric with structure or crispness but I love that this particular fabric is heavy enough to hold the shape of the dress but brings some movement. It looks like it might be quite thick with a bouncy sort of texture to it but actually it is completely smooth and has a beautiful fluid drape. So dreamy.
The Fabric Store describe the design of the jacquard weave as 'lichen' and it is the most perfect word for it. It has a kind of organic and mossy feel. The combination of matt and satin texture in the jacquard gives a real depth to it and the dense black of the satin areas look almost like spongy velvet from a distance. So much more interesting than a flat black fabric. I actually couldn't decide which side of the jacquard to use as there is no clear wrong or right and both are equally beautiful. I went for the less shiny one in the end. The other side has a bolder pattern in the jacquard which felt a bit more modern, almost animal print and I wanted to keep this classic.
I generally get away with only a few small fitting tweaks with most pattern companies. However, I've learnt from prior experience that Papercut Patterns take a little bit more work as they are drafted for a slightly different body shape than mine. I started with cutting the size 3 and grading out to between a 3 and 4 at hip. The 3 should just about fit my measurement at the hip but I have found some Papercut designs to be a little snug in this area in the past. I also find them quite long in the body and I'm both petite and short in the body, particularly between the shoulder and bust. I often find I need to take straps up. There is no lengthen/shorten line on the pattern but after holding the front bodice pattern piece up to myself and deducing that the dart point could do with coming up a little, I decided to shorten it by 3/4" between the bust and the armhole. Shortening it at this point worked well for the back too as it was high enough not to affect the waist ties. I shortened it then redrew the curve of the wrap.
I wasn't dead set on 3/4" being the right amount but I figured I could adjust the length slightly when attaching the shoulder strap. However, because the shoulder straps are attached early on and because of the nature of the wrap style of the dress it is hard to try on and assess the length until the dress is pretty much done! You could go back in and alter the strap length at the end but it would be a fiddle. Luckily my 3/4" adjustment has turned out perfectly! I've definitely got so much better at knowing the proportions of my own body in the last couple of years.
I am delighted with the fit. The wrap nature of the bodice does make the fit a bit more forgiving but in general it skims the body with the perfect amount of ease. It fits so well over the hips and seat and because of the wrap at the back there is no need for a sway back alteration which is a problem I sometimes encounter. Now I've worn it a little bit to take photos I think I could do with taking in the centre back waist a little as the zip sits away from the body and fights against the wrap bodice a little. The neckline lays flat across the collar bones and I find the height of it very elegant. I thought I was going to want to take a huge chunk off the length of the skirt to suit me as the skirt panels looked really long but I actually really like the elegance of the long midi length! I ended up only taking off 2" to achieve a true midi length on my height.
Next time (as I really want to make another of these in a colour for daywear) I might make the opening in the side seam for the waist tie a little shorter. At the moment the tie slips down a bit as you wear it and you get a little peep of skin which really shows up against the black. The dress can also be worn simply tied at the back rather than wrapped around which I rather like but then the slit is left open exposing your skin up the side seam. I think you probably have to decide which way you are going to wear it and sew up the side seam if you want it tied at the back.
This was such a fun project to sew because of the unique construction. I love making something a little bit different. I've tried to get some flat photos of the dress that give you an idea of the unusual way it comes together. The only change I made to the instructions was to stay-stitch along those long back edges (maybe not necessary in a more stable fabric but definitely needed in this slippery viscose) and to also under-stitch them. The instructions suggest under stitching the front as far as possible but don't mention it at the back and I think it is really useful to keep that curved wrap edge sitting nicely without the lining peeping out. I did this by sewing along the long curved edge, then under stitching before sewing the armhole and bottom seams rather than sewing all of them at the same time as instructed. To prevent the lining peeping out along the bottom edge I offset the raw edge of the shell fabric slightly inside the raw edge of the lining fabric when I sewed them together so that the lining was naturally pulled to the inside of the garment when turned right side out.
As I approached the home straight when making this I just had a feeling it was going to be a winner. So much so that I even went back and unpicked the top of the side seams to get a better match at the underarm. I also gave it the special treatment and hand sewed the hem and front split. I'm so happy that finished result 100% lived up to my high hopes. This fabric has been sitting in my stash for well over a year with a note pinned to it saying 'Axis Dress' and I'm slightly kicking myself that I didn't get around to making it sooner!


You're absolutely stunning! The fabric and the pattern work so well together, and the dress looks so luxe.
ReplyDeleteOut of curiosity -- is the dress bra-friendly when you tie it at the front?
Ah thank you Kiran! I'm so pleased with how well this turned out and the fabric worked with the pattern.
DeleteSorry I took so long to get back to your question - I have trouble with the blogger comments sometimes! I think it potentially could be if you had a bra with straps in just the right place. I can get away with one of my regular bras under it but think I will end up wearing it with a strapless one
So classic and elegant! Hope you can safely wear it to an appropriate occasion before too long...
ReplyDeleteThanks Nina, me too!
DeleteGorgeous, as always!
ReplyDeleteLooks like a perfect match of pattern and fabric. Very elegant on you!
Thank you very much! I had a good feeling about using this fabric for the Axis and I'm so pleased it turned out well!
DeleteYou look beautiful great job : )
ReplyDeleteThanks Liz!
DeleteReally gorgeous! The fabric is wonderful. Successful all the way around.
ReplyDeleteThank you. I'm really pleased with how it turned out and am so in love with the fabric
DeleteLovely fabric/pattern combination. Could you add a little modesty panel type thing under the side slit to stop the peek of skin? Like a fly zip guard or the panel behind hook & loop buttons.
ReplyDeleteThat is a great idea! I'm sure I could work that out, even if it just meant hand stitching a 'fly guard' on. Thanks very much!
Delete