
The garment I've got to share with you today has been a long time coming! Years in fact. Bra sewing has been on every project list for the year/season or goal setting challenge like #makenine on Instagram for quite some time. I'm not quite sure why but other garments seemed to continually jump ahead it in the queue. I think my delay was partly due to it being a project out of my comfort zone; when sewing time is limited and I'm tired it always seems easier to sew something that feels familiar and I can complete satisfactorily without too much thought. What is also really off-putting about bra sewing is gathering all those different supplies! What with different elastics, fabric, lining, hooks and eyes, straps and sliders I never felt like I had quite all the right matching bits and pieces for a bra. However, in the end I decided my first bra was never going to be perfect anyway so just dove on in there with what I had accumulated.

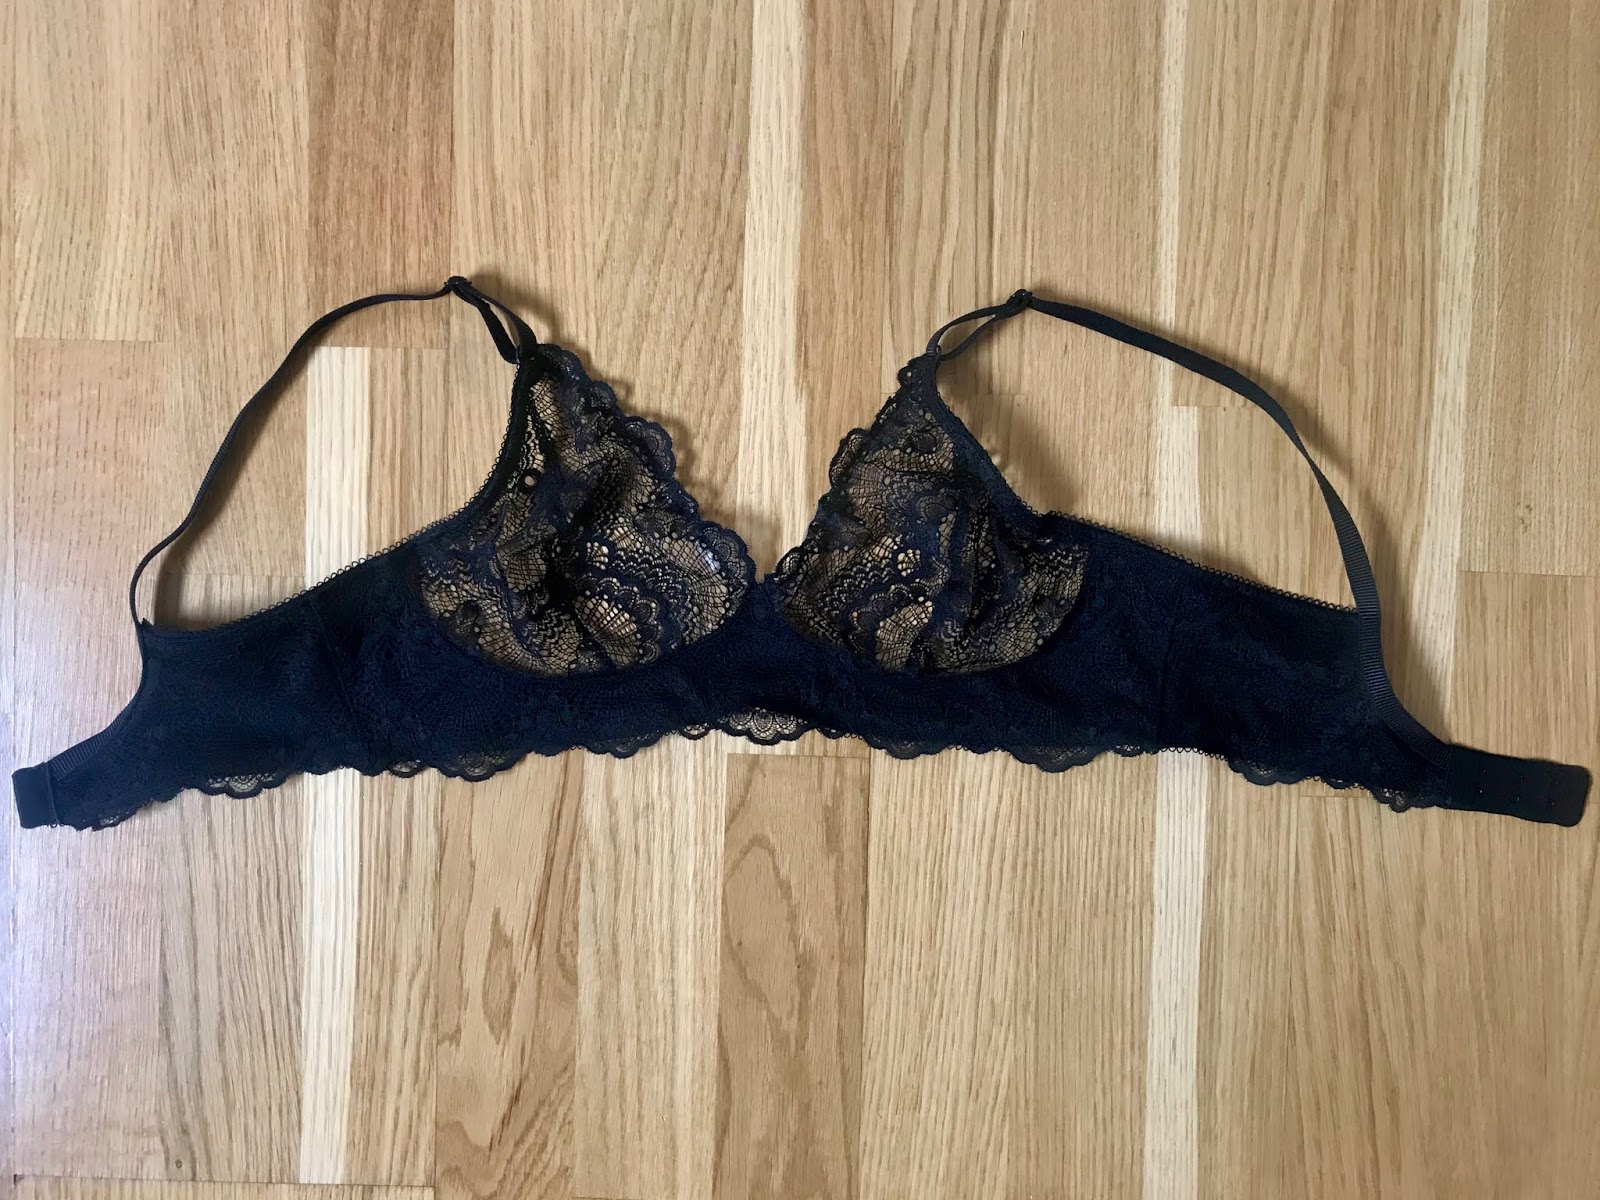
My first bra is not perfect indeed but I'm actually very pleasantly surprised with what I've managed to make. I've wanted to make the Cloth Habit Watson Bra since it's release and thought it would be a good starting point as the stretch aspect makes the fit more forgiving and it doesn't involve underwires or too much structure. I've had this black stretch lace stashed away for absolutely ages and actually forget where I got it from beyond a stand at one of the Knitting & Stitching shows! It was quite narrow at 25-30cm wide and I had just enough to cut my pieces out of a metre. I fell in love with the Art Deco/early 20th century feel of the pattern in this lace and of course wanted to make use of the beautiful scalloped edge. However trying to incorporate the scallop was obviously going to make my first foray into bra making much more complicated as I was veering off piste!

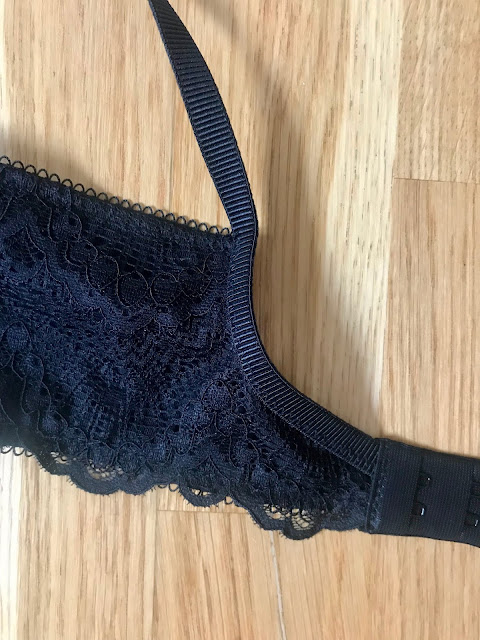
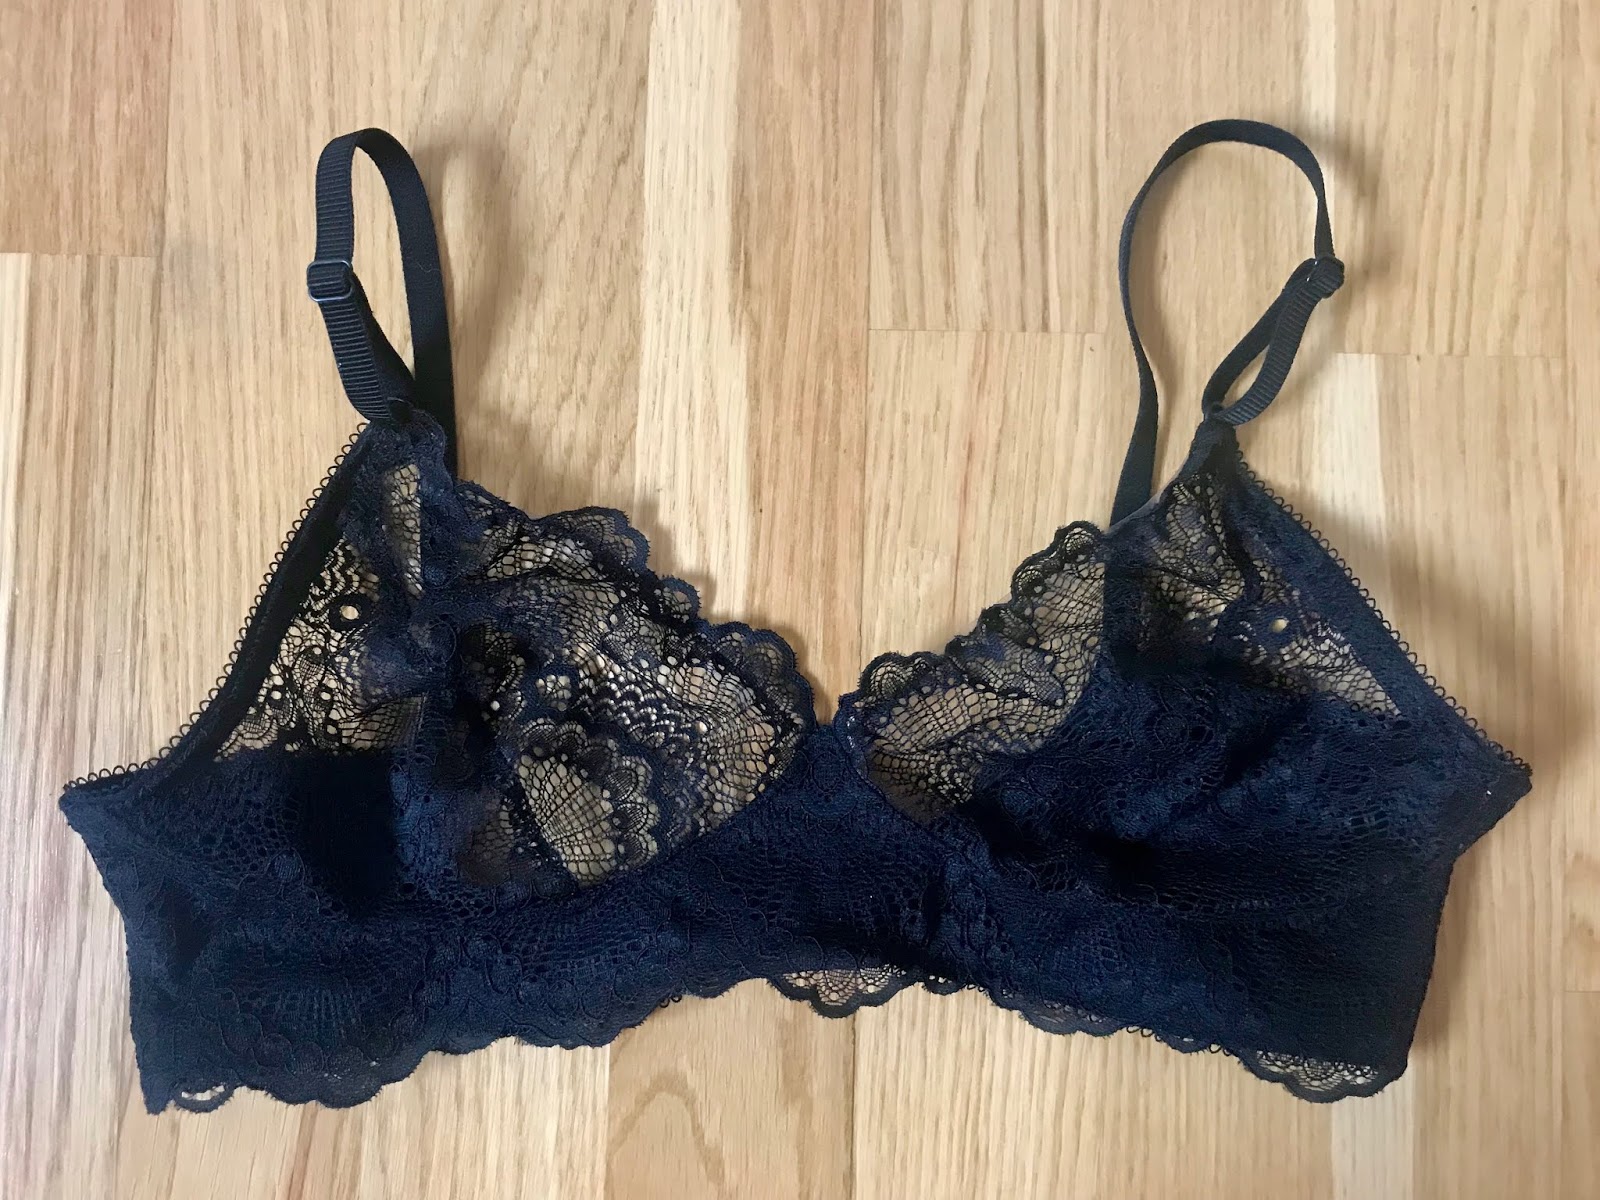
But my advice to beginner sewers is always to make exactly what you feel like and to make things you are excited about rather than things you think you should make because they are marked 'beginner'. You might not get great results first time but you'll put your all into making it work and learn a huge amount along the way. So ahead I went with the scallops! There's actually a great post on the Cloth Habit blog as part of the Watson Sew Along about how to cut a scalloped lace cup which involves slightly altering your inner cup pattern piece. I wanted to use the scallop along the lower edge of the band too so had a look at Lladybird's post about how she made and finished the edges on her lace version. To finish the lower edge I basted the power mesh and the lace pieces together as instructed then simply stitched the elastic to the inside above the scallop and trimmed away any power mesh beneath the elastic to leave a beautiful delicate scalloped edge. I used the wider picot elastic despite not being able to see the decorative edge as it was all I had to hand with the soft plush back. As I didn't turn that bottom edge in as instructed this left my back edge too wide for the hook and eye pieces so I had to trim down the top edge as advised in the instructions.

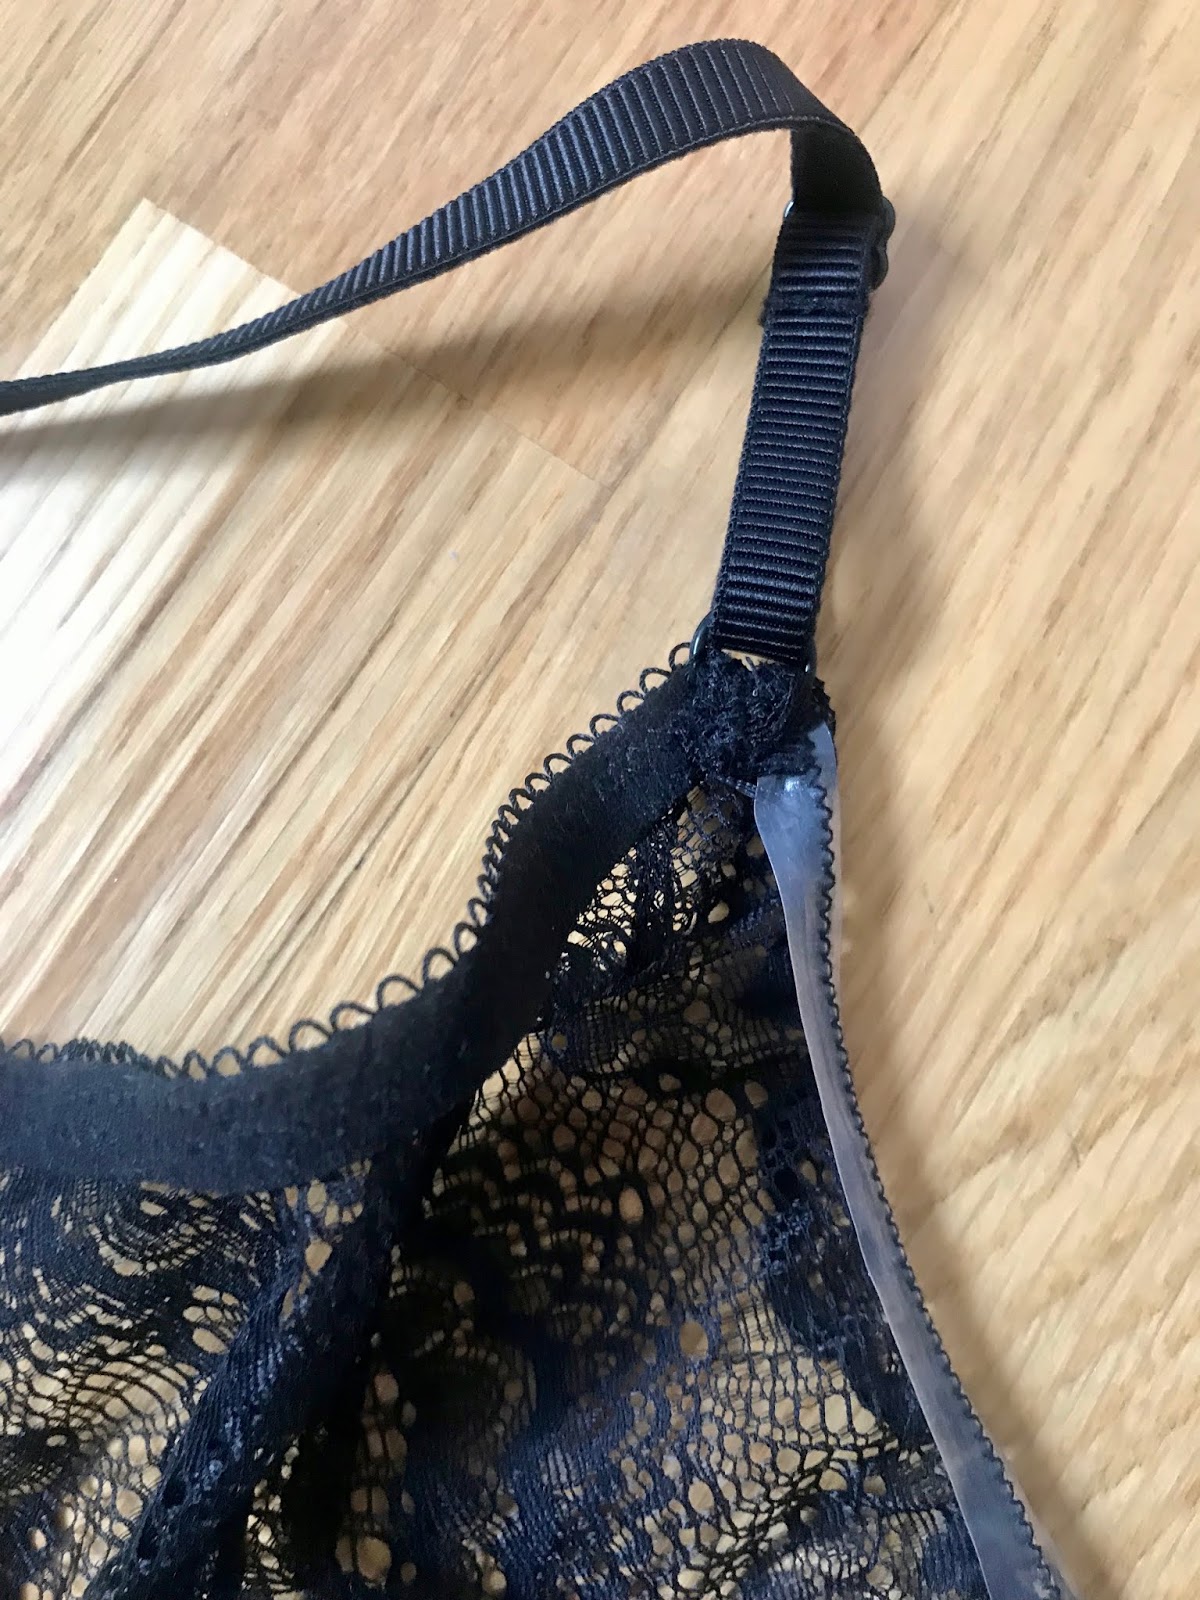
I'm not loving the look of the clear elastic which I used to finish the inner edge of the cup. It needs an elastic here to stabilise it and prevent it stretching out over time but I couldn't use picot as recommended as I wanted to retain the scalloped edge. Perhaps if I'd had a narrower clear elastic I wouldn't mind as much? Lauren used a strip of selvedge from her power mesh which looks much better but as I was working with scraps I didn't have any selvedge left. Does anyone have any alternative finishes they can recommend? I'd also appreciate any advice on where you lingerie makers in the UK get your fabrics and notions from, particularly kits that contain everything you need as this would definitely encourage me to make more lingerie! Sewing Chest is great but I'd like to shop around for a bit more variety.

The only thing I'm not happy about in terms of the scallop is where the cup meets the ring at the top. Because you've straightened out the front edge of your pattern piece and lined up the scallop so low points of the curve meet at the centre front you loose the narrowing of the cup at the top point and I ended up trying to pull quite a wide piece of scallop through the ring. It doesn't look terrible but isn't ideal. Next time I'd also cut longer pieces for the straps. I cut the recommended 18" after measuring myself but think I'd like a little more room for adjustment.

For lining the cradle I used some fairly thick black power mesh I had left over from sewing activewear and as my lace is quite delicate I used it to line the rear band pieces too. The strap elastic, plush back picot elastic and hook & eye piece all came in a kit from Sewing Chest which again I've had for absolutely ages. The one missing piece of the puzzle were the sliders and rings which I got from MacCulloch and Wallis in the end because I happened to be nearby, but they do only stock black and white in two sizes. I definitely made my life easier by using black; trying to find all those elements to match in any other colour but white must be a nightmare and I'm no natural with a dye pot!

I usually love doing really accurate sewing, particularly since I got my Brother Innov-is machine as it makes it so easy, but to begin with I found working with those tiny seam allowances quite frustrating. It took some patience, practice and a bit of time with the unpicker before I was achieving results I was happy with. Again I probably didn't make my life easy with this buy choosing such a fine lace for my first attempt! The bra uses 1/4" seam allowances throughout which makes sense for such small pattern pieces but is much smaller than I'm used too. It took me a while to figure out how to keep to that distance accurately as the markings for such small seam allowances are quite hidden on the machine. There is one before the bobbin cover and one behind the foot but no groove in the standard machine foot to line up with. I could have done with a marking on the bobbin cover and in hindsight could have used masking or washi tape to create a temporary one.
I found stitching along the elastic, particularly where the strap elastic joins the back band in a curve quite difficult to keep in the right position and have had a bit of a wobble here and there. Hopefully practice witll make perfect with that one. I love that as the lace is black with a bit of texture you can't see the stitching in it at all. Very forgiving for those first time wobbles! I was nervous about inserting the cups correctly but that was actually really easy and I love the shape. I'm particularly proud of how neat and tidy the central tip of my cradle is where the two cups meet. I make full use of the needle up/down button when sewing tight little points and corners like this. Pressing this button rather than using the foot allows you to sew individual stitches so you can stop exactly at the point you want then pivot rather than accidentally going a stitch or two too far.

Carmen gave me a great tip on Instagram to make sure I held my thread ends as I started sewing. One of the biggest problems I encountered was getting a seam started without the thread knotting up or fabric getting sucked down into the throat plate. My F420 sewing machine has a thread cutting function which means the bobbin thread is hidden in the machine after cutting the last seam you sewed. I found I needed to ignore this function and lift the presser foot and snip my own threads like I used too so I could leave two nice long thread tails and get my next seam started smoothly.

I treated this as a bit of a wearable toile and sewed the whole thing on my machine for accuracy rather than risking mistakes with such fine seam allowances on the overlocker. The visible seam allowances inside are trimmed right down and topstitched so I don't really mind the finish. I also think the seam through the cup which is just lace is much less visible and bulky this way. My duck billed appliqué scissors where invaluable when it came to trimming down seam allowances in such delicate fabrics.

I cut the 34D after measuring myself and following the pattern instructions which is different to my RTW size but I trusted the pattern and it has turned out pretty great. The band is slightly roomy and the centre of the cradle doesn't lay quite flat but I think this is more to do with the way I applied the elastic than the sizing of the pattern. I think I didn't stretch the plush back elastics enough (as the armhole gapes a bit too) and stretched the clear elastic too much as it bunches up a little! Working with the elastics and figuring out how tight to apply them as I sewed was probably the hardest part of this project and is something I hope will improve with more practice; I was getting more of a feel for it towards the end.

The pattern was fantastic and I highly recommend it as a starting point for any beginner lingerie sewer. The sizing information is particularly good and I like that the PDF pages you need to print for each size are clearly listed (also that it is such a small pattern to assemble!). The instructions were thorough and well illustrated. I didn't find myself left feeling unsure at any point; which is saying something considering bra making felt so foreign to me when I started! I particularly appreciated the tips scattered throughout the instructions and also the inclusion of recommended stitch type, length and width when zig zagging. Thanks to Amy my bra turned out great!

I expected bra sewing to rapidly become an addiction but can't say it is yet. I did enjoy the process and was amazed at how quickly and neatly it all came together once I got going but I feel like I've still got a lot to learn. I've got some white stretch lace for a second Watson but think I'd actually like to try a version in a plain mesh so I can finish all the edges as the pattern intends and work on my accuracy. Then I'd love to move on to more structured non stretch bras using the Orange Lingerie patterns as I have Norma's book already and think working through that could really help. I certainly won't be leaving it years before my second bra anyway!
My first bra is not perfect indeed but I'm actually very pleasantly surprised with what I've managed to make. I've wanted to make the Cloth Habit Watson Bra since it's release and thought it would be a good starting point as the stretch aspect makes the fit more forgiving and it doesn't involve underwires or too much structure. I've had this black stretch lace stashed away for absolutely ages and actually forget where I got it from beyond a stand at one of the Knitting & Stitching shows! It was quite narrow at 25-30cm wide and I had just enough to cut my pieces out of a metre. I fell in love with the Art Deco/early 20th century feel of the pattern in this lace and of course wanted to make use of the beautiful scalloped edge. However trying to incorporate the scallop was obviously going to make my first foray into bra making much more complicated as I was veering off piste!

But my advice to beginner sewers is always to make exactly what you feel like and to make things you are excited about rather than things you think you should make because they are marked 'beginner'. You might not get great results first time but you'll put your all into making it work and learn a huge amount along the way. So ahead I went with the scallops! There's actually a great post on the Cloth Habit blog as part of the Watson Sew Along about how to cut a scalloped lace cup which involves slightly altering your inner cup pattern piece. I wanted to use the scallop along the lower edge of the band too so had a look at Lladybird's post about how she made and finished the edges on her lace version. To finish the lower edge I basted the power mesh and the lace pieces together as instructed then simply stitched the elastic to the inside above the scallop and trimmed away any power mesh beneath the elastic to leave a beautiful delicate scalloped edge. I used the wider picot elastic despite not being able to see the decorative edge as it was all I had to hand with the soft plush back. As I didn't turn that bottom edge in as instructed this left my back edge too wide for the hook and eye pieces so I had to trim down the top edge as advised in the instructions.

I'm not loving the look of the clear elastic which I used to finish the inner edge of the cup. It needs an elastic here to stabilise it and prevent it stretching out over time but I couldn't use picot as recommended as I wanted to retain the scalloped edge. Perhaps if I'd had a narrower clear elastic I wouldn't mind as much? Lauren used a strip of selvedge from her power mesh which looks much better but as I was working with scraps I didn't have any selvedge left. Does anyone have any alternative finishes they can recommend? I'd also appreciate any advice on where you lingerie makers in the UK get your fabrics and notions from, particularly kits that contain everything you need as this would definitely encourage me to make more lingerie! Sewing Chest is great but I'd like to shop around for a bit more variety.

The only thing I'm not happy about in terms of the scallop is where the cup meets the ring at the top. Because you've straightened out the front edge of your pattern piece and lined up the scallop so low points of the curve meet at the centre front you loose the narrowing of the cup at the top point and I ended up trying to pull quite a wide piece of scallop through the ring. It doesn't look terrible but isn't ideal. Next time I'd also cut longer pieces for the straps. I cut the recommended 18" after measuring myself but think I'd like a little more room for adjustment.
For lining the cradle I used some fairly thick black power mesh I had left over from sewing activewear and as my lace is quite delicate I used it to line the rear band pieces too. The strap elastic, plush back picot elastic and hook & eye piece all came in a kit from Sewing Chest which again I've had for absolutely ages. The one missing piece of the puzzle were the sliders and rings which I got from MacCulloch and Wallis in the end because I happened to be nearby, but they do only stock black and white in two sizes. I definitely made my life easier by using black; trying to find all those elements to match in any other colour but white must be a nightmare and I'm no natural with a dye pot!

I usually love doing really accurate sewing, particularly since I got my Brother Innov-is machine as it makes it so easy, but to begin with I found working with those tiny seam allowances quite frustrating. It took some patience, practice and a bit of time with the unpicker before I was achieving results I was happy with. Again I probably didn't make my life easy with this buy choosing such a fine lace for my first attempt! The bra uses 1/4" seam allowances throughout which makes sense for such small pattern pieces but is much smaller than I'm used too. It took me a while to figure out how to keep to that distance accurately as the markings for such small seam allowances are quite hidden on the machine. There is one before the bobbin cover and one behind the foot but no groove in the standard machine foot to line up with. I could have done with a marking on the bobbin cover and in hindsight could have used masking or washi tape to create a temporary one.

I found stitching along the elastic, particularly where the strap elastic joins the back band in a curve quite difficult to keep in the right position and have had a bit of a wobble here and there. Hopefully practice witll make perfect with that one. I love that as the lace is black with a bit of texture you can't see the stitching in it at all. Very forgiving for those first time wobbles! I was nervous about inserting the cups correctly but that was actually really easy and I love the shape. I'm particularly proud of how neat and tidy the central tip of my cradle is where the two cups meet. I make full use of the needle up/down button when sewing tight little points and corners like this. Pressing this button rather than using the foot allows you to sew individual stitches so you can stop exactly at the point you want then pivot rather than accidentally going a stitch or two too far.

Carmen gave me a great tip on Instagram to make sure I held my thread ends as I started sewing. One of the biggest problems I encountered was getting a seam started without the thread knotting up or fabric getting sucked down into the throat plate. My F420 sewing machine has a thread cutting function which means the bobbin thread is hidden in the machine after cutting the last seam you sewed. I found I needed to ignore this function and lift the presser foot and snip my own threads like I used too so I could leave two nice long thread tails and get my next seam started smoothly.

I treated this as a bit of a wearable toile and sewed the whole thing on my machine for accuracy rather than risking mistakes with such fine seam allowances on the overlocker. The visible seam allowances inside are trimmed right down and topstitched so I don't really mind the finish. I also think the seam through the cup which is just lace is much less visible and bulky this way. My duck billed appliqué scissors where invaluable when it came to trimming down seam allowances in such delicate fabrics.

I cut the 34D after measuring myself and following the pattern instructions which is different to my RTW size but I trusted the pattern and it has turned out pretty great. The band is slightly roomy and the centre of the cradle doesn't lay quite flat but I think this is more to do with the way I applied the elastic than the sizing of the pattern. I think I didn't stretch the plush back elastics enough (as the armhole gapes a bit too) and stretched the clear elastic too much as it bunches up a little! Working with the elastics and figuring out how tight to apply them as I sewed was probably the hardest part of this project and is something I hope will improve with more practice; I was getting more of a feel for it towards the end.

The pattern was fantastic and I highly recommend it as a starting point for any beginner lingerie sewer. The sizing information is particularly good and I like that the PDF pages you need to print for each size are clearly listed (also that it is such a small pattern to assemble!). The instructions were thorough and well illustrated. I didn't find myself left feeling unsure at any point; which is saying something considering bra making felt so foreign to me when I started! I particularly appreciated the tips scattered throughout the instructions and also the inclusion of recommended stitch type, length and width when zig zagging. Thanks to Amy my bra turned out great!
I expected bra sewing to rapidly become an addiction but can't say it is yet. I did enjoy the process and was amazed at how quickly and neatly it all came together once I got going but I feel like I've still got a lot to learn. I've got some white stretch lace for a second Watson but think I'd actually like to try a version in a plain mesh so I can finish all the edges as the pattern intends and work on my accuracy. Then I'd love to move on to more structured non stretch bras using the Orange Lingerie patterns as I have Norma's book already and think working through that could really help. I certainly won't be leaving it years before my second bra anyway!


