Wednesday 27 February 2013

Dip Hem Scout Tee

Diary of a Chainstitcher Black Hammered Silk Grainline Studio Scout Tee with Dip Hem

I am really, really pleased with this project as it is my first attempt at really playing around with an altering a pattern. I made my first version of Grainline Studio's Scout Tee a while back and although I'm happy with it and it gets regular wear I wanted to make a few adjustments to the fit. Firstly I found the size I cut (a 4) to be perfect across the shoulders and around the waist but a little tight across the bust. The armholes also felt a little small and the length was a little short for my personal taste; great for tucking into skirts but on the short side for wearing with jeans. Before I started this version, I shook of my impatience to start sewing, and traced the size 4 pattern pieces onto a large piece of paper. I then increased the width across the bust (grading down to the usual size waist) and depth of the armholes slightly. I then cut and spread on the 'lengthen here' line to add just an inch front and back.

Diary of a Chainstitcher Black Hammered Silk Grainline Studio Scout Tee with Dip Hem

I wasn't yet sure what fabric I wanted to make this in, probably a lightweight printed cotton similar to my first. Then when out and about shopping for work one day I came across this remnant of black hammered silk at a bargain price in Biddle Sawyer Silks on Berwick Street. I knew instantly the type of top I wanted it to be and thought the Scout Tee pattern might be just the place to start. After making my alterations for a slightly looser fit all I really needed to do was create the dip hem which I simply drew on by eye. I didn't want too extreme a dip so just made it 2 inches longer at it's lowest point. I'm pretty happy with this aspect of it as it means I can still tuck it in if I want to.

Diary of a Chainstitcher Black Hammered Silk Grainline Studio Scout Tee with Dip Hem

I'm really chuffed with the finished result and love the relaxed, loose feel of the top but I'm wondering if the drape might have turned out just a smidge more flattering if there was slightly less fabric involved around the waist. I wonder if this is to do with the increased width to accommodate the bust and if next time I should try using just the adjustments to the front pattern piece and keep the back slim?

Diary of a Chainstitcher Black Hammered Silk Grainline Studio Scout Tee with Dip Hem

Anyway, I think that's nit picking!

I expected this fabric to be a complete nightmare to work with and while the cutting was a little difficult it wasn't as bad as I had built it up to be in my head and for some reason my machine absolutely loved this stuff! Maybe it was something to do with the hammered texture helping it to get a grip but it just glid through with no slipping and sliding about.

Diary of a Chainstitcher Black Hammered Silk Grainline Studio Scout Tee with Dip Hem

The fabric for this project was the perfect opportunity for me to try out a new technique and a new little gadget for my machine! After the success I had with the invisible zip foot I bought last month I got the bug and treated myself (or rather my Janome) to a rolled hem foot after watching some very helpful YouTube clips on how to use them. It wasn't quite the success of the zip foot but still had me squealing! I need a little more practice to get used to how much fabric to feed into the magical turning part of the foot as in some places I gave it too much to cope with and there are some raw edges poking out but it got better as I went along! Just look at how narrow and professional looking that hem is! I think hemming this slippery silk along the curve of the dipped hem would have been an absolute nightmare without it. I also used a rolled hem on the sleeves.

Diary of a Chainstitcher Black Hammered Silk Grainline Studio Scout Tee with Dip Hem

For the first time I tried setting in my sleeves on the flat, before I sewed the side and underarm seams. I don't find setting in sleeves too complicated usually I just wanted to try this new technique because I was using my favourite french seams everywhere else and wanted to attempt them around the armholes. It was much easier than I had expected thanks to some reassurance that it WAS possible from Jen at Grainline's tutorial. I'm so pleased that the whole of the inside of my garments can now be finished in this beautiful fashion! As far as setting the sleeves in flat goes, I didn't find it any more or less difficult than the traditional method to be honest.

Diary of a Chainstitcher Black Hammered Silk Grainline Studio Scout Tee with Dip Hem

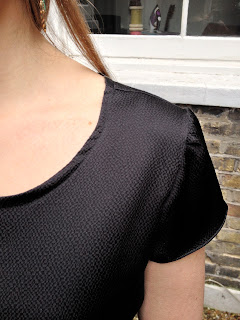
I found the neckline the most difficult part of this project. I really liked the bias tape facing on my first version so decided to stick with it on this. I had an inkling that making bias take with the slippery hammer silk was going to be a nightmare and considered using bought bias tape as an easier alternative. But the cotton bias tape was much stiffer than the silk and I wanted to keep the soft drape throughout so gritted my teeth and went for making my own. The actual making of the tape wasn't too bad thanks to my trusty bias tape making tool and a hot iron. Attaching it was not so straight forward. I used soooo many pins to put this in and still it was impossible to keep nice and straight and even. I did the best I could and think the end result is ok but it does sit away from the body at points and shows a bit of a twist whereas my first version sits nice and flat all the way round.

Diary of a Chainstitcher Black Hammered Silk Grainline Studio Scout Tee with Dip Hem

I can see me getting a lot of wear out of this top; the relaxed style and dip hem make it great to wear with jeans and boots but the elegance of the fabric means it could also be a great evening option. It looks great tucked into my Charlotte skirt anyway!

Diary of a Chainstitcher Black Hammered Silk Grainline Studio Scout Tee with Dip Hem

(apologies if you can't make out a lot of the construction details in this post. Black, particularly this shiny black is so hard to photograph!)

Sunday 24 February 2013

My Second Charlotte Skirt!

Yes, I like this pattern so much I made two in quick succession!

Diary of a Chainstitcher Floral Brocade By Hand London Charlotte Skirt sewing pattern

I liked my first version, but this one I LOVE! I'm absolutely delighted with the way it turned out; I think I've got the fit a bit better, the length just right and I made a bit more of an effort with the finishing on this one. It feels like a really special skirt because of that extra bit of effort and yet still completely wearable for all different occasions!

Diary of a Chainstitcher Floral Brocade By Hand London Charlotte Skirt sewing pattern

I actually had this silk brocade in mind for my first Charlotte skirt for the sewalong but walked away from it when I saw the £16 per metre price tag in Borovicks on Berwick Street (I love that shop by the way!). I thought I would need at least 2 metres for the skirt so I just didn't feel confident enough in my sewing skills to be cutting into that total expense of fabric just yet. However about halfway through making my first Charlotte I realised that I was going to love this pattern and if I didn't add the peplum or ruffle I could get away with just a metre of fabric this width. Suddenly £16 for a new skirt didn't seem so bad! So off I trotted back to Borovicks and voila!

Diary of a Chainstitcher Floral Brocade By Hand London Charlotte Skirt sewing pattern

As the circles in the pattern are laid out fairly regularly in stripes I did consider for quite some time making the effort to match up the pattern at the seams but as it was such a detailed pattern I thought this might be quite difficult to get right, and would require more of my scant metre of fabric. In the end I decided the detail of the pattern made it random enough to get away with not matching, but did try to line up the rows and looking at the side seam in the picture above I think i got away with it!

Diary of a Chainstitcher Floral Brocade By Hand London Charlotte Skirt sewing pattern

The invisible zip again went in like a dream using my lovely new invisible zip foot. If I were to make this again I would like to work on my construction of the tab closure feature at the back of the waist. I think this time I managed to get a crisper square edge to the tab but it still doesn't naturally line up quite right where it overlaps the other end of the waistband. I think this is to do with not being accurate enough with my seam allowances when creating the tab and then attaching the waistband to the skirt. It's just a couple of millimetres and not that obvious when fastened but I know it's not quite right and it bugs me!

Diary of a Chainstitcher Floral Brocade By Hand London Charlotte Skirt sewing pattern

I used a big popper to fasten the tab again and because this fabric has a bit more body than the denim for my first version the end of the tab doesn't lie quite flat. I might change it to two smaller poppers nearer the corners to hold it down more effectively.

Diary of a Chainstitcher Floral Brocade By Hand London Charlotte Skirt sewing pattern

I'm really pleased with the extra work I put in on the insides. I find it so satisfying when I know it's all been done as best it can be! I used a hong kong/bound seam finish with some bought black bias tape (I haven't quite got the patience to make enough bias tape to be finishing seams!) Doesn't it look lovely with the black and white fabric? I've tried various different methods of transferring pattern markings to my fabric recently and think out of everything I prefer the traditional old tailors chalk and tailor's tacks to mark the points of the darts. Accurate, simple and effective. your can still see my pink chalk marks for the dart legs in the pic below!

Diary of a Chainstitcher Floral Brocade By Hand London Charlotte Skirt sewing pattern

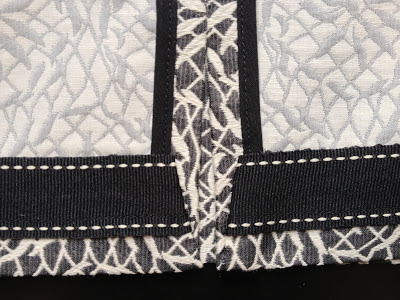
I was tempted to just turn and machine stitch the hem but this time I put in the time with the hand stitching. I found some perfect black and white grosgrain ribbon in my stash to edge the hem with and love the finished look. I machine stitched this to the outside of the raw edge of the skirt, pressed it inwards and slip stitched around. It did take an episode of 'The Walking Dead' to do so and another episode for slip stitching the waistband down, but it's quite therapeutic I find! (the hand-stitching, not 'The Walking Dead'...)

Diary of a Chainstitcher Floral Brocade By Hand London Charlotte Skirt sewing pattern

Although my first Charlotte skirt is easy enough to walk about in (considering it's a pencil skirt) I wanted to work on the fit of the lower portion this time so decided to add in the back vent. I was really happy to have the sewalong from the ladies at By Hand London to follow at this point as I'm not sure I would have achieved quite as neat a finish as you see above without their guidance! The mitred corners were quite tricky with the added bulk of the bias tape on the seam and the width of the ribbon on the hem but I'm so pleased with how neat it looks. I will admit I had to give it a couple of tries though; the first time one corner ended up a noticeable amount longer than the other!

Diary of a Chainstitcher Floral Brocade By Hand London Charlotte Skirt sewing pattern

By Hand London announced the other day that the Elisalex dress sewalong will be starting on 11th March. I've got pattern and fabric ready and can't wait! They also gave a little sneaky peak of their next pattern release; I can't wait for that either!

Diary of a Chainstitcher Floral Brocade By Hand London Charlotte Skirt sewing pattern

I'm off to swan about like a lady in my lovely new skirt now! Have a good start to the week everyone!

Sunday 17 February 2013

Ever wanted to see inside a Dior Evening Dress?

I've been working at the National Theatre's Costume Hire Department (where I used to work full time) for the last couple of weeks and made an exciting discovery when going through a rail of new stock one day which I thought you may be interested in seeing here on the blog. This evening dress while gorgeous at first glanced on closer inspection was very stained and in clear need of a bit of attention. I opened it up to see what could be done to rescue it and discovered this...

Diary of a Chainstitcher: Inside a Dior Couture Dress

Wowzer! I had in my hands a real piece of designer history! We think it must have been donated to the theatre by some kind soul who could no longer had use for this beautiful piece but wanted it to go to a good home. I love thinking about who first bought this and where they wore it and what the complete outfit was like!

Diary of a Chainstitcher: Inside a Dior Couture Dress

We decided that, although the full skirted silhouette suggests 1950s at first glance, this is more of an early 1960s gown because of the style of the high waistline. It looks to me like something that might be worn to a debutantes' ball. Even though the silk is now very stained you can tell the quality of it at first touch. Isn't it the most gorgeous colour! We couldn't find a word to accurately capture it because of the way it changes in the light. In the picture above it looks ivory, in the picture below of the detail at the back it looks more silver/mauve and in other lights it appears quite pink.
Diary of a Chainstitcher: Inside a Dior Couture Dress

Diary of a Chainstitcher: Inside a Dior Couture Dress

Those pleats into the centre back waistband add further fullness to the skirt and are just gorgeous in that duchess satin. And I imagine on the shaping under the bust in the picture below is very flattering.

Diary of a Chainstitcher: Inside a Dior Couture Dress

So yes the outside is very beautiful; classic, elegant, sophisticated and fashionable. But it's the inside where the fun really begins for us seamstresses! I tried to get as many good pictures of the construction details as I could. Apologies if they don't show up brilliantly, I only had my phone available to snap with! This dress is now though in stock at the hire department along with many other beautiful examples of construction so if you want to take a closer look all you have to do is call up to make an appointment to look around for research!

Diary of a Chainstitcher: Inside a Dior Couture Dress

When you first open it up you instantly get an idea of just how much work has gone into making this dress. I imagine it would have been commissioned by the wearer for a particular ball/event and was fitted perfectly for her. The construction of the outer gown itself is beautiful, underlined in silk organza to help hold the shape. But underneath that, as you can see in the picture above is attached another entirely more complex dress consisting of the layers and layers of petticoat and a boned mesh bodice; sort of like a softer, contemporary version of a period corset. The top of the bodice is bound in the same duchess satin as the exterior of the dress which I think is a lovely touch.

Diary of a Chainstitcher: Inside a Dior Couture Dress

The closer you look the more of an idea you get of the hours that must have gone into this. There's a huge amount of hand stitching; as you can just make out in the picture below, the entire organza lining is blind stitched to the main fabric. I love that the lining is organza as it means you really can see all the construction details; such as these notches made in the seam allowance around the armhole. You can just about make out the two layers of main fabric and underlining here too.

Diary of a Chainstitcher: Inside a Dior Couture Dress

The image below is of the waist seam. Here it looks like some adjustments have been made to the fit to take it in a little at this point. There are a few different rows of machine and hand stitching as well as tell tale signs of uneven seam allowances and things not matching up quite right. It's not what you'd expect from this quality of garment and the rest of the dress is constructed imaculately. I wonder if these alterations were made to accommodate the changing shape of the original wearer or to fit a new owner? Perhaps this dress was passed on from mother to daughter?

Diary of a Chainstitcher: Inside a Dior Couture Dress

The dress fastens down the centre back with a lapped metal zip as was common at the time. Plastic zips and invisible zips weren't around yet! I love the metal zips, to me they seem to indicate a sign of times when garments were made to last.

Diary of a Chainstitcher: Inside a Dior Couture Dress

Now onto the petticoats. the beautiful shape of this dress is achieved by many full layers of quite stiff petticoats. Working from outside to inside, first you have the main fabric of the dress itself; underlined and lined.

Diary of a Chainstitcher: Inside a Dior Couture Dress

Then you have a soft, smooth petticoat layer which helps the main fabric lay flat and smooth and also to move freely on top of the other petticoats and not catch as you moved about. (I'm assuming this was important as the state of the stains under the arms indicates a fair bit of dancing and fun being had in this frock!) I couldn't quite place what fabric this layer is (image below), but it felt like a silk of some kind. Enclosed in the wide hem is horsehair braid. As the fabric of this layer is so fine and soft this technique helps it keep it's fullness around the hem.

Diary of a Chainstitcher: Inside a Dior Couture Dress

Finally come three tiers of net petticoats. These are much stiffer than the first petticoat layer and really give the skirt it's body. The hems of each of these tiers also had a form of horsehair braid attached, the likes of which I had never seen before! Isn't it unusual? It was about 3-4" wide.

Diary of a Chainstitcher: Inside a Dior Couture Dress

This picture below hopefully gives you a better idea of just how many layers and how much fabric was involved in the skirt of this dress. Just look at the lengths of painstakingly hand stitched hem!

Diary of a Chainstitcher: Inside a Dior Couture Dress

I've one final beautiful touch to point out to you in the image below. The straps of the under bodice appeared to be of a very fine, almost wired cord which would have dug into the shoulders I imagine quite painfully! These straps have therefore been enclosed in a loose, narrow silk tube to make them a bit softer on the skin. Another indication of the thought and time that went into making this dress just right. And an indication of how expensive it must have been bought new, I wish I could see it in it's freshly made glory!

Diary of a Chainstitcher: Inside a Dior Couture Dress

I hope you've enjoyed this peek inside a vintage designer ball gown as much as I did!

Liebster Blog Award

I love finding out that there are people who actually enjoy reading my blog! I'm always delighted when I have a new follower or comment so I was delighted when a comment popped up on the blog from Hazel at Disaster in a Dress informing me she'd nominated me for the Liebster blog award. Thank you very much Hazel, lovely to meet you and your blog!


The award rules are as follows:


  • Nominees must link back to the blogger who awarded them
  • Write 11 random facts about yourself
  • Answer 11 questions asked by the blogger who nominated you
  • Nominate 11 new blogs and ask them 11 new questions
I'm awful at listing things about myself so I have instead decided to list 11 interesting facts I learnt at the V&A talk I went to last week about Restoration Make-Up:

Credit: janeaustensworld.wordpress.com
  1. The white colour of the face and red cheeks fashionable in that era were achieved by the use of 'paint'. The most popular (and expensive) form of this was 'Venetian Ceruse' which, you've guessed it, came from Venice.
  2. The ceruse was lead based and lots of people during this period (both men and women) died of lead poisoning after using these paints. They knew that this is what everyone was dying of but they continued to use the paints as being fashionable was SO important at this time.
  3. The paint came in the form of a powder which could be mixed with flower waters or greases and applied as a paste or was also used in its dry form for powdering the huge wigs of the time.
  4. The poisonous nature of the paint caused all sorts of problems, which other popular beauty techniques of that era were invented to combat. For example it would make your hair fall out, making the wig an ever more popular practical as well as fashionable choice.
  5. The lead paint also caused your teeth to fall out so people often wore wooden false teeth (or a porcelain set for a very special occasion if you were very wealthy). They also put a small cork ball in each side of the mouth (called plumpers) to fill out the cheeks which appeared sunken with no teeth behind.
  6. A rabbit's foot (considered a lucky token at the time) was often used as a sponge/brush to apply the red paint as rouge. Alternatively 'spanish wool' could be used to achieve the same colour.
  7. Double chins and big false eyebrows were considered very fashionable and beautiful at this time.
  8. At some points it was considered stylish to give your paint a sheen by wearing an egg white wash over it. This made it even stiffer than usual and if you laughed your paint would crack and bits of it may fall off!
  9. If you were lucky enough to still have your hair it would be built up over cushions and dressed with feathers. Once powdered and dresses it would stay that way until it cracked and you would need to sleep with your head on a little block to preserve it's shape.
  10. A feature of make up from this era you may recognise are the small black patches worn on the face and decolletage. These were often cut out of velvet or taffeta and stuck on with a mastic.
  11. The patches were often used to cover up pock marks and bad skin caused by the lead paint but their positioning is also said to convey a message:
  • corner of eye = passion
  • centre of right cheek = gayness
  • centre of left cheek = I have a lover
  • upper lip = kisses
  • side of nose = sauciness
  • forehead = majesty
I hope you all found those facts as interesting as I did! These are the questions Hazel asked:

1. What is your favourite project that you've made? (sewing, knitting e.t.c)
It is still most definitely the Lonsdale dress I made to wear to my cousin's wedding last year. I was so pleased with the finish I achieved on it and felt very proud to be wearing a hand made outfit!

2. If you could live anywhere in the world where would it be?
This is a REALLY tough question. I want to go everywhere! I think out of the places I have been so far though I would have to say New York.

3. Online fabric shopping. Yes or No?
I'd like to say yes as it seems so easy, you can see the exact fabric content and most sites have a good description of the weight and drape along with suggestions of suitable purposes. However, I still much prefer being able to touch a fabric and test the drape myself.

4. What essentials could you not leave your house without?
Top of that list would have to be my iPhone, although I'm kind of ashamed to admit how addicted to it I am! I had to go out without it the other day when a software update went a bit wrong. I felt SO lost without it and realised how many things I rely on it for. I couldn't tell the time, look on a map to see where I was going, look up the train times home and of course I missed catching up on blog reading using the bloglovin' app on the train!

5. Who are your fantasy dinner party guests?
Oo another tough one. Audrey Hepburn. Fearne Cotton. Manolo Blahnik. Edith Head. Johnny Depp. Harvey from Suits.  Mary Berry. I could keep going and going but I think I'll stop there!

6. What inspires you to craft?
Seeing what everyone else is making on their blogs of course!

7. What is your most visited website?
Recently it has to be Tom & Lorenzo's Mad Style posts about the costumes in Mad Men. I discovered them when searching for inspiration for Julia Bobbin's Mad Men Dress Challenge 2 and they are just fascinating. Well worth a read and a look at the pictures!

8. What are the top 5 most played songs in your iTunes/music library?
I don't actually use my iTunes that much (because I steal my boyfriend's humungous music collection!) and I was kind of dreading looking in case it was something really embarrassing but it's actually ok!
1. All My Life - Foo Fighters
2. Dog Days Are Over - Florence and the Machine
3. Bubbles - Biffy Clyro
4. Bonkers - Dizzee Rascal
5. Red Flag - Billy Talent

9. What is the background on your desktop/phone home screen?
Both of them are actually pictures from the London 2012 Olympic Opening Ceremony after I worked on it last summer. There's some pretty special memories associated with those pics!

10. What is your favourite TV programme?
Well now this answer probably changes almost weekly! I think a constant favourite has to be Mad Men but recently my boyfriend and I have been watching old episodes of the BBC's Luther and I absolutely love it.

11. Do you prefer working with stretch or woven fabrics?
I'm still yet to try working with stretch/knit fabrics so I'm going to have to say woven. Stretch is definitely on the radar for this year though!

On to my nominees, I'm sure many of you have been nominated for this before so please don't feel you have to do another post but I just wanted to nominate you anyway as I love your blogs!:

6. Jane at Handmade Jane
7. Evie at Pendle Stitches
8. Julia at Secret Life of Seams
10. Joanne at Stitch 'n Witter
11. Marie at A Stitching Odyssey

I know I'm meant to make up 11 questions to ask you but I thought Hazel's were pretty brilliant for getting to know someone so I'm going to ask the same. I hope you don't mind Hazel!

1. What is your favourite project that you've made? (sewing, knitting e.t.c)
2. If you could live anywhere in the world where would it be?
3. Online fabric shopping. Yes or No?
4. What essentials could you not leave your house without?
5. Who are your fantasy dinner party guests?
6. What inspires you to craft?
7. What is your most visited website?
8. What are the top 5 most played songs in your iTunes/music library?
9. What is the background on your desktop/phone home screen?
10. What is your favourite TV programme?
11. Do you prefer working with stretch or woven fabrics?

Right well I'm off to finish off a couple of half done projects. Please do check out these lovely blogs I've nominated and have a wonderful Sunday!

Wednesday 13 February 2013

Valentino: Master of Couture at Somerset House


Credit: uk.lifestyle.yahoo.com

Last week I visited the Valentino: Master of Couture exhibition at Somerset House (half price ticket offer available on Groupon if anyone is interested!). I really enjoyed the visit and was overall impressed with the way such a large quantity and variety of garments were displayed. The first part of the exhibition was about Valentino's career and included many artefacts from throughout his life. I particularly enjoyed the opportunity to see some of his sketches from the 1960s/70s in this section.

The main bulk of the exhibition is in one long room and is were almost all the garments are on show. There is a lovely neutral tone to the whole exhibition space which I think worked to make the dresses the feature of the room (although it would be hard to detract from them!) and also to give the whole room a feeling of elegance and glamour. I really enjoyed the fact that there was a range of dressing spanning the whole of his long career and that the diversity of his designs was really clear to see from the items chosen. I half expected the exhibits to be displayed in chronological order but they were in fact mixed up and grouped more randomly by colour and style which worked really well in my opinion. Valentino's work has been so varied throughout his entire career it could have been too much of a mishmash in date order! To give you a good a quick indication of the date of each gown the mannequins are colour coded by decade; excellent idea! The curators also used a technique which I have not encountered before to provide attendees with written information about each garment. Each mannequin wore a disk on their wrist with a number which corresponded with a description in the exhibition guide book which is handed out free on arrival. I thought this was BRILLIANT as when exhibitions are quite busy (which this was) it sometimes can be difficult to pause long enough at a point where you can read a placard next to a display. However, as it was so easy to read up on each dress I would have liked a bit more information on each one. The write ups were basically just a visual description of each garment with a date, although some did describe particular techniques used and a couple included who wore them.

Credit: iwantyoutoknow.co.uk

I loved the design of having the dresses exhibited as if members of the audience at a catwalk show, with the walkway for the viewers as the central catwalk. It gave the visit a real sense of occasion and I liked the idea of the garments being shown in the environment they originally would have been seen. The hand written name labels on the empty chairs with names of fashion icons and celebrities who have worn Valentino was also a lovely touch.

I did however wish it was possible to see more of the garments. It's difficult to achieve but I always go to fashion and costume exhibitions and wish I could see the back or sides of the dress (as well as the inside construction details but I think I might have to keep dreaming on that one!). The mannequins (which it has to be said didn't always fit the dress particularly well) were arranged in a variety of poses so some of the dresses you could see the back or side of, but then you couldn't see the front. These dresses are so unbelievable you want to see every inch of them because it is clear that careful thought has gone into the design of every inch of every item.

Credit: stylesight blog

This is the main thing that I picked up on during my visit, that I think Valentino's couture style can be described as using and designing every single part of the item. Every neckline, hem, sleeve incorporates and new and unique style or technique. The dart placement, hem length and shape, fastening, decoration, colour - every element of every single dress in that exhibition was completely different from the next. Plus I decided that he REALLY can design a back! The backs of the dresses that you could see were beautifully creative in their construction and decoration, which I think serves to prove his design of every inch further as this is so often a neglected part of design.

Credit: guardian.co.uk

This dress in particular grabbed my attention as being beautifully and cleverly designed. I thought of it as a modern twist on a Tudor period dress (funny that it caught the costume girl's attention hey?!) The fabric has a really period feel which I think works beautifully with the style of the fitted bodice and underskirt visible through the open centre front panel of the overskirt which was a popular design feature during this time and also throughout the 18th century. The addition of the sable fur around the armholes is also a genius touch and nod to period details. The unusual neckline, wide decorative and sleeveless design bring it completely up to date in fashion as an evening gown though.

As they were all couture dresses I didn't find a lot of the dresses inspired my own sewing in terms of copying techniques or design (slightly too advanced for me perhaps!) but there were a few things which caught my attention and got the creative juices flowing. In particular there was a very wearable simple cream wool shift dress which had three tiers with a scalloped edge to each tier and the hem. I've seen tutorials online about how to create a scalloped edge and after seeing this dress I may well experiment with this style in future.

Credit: Style.com & Getty

The final section of the exhibition had a brilliant installation explaining some of the more unusual couture sewing techniques used in Valentino's designs. As well as a sample and written explanation of each technique there were 'how to' videos about most. You can imagine how fascinating I found this! Some of the techniques just seemed impossible even with a how to video but there were a couple which I might actually like to give a try - only if I've got A LOT of time on my hands though! The one which I really liked the effect of was 'Pieghe Voltate' as pictured above on a Valentino dress worn by Dita Von Teese. It involves folding back the ends of strips of the main fabric (usually silk) to reveal a contrasting facing.

Perhaps Julia Bobbin's Mad Men Dress Challenge No. 2 will provide me with the opportunity to make something a bit special and try something like this out!

Sunday 10 February 2013

A Charlotte Skirt


I've been following (as closely as possible!) the By Hand London Charlotte Skirt Sewalong and just about finished my trial version in time for Tuesday's press night of the show I've been working on. The fact that I wore it to press night kind of proves how happy I was with how it turned out!

I really enjoyed the step by step process of the sewalong, it slowed me down and stopped me from making the silly mistakes I make when I'm just trying to get something done as quickly as possible. The girls at By Hand London included some great tips and tricks in their posts and explained each step in just enough detail to be helpful. I can't wait for the Elisalex dress one now, I've got fabric ready and waiting!

I chose to use some stash fabric for my first attempt; even though I was itching to use a beautiful brocade. It's a fairly fine teal denim with a little bit of stretch which I picked up for probably about £2 a metre on an early fabric shopping trip to Walthamstow market. I think it worked out pretty perfectly for this skirt as the pattern recommends quite a heavy weight fabric, even an upholstery fabric. It holds it's shape nicely and the darts went in like a dream. However it does also like to hold it's creases and wrinkles so excuse any you may spot in the pictures, I have pressed the life out of it really!


I cut a UK 10/US 6 based on the waist measurement; I was a little bit between sizes but decided to err on the side of caution and go bigger rather than smaller. I ended up taking it in a fair amount down the sides to get a nice shape. This may be partly due to the fact that the pattern is designed to fit a curvy lady who likes a little more ease around the hips but there is a bit of room around the waist too so I'm tempted to cut a size smaller next time. However the next bit of fabric I've got in mind I'm a bit to precious about to risk making a sizing mistake on so I'll probably stick with the 10 as taking it in was so easy to do as you went.

I absolutely love the fit of this skirt. Considering it's a pencil skirt I feel really comfortable in it and it sits really nicely. I think next time I'll try to consider more carefully as I'm taking it in down the side how i want it to fit. This time I did take care to make sure the amount was even each side but I think I should have continued this down to the hem rather than just around the hips as this version slightly looses it's pencil shape here. I do really like this on this version though as it means I can still walk easily without needing to add the back slit and that makes it slightly less dressy I think. There are also a few wrinkles across the front of the skirt due to bad fit which I think are hard to erase completely when making a pencil skirt but I'm hoping to adjust the fit slightly to reduce this affect next time. Any ideas how?!!!

This skirt was my very first attempt at inserting an invisible zip and I bought an invisible zip foot for my machine specially for the occasion; I think I knew I was going to love this skirt and be making a few! The invisible zip foot was an absolute REVELATION for me! I was really apprehensive about this technique but with the foot (and By Hand London's tutorial of course) I found it the easiest zip I'd put in so far. So neat and the sewing machine foot does all the hard work for you basically!


I added a big popper (I could probably get away with a MUCH smaller one to be honest, haha!) to fasten the flap at the back of the waistband. Initially I added a button to the top of the flap as a pretend fastening as suggested in the sewalong but then I realised in this plain fabric I really wanted the option of wearing a belt with it too so I took the button off.


Overall I absolutely love it and can see me getting a lot of wear out of it. I've already started my next one! I'd love to try a peplum or hem ruffle version and was sorely tempted this time but I just didn't think it would look right in this denim. I also think I wouldn't get as much wear out of it with these design details. It would be much more of an 'occasion' piece and I'm really trying to make more items that will get regular wear. I can't wait to see what patterns By Hand London bring out next!