
The story of this dress is quite a saga. I almost gave up on it more than once. Which was a surprise to me as although fiddly, I expected it to be straightforward given that I was using patterns I'd had success with before and familiar techniques. But then again I always seem to learn something from every project I tackle! I've had a few press nights and dressed-up events to go to recently and decided my wardrobe could definitely do with another glamorous, feel good dress. And let's face it, this is the kind of sewing that I really, really love. It might seem like my wardrobe is full of dresses but a lot of my occasion ones I made quite a long time ago and now don't fit quite right or just don't seem as well made as they did back then. The curse of improving sewing and fitting skills! A lot of them are also more suitable for weddings and such occasions rather than a night out. And there are only so many times I can wear my favourite jumpsuit around a lot of the same people!
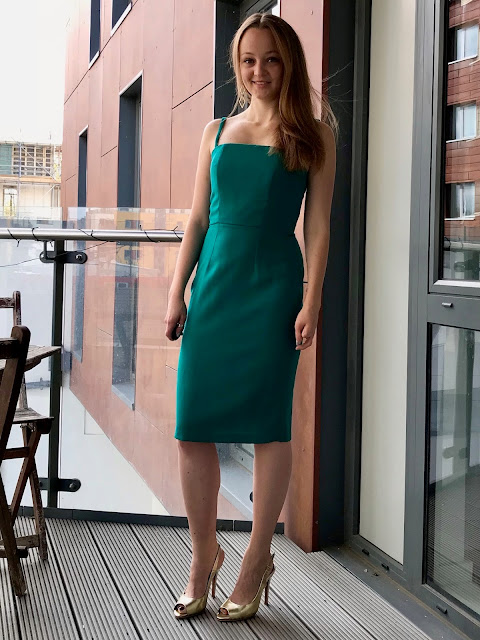
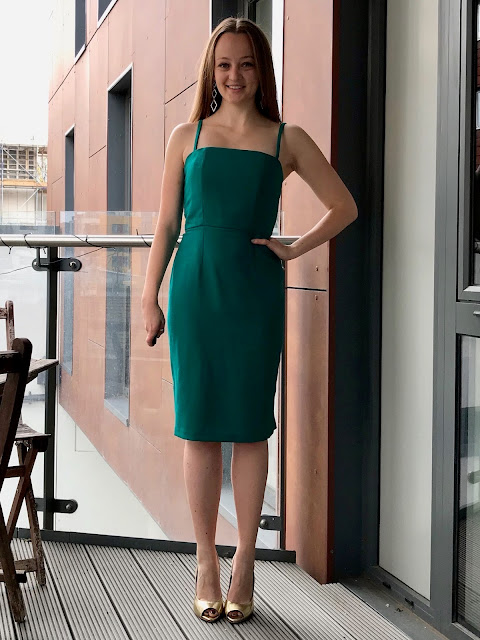
I didn't have time to go fabric shopping so decided to make the most of my stash which has grown a little larger than usual throughout the year. Almost forgotten at the bottom of the basket was this lovely little length of wool crepe in a vivid shade of jewel toned green. The perfect choice of colour as one of the events was press night for Young Frankenstein. I didn't have a huge amount of it, less than a metre and a half I would say. The lack of fabric determined the design choice and I was more than happy to go with a classic strappy, wiggle dress. I didn't have much time on my hands to be fiddling with fit, I wanted a project to sink my teeth into but that would come together smoothly and not be too taxing on a tired brain so I turned to the patterns I already had in my stash so I knew what to expect. I needed up using a combination of two Sew Over It patterns. I always seem to be pretty successful with the fit of these and their Ultimate Pencil Skirt is my go to pattern for that silhouette. I paired it with the bodice from the Rosie Dress which I loved the simple cut and shape of when I tested it a few months back, along with the super skinny rouleaux straps.

I cut between the size 8 and 10 for both patterns FYI which is standard for me with Sew Over It and spot on my measurements. I only made a couple of changes to the patterns (to begin with at least!) as I was very happy with how they had turned out previously. First I took a bit of width out of the top edge of the bodice at the side seams as my first version didn't sit quite close enough to the body in that area for my liking. I believe I removed about 1/2" at the top and graded down to nothing at the waist along that seam. Secondly I moved the darts in the skirt a little so they would match up with the princess seams of the bodice. This takes a little bit of thought and a lot of measuring!

As I had worked with the patterns before I didn't make a muslin and despite my careful thinking through and confidence in the patterns when I first put in the zip and had a try on the result was a complete disaster. I had wrinkles and drag lines all over the place, it was way too tight around the hips and clinging in all the wrong places. At first I thought it's fine, I'll unpick the side seams and sew them back up with a smaller seam allowance to give me a bit more room. No luck. I'd sewn myself the least flattering thing I'd ever made. I just didn't understand as both patterns had fit so well before and I knew my weight had been fluctuating of late but not to that extreme. I was so excited about the idea of this dress and it was incredibly frustrating to have wasted a fair bit of my precious sewing time on such a mess. The only thing that stopped me throwing it straight in the bin was the waste of that luxurious fabric!
It took a couple of weeks away from it and a couple of other quick and successful sewing projects under my belt one weekend to make me revisit the dress. I put my original Ultimate Pencil Skirts on and they still fitted well so there must be something else going on. As soon as I put it back on with a clear head I realised. The skirt pattern has a super high waist; very flattering and lovely in a skirt but it's not made to be joined straight on to a bodice. I had way too much length in the waist and everything needed to be lifted up a bit giving me much more room in the hip when the curves of the skirt matched the curves of my body. I folded the skirt up at the waist until things seemed to be sitting correctly and pinned in place. I unpicked the zip, separated the skirt and bodice and took 1.5" off the top of the skirt then reassembled. A vast improvement and such an easy fix! It did unfortunately mean that all my hard work moving the darts to line up with the princess seams of the bodice went to waste at the back but they still match at the front and side seams at least.

I was triumphant after figuring it out and the excitement for the project retuned. Unfortunately the dress wasn't quite done testing my patience yet. After the saga of the fit I had the saga of the straps. I spent one whole evening doing a fair bit of swearing whilst attempting to turn through skinny little straps with my loop turner. To get a super delicate lovely rouleaux strap you need to trim your seam allowance right down. However, if you do that on wool crepe it will fray and spread as you turn those straps out until the seams burst open. I wanted my straps as skinny as I could get them but I had no choice but to make them thicker then intended because of the fabric. A lot of trial and error then ensued figuring out the perfect width and using up the last of my crepe. I almost resorted to using the satin lining or some ribbon but am glad I didn't. In actual fact it would totally work strapless as I could have done with making the straps a bit shorter and when they slip down everything still stays in place. That must be proof that the bodice fits right!
I absolutely love wool crepe for it's combination of weight and drape as well as the way stitches sink into it almost invisibly, but it does need the right handling and treatment. It should really only be dry cleaned and you do need to be careful with the heat from your iron as this fabric loves to shrink. It's a good idea to at least give it a good steamy press before cutting to preshrink a little. There's various tips out there on the internet advising on the best ways to pretreat wool. I got this fabric years back from a Broadwick Silks remnant sale and first used it back then for a Charlotte Skirt. It didn't come out so well because my lack of fabric handling experience meant I didn't get those seams pressed nice and flat and the overall look felt a bit 'bouncy' rather than tailored as a result. This time around I had my trusty tailors clapper to hand and am a bit more liberal with the pressing so I'm much happier!

I used a piece of the Stoff & Stil acetate lining that I used for my version of B5814 earlier this year as it was a good colour match and also nice and strong to attached the boning to. I used the same method of inserting the boning as I did with this dress rather than as instructed in the Rosie pattern. This has you cover the ends of rigilene with small squares of fabric then just sew these ends to the lining. I had some covered plastic boning and so opted to sew it down all the way along the length. I had no problems with the boning in my first Rosie dress but just like the thought of it being securely attached in place. I decided not to line the skirt. For a special occasion dress like this I usually would do but I didn't have any nice soft lining or silk in a good colour to hand and the acetate I used for the bodice was too stiff; I wanted to keep some softness to it.

I'm really proud of my crisp little skirt vent. It must be my fourth or fifth time using this pattern so I should be able to turn out a pretty good one by now! In the end I was so pleased with the dress that I went the whole hog and finished a lot of it with hand-stitching - including the hem. From complete frustration to real pride in the course of one garment!

I hope I haven't bored you all to tears with that tale but at least it has a happy ending! I'm so pleased I went back to it and it didn't end up in the bin the first time around. It's far from perfect and the fit could do with some more tweaking if I'd had the patience but I adore this colour and feel super comfortable in the dress, which is an achievement for such a boned and fitted number. I think perhaps my wardrobe could benefit from one in black. I've got one more press night to go to this year and might treat myself to something else new. I've actually spotted a tuxedo inspired jumpsuit which I might try and recreate and think I've found the perfect fabric. Now to hunt down the right pattern(s) to serve as a starting point...

I didn't have time to go fabric shopping so decided to make the most of my stash which has grown a little larger than usual throughout the year. Almost forgotten at the bottom of the basket was this lovely little length of wool crepe in a vivid shade of jewel toned green. The perfect choice of colour as one of the events was press night for Young Frankenstein. I didn't have a huge amount of it, less than a metre and a half I would say. The lack of fabric determined the design choice and I was more than happy to go with a classic strappy, wiggle dress. I didn't have much time on my hands to be fiddling with fit, I wanted a project to sink my teeth into but that would come together smoothly and not be too taxing on a tired brain so I turned to the patterns I already had in my stash so I knew what to expect. I needed up using a combination of two Sew Over It patterns. I always seem to be pretty successful with the fit of these and their Ultimate Pencil Skirt is my go to pattern for that silhouette. I paired it with the bodice from the Rosie Dress which I loved the simple cut and shape of when I tested it a few months back, along with the super skinny rouleaux straps.

I cut between the size 8 and 10 for both patterns FYI which is standard for me with Sew Over It and spot on my measurements. I only made a couple of changes to the patterns (to begin with at least!) as I was very happy with how they had turned out previously. First I took a bit of width out of the top edge of the bodice at the side seams as my first version didn't sit quite close enough to the body in that area for my liking. I believe I removed about 1/2" at the top and graded down to nothing at the waist along that seam. Secondly I moved the darts in the skirt a little so they would match up with the princess seams of the bodice. This takes a little bit of thought and a lot of measuring!

As I had worked with the patterns before I didn't make a muslin and despite my careful thinking through and confidence in the patterns when I first put in the zip and had a try on the result was a complete disaster. I had wrinkles and drag lines all over the place, it was way too tight around the hips and clinging in all the wrong places. At first I thought it's fine, I'll unpick the side seams and sew them back up with a smaller seam allowance to give me a bit more room. No luck. I'd sewn myself the least flattering thing I'd ever made. I just didn't understand as both patterns had fit so well before and I knew my weight had been fluctuating of late but not to that extreme. I was so excited about the idea of this dress and it was incredibly frustrating to have wasted a fair bit of my precious sewing time on such a mess. The only thing that stopped me throwing it straight in the bin was the waste of that luxurious fabric!

It took a couple of weeks away from it and a couple of other quick and successful sewing projects under my belt one weekend to make me revisit the dress. I put my original Ultimate Pencil Skirts on and they still fitted well so there must be something else going on. As soon as I put it back on with a clear head I realised. The skirt pattern has a super high waist; very flattering and lovely in a skirt but it's not made to be joined straight on to a bodice. I had way too much length in the waist and everything needed to be lifted up a bit giving me much more room in the hip when the curves of the skirt matched the curves of my body. I folded the skirt up at the waist until things seemed to be sitting correctly and pinned in place. I unpicked the zip, separated the skirt and bodice and took 1.5" off the top of the skirt then reassembled. A vast improvement and such an easy fix! It did unfortunately mean that all my hard work moving the darts to line up with the princess seams of the bodice went to waste at the back but they still match at the front and side seams at least.

I was triumphant after figuring it out and the excitement for the project retuned. Unfortunately the dress wasn't quite done testing my patience yet. After the saga of the fit I had the saga of the straps. I spent one whole evening doing a fair bit of swearing whilst attempting to turn through skinny little straps with my loop turner. To get a super delicate lovely rouleaux strap you need to trim your seam allowance right down. However, if you do that on wool crepe it will fray and spread as you turn those straps out until the seams burst open. I wanted my straps as skinny as I could get them but I had no choice but to make them thicker then intended because of the fabric. A lot of trial and error then ensued figuring out the perfect width and using up the last of my crepe. I almost resorted to using the satin lining or some ribbon but am glad I didn't. In actual fact it would totally work strapless as I could have done with making the straps a bit shorter and when they slip down everything still stays in place. That must be proof that the bodice fits right!
I absolutely love wool crepe for it's combination of weight and drape as well as the way stitches sink into it almost invisibly, but it does need the right handling and treatment. It should really only be dry cleaned and you do need to be careful with the heat from your iron as this fabric loves to shrink. It's a good idea to at least give it a good steamy press before cutting to preshrink a little. There's various tips out there on the internet advising on the best ways to pretreat wool. I got this fabric years back from a Broadwick Silks remnant sale and first used it back then for a Charlotte Skirt. It didn't come out so well because my lack of fabric handling experience meant I didn't get those seams pressed nice and flat and the overall look felt a bit 'bouncy' rather than tailored as a result. This time around I had my trusty tailors clapper to hand and am a bit more liberal with the pressing so I'm much happier!

I used a piece of the Stoff & Stil acetate lining that I used for my version of B5814 earlier this year as it was a good colour match and also nice and strong to attached the boning to. I used the same method of inserting the boning as I did with this dress rather than as instructed in the Rosie pattern. This has you cover the ends of rigilene with small squares of fabric then just sew these ends to the lining. I had some covered plastic boning and so opted to sew it down all the way along the length. I had no problems with the boning in my first Rosie dress but just like the thought of it being securely attached in place. I decided not to line the skirt. For a special occasion dress like this I usually would do but I didn't have any nice soft lining or silk in a good colour to hand and the acetate I used for the bodice was too stiff; I wanted to keep some softness to it.

I'm really proud of my crisp little skirt vent. It must be my fourth or fifth time using this pattern so I should be able to turn out a pretty good one by now! In the end I was so pleased with the dress that I went the whole hog and finished a lot of it with hand-stitching - including the hem. From complete frustration to real pride in the course of one garment!

I hope I haven't bored you all to tears with that tale but at least it has a happy ending! I'm so pleased I went back to it and it didn't end up in the bin the first time around. It's far from perfect and the fit could do with some more tweaking if I'd had the patience but I adore this colour and feel super comfortable in the dress, which is an achievement for such a boned and fitted number. I think perhaps my wardrobe could benefit from one in black. I've got one more press night to go to this year and might treat myself to something else new. I've actually spotted a tuxedo inspired jumpsuit which I might try and recreate and think I've found the perfect fabric. Now to hunt down the right pattern(s) to serve as a starting point...


