
I've got a slightly different post to the usual garment sewing today as I wanted to share this cover I made for my overlocker/serger a couple of weeks ago. My sewing space is in our living room so I'm always trying to find ways to tidy/hide things away or at least make them look nice and non intrusive. I often put my sewing machine away but my overlocker sits out on the desk and up until now has been covered by the thin and flimsy cloudy plastic cover it came with.
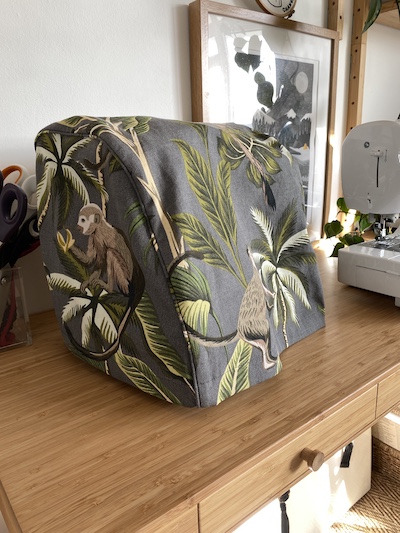
I used the Closet Core Patterns free pattern (which also includes a regular sewing machine cover) and blog tutorial to make this. I've been meaning to sew one ever since this pattern was first published but was struggling to find a fabric I wanted to make it in. It ideally needs to be an upholstery weight fabric to give it some structure and I also wanted it to be fun and go with our living room in some way. Fabrics Galore posted this Marcel home furnishing fabric on Instagram in January and I knew it was just the fabric I'd been looking for the second I saw it! Our soft furnishings are a similar grey to the background and we also have a lot of greenery in the form of plants and cushions which I made from a foliage print from Stoff & Stil years ago. But of course the main appeal of this fabric is the monkeys! Ed and I both love animals and there are a lot of nods to them in our home decor too.

The pattern calls for a metre of fabric which is quite a lot but you need the length for the main pattern piece which reaches right over from back to front of the overlocker. You will end up with some quite big offcuts, which you could make little matching sewing accessories out of like a thread catcher or soft case for your shears. Having quite a lot of fabric to work with worked out well for me though as I could play with where I put my pattern pieces to get the most out of the monkeys! I picked one monkey to sit centrally on each side piece and then made sure two were evenly spaced on the front and top of the overlocker. I'm really pleased with how this turned out.

The pattern is great and easy to follow and I particularly liked the addition of piping which I think elevates the item a little and was also really fun to make (note that the seam allowances for this pattern are 1/2" so for an easy life make your piping seam allowances that width too, then you can just line up the raw edges and sew!). However, the sizing hasn't worked out so great for my overlocker. I looked at the machine measurements the pattern is drafted for (12" long, 12" high and 14" deep) and used the lengthen/shorten lines on the pattern to adjust the pieces to fit my machine (12" long, 12" high and 11" deep). If you do this make sure to reduce the length of the central pattern piece accordingly, so it matches the length of the long curved edge of the side panel.


I added a pocket to one of the side panels (for which I very carefully pattern matched the monkey!). My overlocker (the Brother 1034D) doesn't come with a place to store all the accessories on the machine so these float around in one of my desk drawers and I liked the idea of being able to keep them with my overlocker. Unfortunately as I had to lop a bit of length off the cover the pocket is now a bit shallow to be all that useful, especially given that the deep hem stitching reduces the depth of the pocket further. It also would have been better on the opposite side of the overlocker I think where the machine fills the full cover and the pocket would have been kept taught. Ah well, lesson learned if I ever make another one!

Despite not being perfect I'm really pleased with how the cover looks sitting on my desk; certainly a lot more pleasing than the battered old plastic sheet before! I'd definitely recommend the Closet Core Patterns and tutorial for making a quality cover but do suggest looking at the measurements of your machine carefully before diving on in. I think the regular machine cover will likely be more successful as they are generally a more standard boxy shape across the board.
Cute and clever!
ReplyDeleteThanks! It was a really satisfying little project
DeleteGood for you! This is a gorgeous addition to your home. Like you, I put this pattern on my to do list when it came out but never got round to it. I'm taking a break from apparel sewing to make more masks, and you've inspired me to get on with this. My overlocker seems similar to yours so thanks for the tips too.
ReplyDeleteO great! I hope you enjoy making one! It was a nice change from garment sewing, stretches a different part of the creative muscles!
DeleteLooks very snazzy! Did you use cotton cording for the piping? This is on my to do list for my machine too! I'm as far as pulling out my pillow making remnants to determine which to use, your post motivates me.😊
ReplyDeleteThank you! I hope you enjoy making yours. Yes I used cotton piping cord, I think it was 3mm
Delete