Showing posts with label Pattern Testing. Show all posts

Sunday, 18 June 2017

Pattern Testing: Orsola Dress from By Hand London

Despite telling myself that I was going to leave pattern testing to one side for a bit so I could focus on my ever increasing sewing queue I saw the design for the latest release from By Hand London and couldn't resist getting my hands on it immediately! The Orsola Dress is a chic and wearable sheath dress which features a beautiful wrapped back. This classic cut with interesting and considered details is just the kind of thing I love to wear. The bateau neckline that dips in the back combined with the figure skimming fit is super classy. Both the dress and skirt variations included in the pattern have the option for a straight front hem or a scallop shape detail which I opted for as I love how this echoes the shape created by the wrap at the back.

Diary of a Chain Stitcher: By Hand London Orsola Dress in Floral Viscose

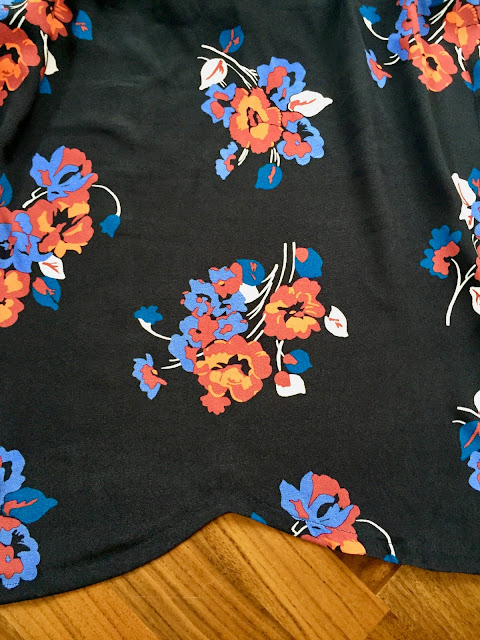
I had some fabric perfect for the skirt in my stash but I wanted to make the dress so I nipped into Lewisham one weekend to find something inexpensive from Maggie's Fabrics market stall. I happened upon this gorgeous viscose print for just £3/m and could not be happier with how it suits the style. I love how vibrant the red/orange flowers look against the navy. The slinky, slippery drape gives a relaxed vibe to the style and I feel like a more structured fabric would give it a totally different look. I really like the idea of making up a skirt version in a brocade.

Diary of a Chain Stitcher: By Hand London Orsola Dress in Floral Viscose

That lovely shifty nature did present some challenges when it came to cutting out and keeping those curves nice and even but patience and plenty of stay-stitching kept things stable. There are so many curves and edges cut on the bias in this design that taking a good bit of time over stay-stitching is essential; although yes it is frustrating not to be able to get straight on with the construction! The bodice is lined so I could have used a more stable fabric for this but I didn't want to ruin the romantic feel of the draped back so opted to self line.

Diary of a Chain Stitcher: By Hand London Orsola Dress in Floral Viscose

One of my favourite elements of the design is the faced hem which gives a gorgeous neat finish and a bit of weight to the hem. I was concerned that the effect of the scallop at the front would be lost in such a delicate and drapey fabric as my viscose so I opted to use a lightweight fusible interfacing on the facing pictures to add a bit of structure. I'm pleased I did this as I think it hangs nicely and keeps its shape well now. In a crisper fabric you wouldn't need to do this. I also added the interfacing to one set of the waistband and tie pieces. The ties are quite skinny and I felt they might end up looking a little limp in just the fine viscose. The interfacing adds just the right amount of body.

Diary of a Chain Stitcher: By Hand London Orsola Dress in Floral Viscose

Your fabric choice combined with how much you choose to stabilise the back edges of the bodice will quite drastically effect how that area fits too. Mine hangs away from the body slightly as I allowed it stretch out slightly (on purpose as I liked the idea of a softly draped back in this fine romantic print). The back edges of the By Hand London samples lay closer to the back and to achieve this you'd need to stabilise this bias edge with stay stitching and possibly the addition of some narrow twill tape/stay tape in the seam allowance.

Diary of a Chain Stitcher: By Hand London Orsola Dress in Floral Viscose

As with all By Hand London patterns (I've sewn most of them at this point!) I opted for cutting the UK10 and found it to have a little more ease than I am used to with their patterns. I wouldn't size down though as I love the more relaxed feel of this, I think the amount of room is spot on for the wrap style. I was concerned about risk of exposure with the back wrap when bending over or moving about in the wind but it feels very secure. I do usually have to shorten By Hand London patterns a little and usually do this from the hem but was well into making this one before I realised that the shaped hem would make this really tricky and I could have done with a lengthen/shorten line on the pattern piece (this has been added in since I tested it). It actually turned out fine though as I love the length as is!

Diary of a Chain Stitcher: By Hand London Orsola Dress in Floral Viscose

The only change I'd make to the fit next time is to take a little length out of the shoulder (about an inch) as it feels a little like it wants to slip off down my arm although doesn't quite. I definitely think it's the length rather than the width that is the problem and taking a bit of length away would have the added benefit or raising the point where the back wrap crosses as at the moment my bra band tends to peek out just a touch. As well as wanting to slip off the shoulders the dress doesn't want to stay on a hanger so I would recommend adding little ribbon hanging loops. You could insert these into the shoulder seam of the lining for a nice clean finish. I love this dress so much I might well end up unpicking my shoulders to take a little length out to absolutely perfect it so could add these in then.

Diary of a Chain Stitcher: By Hand London Orsola Dress in Floral Viscose

I'm not going to talk too much about the instructions as many of the little notes I made while testing have since been tweaked in the final release so my sewing experience is likely to be quite different to yours. I will say that it is a real pleasure to sew as it uses lots of familiar sewing techniques so isn't too tricky to put together and there are no fastenings to deal with! There's a bit of hand sewing involved to cleanly finish up the waistband and secure the hole in the side seam for the tie to pass through but nothing too strenuous. If you didn't want to see topstitching around your hem facing you could slipstitch this in place by hand but equally you could make more of the topstitching and use a contrasting thread or add in more at the waistband.

Diary of a Chain Stitcher: By Hand London Orsola Dress in Floral Viscose

I added a couple of tricks into the construction which I've picked up over the years and tend to do for all my dressmaking projects now. I pressed the lining darts in the opposite direction to those of the shell to reduce bulk at the waistline. This pattern does involve sewing a lot of darts which aren't my favourite thing to do in a shifty fabric. I would recommend marking them with tailors tacks and marking them at an additional point along the leg rather than just the tip and raw edge so you can ensure that nothing has shifted off grain and your darts are nice and straight. I also under-stitched the neckline as lining peeking out is a real pet hate of mine. This is really easy to do with this neckline if you do it before you sew up the armholes. The By Hand London method of sewing the neckline and armholes then the side seams of both the shell and lining in one fell swoop is fab.

Diary of a Chain Stitcher: By Hand London Orsola Dress in Floral Viscose

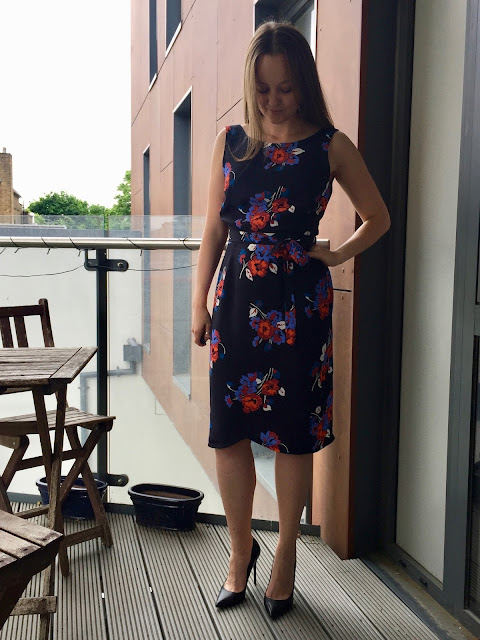
It's a big statement but this could be my all time favourite By Hand London design! Top three at least! I feel really elegant yet effortless in this dress and whilst the cut is fairly modest it's quite sexy at the same time with the flash of skin at the back. It would be appropriate for so many occasions made up in different fabrics; weddings, garden parties, work events or just casual summer days. A skirt version is next up in my sewing queue and then I'd like to try another dress in a solid colour of a more structured fabric like a linen!

Friday, 28 April 2017

Pattern Testing: Eve Dress from Sew Over It

I am pattern testing much less nowadays as it can be really time consuming when you do it throughly and to be brutally honest my sewing queue is so long that I'm never short of things that I'd rather be sewing! However there are some things that I just can't resist and will squeeze in no matter how busy I am and the new Eve Dress from Sew Over It was one of them! I always enjoy testing for Lisa and the ladies on the Sew Over It team as they really do value and incorporate the feedback from their testers. It's not just a last minute 'quick let's get a few other people to sew this up so they'll blog about it' they use it as a key part of the process to iron out every tiny mistake and make the final release the best it can be. Blogging about what I've made is never a requirement and sometimes I don't but I've been dying to share this one with you.

Diary of a Chain Stitcher: Sew Over It Eve Dress in Maroon Floral Viscose

The Eve Dress has been one of the most requested garments from their classes to be released as a separate pattern and is now available in both PDF and paper form. It's a wrap style, designed for woven fabrics and there are two variations included in the pattern. Version 1 has statement flutter sleeves and a dramatic dipped hem and version 2 has more of a contemporary feel with slim elbow length sleeves and a straight hem. Of course I totally succumbed to the the seventies drama of those flutter sleeves and the high-low hem!

Diary of a Chain Stitcher: Sew Over It Eve Dress in Maroon Floral Viscose

Sew Over It supplied the fabric for testing and I decided to choose mine in person at the Knitting & Stitching Show as I felt it was really important to get the right weight and drape for this flowing style. I actually really struggled with choosing fabric as version 1 is a very feminine style for me. My wardrobe does get a bit girly but when the style is so pretty I tend to favour darker, richer colours in solids or larger scale prints to balance it out. A lot of the fabric on their stand with the movement I was after was in pastels and small florals which would make a gorgeous Eve but wasn't for me. But when I returned to the stand when things had quietened down at the end of the day a bolt of just what I was looking for leapt out at me and my decision was made. It's a very fine viscose with the cool, smooth hand I love to wear and it flows and moves beautifully.  It is a little sheer in direct light so I will probably have to wear it with a slip on a sunny day which is a shame as I like how the viscose feels against the skin. Perhaps I should have considered a lining or underling but that would have been quite a huge job and it's a little late now!

Diary of a Chain Stitcher: Sew Over It Eve Dress in Maroon Floral Viscose

I had 3m of the fabric (the final pattern recommends slightly more) and the only reason I needed all of it was the length of the waist ties! I will point out that I never follow layout charts and prefer to jiggle the pattern pieces around to use as little fabric as possible. I had about 3/4m of fabric left over with only a slither missing from the side where I had cut the ties. If you're short on fabric and cutting one of the smaller sizes you might want to consider slimming down the skirt panels slightly so you can fit the ties alongside them across the width of your fabric. I personally wouldn't want the make the ties any shorter as I love the way the wrap around the waist rather than just tying at the back where they first meet. Turning through that length of tube will test your patience as they are quite slim but I love the width as anything wider would feel a bit clunky on this romantic style.

Diary of a Chain Stitcher: Sew Over It Eve Dress in Maroon Floral Viscose

As much as I love the movement of the fabric now it's sewn up it did give me some trouble during cutting and construction! The shiftiness of it, particularly against itself made keeping things on grain when cutting a real challenge and the construction required a lot of pins to keep everything in place. Sewing the ties on with nice neat rectangles of stitching was exceptionally difficult and I haven't done a brilliant job but fortunately the print hides it! Luckily the viscose holds a nice crisp crease when pressed which made all the turning under and stitching required around the front edge and hems a doddle. You don't want to use a fabric which frays badly as the front edge plus hem of the skirt and sleeves are achieved by simply finishing the edges either with an overlocker or zig zag/over-edge stitch on your regular machine, turning them under and stitching.

Diary of a Chain Stitcher: Sew Over It Eve Dress in Maroon Floral Viscose

Sew Over It do recommend using a cotton lawn or voile if you are new to sewing and I would heartily agree after my shifty viscose experience! Fine and drapey fabrics can be very shifty and with all the little details going on in this design I think that could make it tricky for anyone without a bit of sewing experience under their belt. I'm actually not a huge fan of lawn for dressmaking as although lightweight it does have a fairly crisp hand and doesn't drape or flow anything like as well as a viscose crepe or silk georgette. I think it's more suited to shirts and styles with a bit of structure. However with this design it could add some really interesting body to the skirt whilst the weight would retain the breezy feel and the wrap portion of the bodice is quite close fitting so you don't need to be worried about how it will drape in this area.

Diary of a Chain Stitcher: Sew Over It Eve Dress in Maroon Floral Viscose

I cut between the size 8-10 as I always do with Sew Over It patterns as that pretty much exactly matches my measurements and am really happy with the fit. One of the things that I love about their designs is that they really understand what is flattering and comfortable on a woman's body and this is no exception. The wrap bodice has just the right amount of fabric in it and fits closely at the shoulders thanks to the yoke pieces. The patterns fit true to size as well without too much ease. As it is designed with a relaxed fit there is some ease in the back of the bodice but the shaped centre back seam means it still fits well rather than pooling strangely. The waist size on this is spot on as it doesn't do that annoying thing that I've had with wrap dresses before when the dress starts to come through the hole you thread the tie through when tied as tight as you want.

Diary of a Chain Stitcher: Sew Over It Eve Dress in Maroon Floral Viscose

As usual it did come up very long on me! I can see from the pictures of Lisa modelling it that version 1 is designed to be more of a midi length but on 5ft 3" me with the dipped hem that looked a bit overwhelming. When I first tried it on the front hem was hitting 5" below my knee so I chopped off 4.5" all round. I thought those wide curved skirt panels would mean my shifty viscose would drop all kinds of wonky so I left it to hang for 24 hours before hemming but it actually didn't do much.

Diary of a Chain Stitcher: Sew Over It Eve Dress in Maroon Floral Viscose

The height of the neckline and placement of the wrap is great but as my fabric is so slippery I do feel a little bit at risk of exposure as the dress shifts about so have chosen to add a tiny popper at the centre of the neckline to keep things in place. The overlap of the wrap on the skirt is a generous amount and I don't at all feel concerned about this blowing open. The only other thing I did differently to the instructions was to attach my ties before hemming the dress so I could put it on properly and asses the length. I did pick up a handful of other little niggles with the instructions e.t.c while testing but I imagine if you make up the final pattern it will look very similar to mine here as they were only very small and no major changes were made to the drafting.

Diary of a Chain Stitcher: Sew Over It Eve Dress in Maroon Floral Viscose

I think the trickiest part of sewing a wrap dress is probably not stretching out the front edges of the bodice. That edge is on the bias so it's very easy to do but it's really important to keep a close fit in that area as you want it to hug the body and not gape open. The Eve instructions have you reinforce this edge with stay tape to stop it stretching out over time and my favourite part of the pattern is that the instructions include a chart explaining the length of stay tape you will need. It breaks it down into what length you need for the front bodice, yoke, and back neckline for each size so you can mark these points on your tape and check that nothing has stretch out to longer than it should be during construction. If it has you can ease the edges of your dress onto the tape to ensure a closer fit. Such  great idea.

Diary of a Chain Stitcher: Sew Over It Eve Dress in Maroon Floral Viscose

Now I've finished it of course I'm seeing viscose prints all over the place and I want to make more! But I'm really happy I trusted my instincts with the maroon as although the flutter sleeves and breezy wrap skirt lend themselves to more of a summer style I reckon I could get away with styling this with dark tights and smart ankle boots in autumn and winter too. This dress plus strappy sandals would be the perfect summer wedding guest outfit; it's a shame I haven't got any to go to this year but I have got a few press nights for work which I reckon it could be just the ticket for too!

Monday, 8 August 2016

Pattern Testing: The Rosie Dress from Sew Over It (and a giveaway!)

Diary of a Chain Stitcher: Tropical Palm Print Sew Over It Rosie Dress

Summer always has me wanting to sew dresses in their hundreds but my wardrobe is well stocked with them so I've been trying to focus my sewing on separates and more practical items this year. However, a little while ago Sew Over It got in touch to see if I'd like to test their recently released Rosie Dress and I cracked! The main reason for this being that the pattern is based on a 1950s style dress they used to run a class for. It was a good few years ago when this class launched but I remember being so smitten with the design that I wrote to Lisa to ask if there was any chance the dress would be released as a pattern in it's own right. The answer then was possibly in the future and now that time has rolled around I could hardly say no could I?!

Diary of a Chain Stitcher: Tropical Palm Print Sew Over It Rosie Dress

The dress has some really lovely features and options. There are three variations; one skirt and two dresses with wide or skinny straps and an optional collar. As my fabric choice was quite busy I kept it simple with the skinny straps and no collar. I've tested for Sew Over It a number of times and made up a couple of other patterns too. Their testing process is really through and they are always very responsive to any comments their testers have, I've seen a number of changes based on my feedback which is why I'm happy to test for them again.

Diary of a Chain Stitcher: Tropical Palm Print Sew Over It Rosie Dress

I've previously got on really well with their drafting and this one is no exception. The shape of the princess seamed bodice is to die for. I really love the shape of that neckline and where it sits, there is something distinctively 1950s about it. I cut the size 10 following my their measurement chart and the fit is bang on sewn straight up, even the bodice length. I'm pretty lucky with their patterns! As I'm 5ft 3" the skirt is longer than intended on me. Usually I'm not one for a midi length and I'll cut a good bit off but for some reason I absolutely love it in this style. I thought I would feel kind of overwhelmed with fabric with such a full long skirt but it's the opposite! That skirt is a bit of a fabric eater but I tend to wing it a bit with cutting layouts and got mine out of 2.5m of 150cm wide fabric.

Diary of a Chain Stitcher: Tropical Palm Print Sew Over It Rosie Dress

Sew Over It supplied me with my choice of fabric from their online store and I chose this tropical palm tree print cotton which is unfortunately no longer available. I liked that whilst it was a summery print the colours were quite muted so it wasn't too bold. I was, I will admit, a bit disappointed with the fabric when it first arrived. Whilst it's a good weight it's got a kind of coated feel to it which wasn't highlighted in the listing and whilst a wash softened it a little it was still pretty crisp with an unusual hand. As it was a test I ploughed ahead anyway and I'm delighted that I did as that stiff hand has a taffeta like quality to it which gives the skirt beautiful volume and shape. I'm usually a bit wary of a gathered skirt as I find adding bulk around my waist isn't the most flattering look for me. This skirt has a clever inverted box pleat at the centre front though so it keeps it flat across the troublesome tummy area. I'm also not really a fan of the process of gathering but I'm really pleased with how evenly I managed to get my gathers distributed around the waist. I adore how full this skirt is. A nice deep 2cm hem is recommended which is what I used, giving it even more body.

Diary of a Chain Stitcher: Tropical Palm Print Sew Over It Rosie Dress

The shape of the bodice is aided by lightweight plastic boning. The method for inserting this is really straightforward and secure but differs to how I've been taught to insert boning before so it was a really interesting process for me. You cut small squares of your fabric and fold them over the ends of your boning pieces. Then you sew through the fabric and the boning itself to attach the boning along the seam lines of your lining. I was a bit apprehensive about the boning only being attached at either end rather then being secured in a channel but it works really well. I found it easiest to press my little scraps in half before folding them over the boning and then sewed along both the top and bottom edge to keep it secure. The recommended fabrics for the pattern are cottons and linens which should be nice and sturdy for covering the ends of your boning but if you veer away from that and use something more delicate as your fashion fabric the sharp end of the boning might tear through. You could use a tougher fabric or alternatively melt the ends the boning just a little to give it a softer edge.

Diary of a Chain Stitcher: Tropical Palm Print Sew Over It Rosie Dress

As it was a test and I had plenty of fabric I opted to self line the bodice. The slightly strange fabric actually feels quite nice against the skin. You get a lovely clean finish with under stitching the top edge of the bodice and a bit of hand sewing. It was one of those super straightforward sews where everything matches up like it's supposed to. I did have a little list of feedback but it was really minor stuff and illustrations and wording of instructions have since been changed to clarify any confusing parts.

Diary of a Chain Stitcher: Tropical Palm Print Sew Over It Rosie Dress

I adore the super skinny straps, there's something really elegant about them but they did take some time to turn through You definitely need to aggressively trim those seam allowances and use a loop turner! The strap position is marked on the pattern based on tester feedback but obviously everyone is a slightly different shape and if you want the wider straps to cover a bra strap you  definitely need to baste and try these out before you attach your lining. I positioned mine between the notches for the wide straps where they were marked on the test version.

Diary of a Chain Stitcher: Tropical Palm Print Sew Over It Rosie Dress

And now on to the good news for you guys! In return for testing I received the fabric for my dress and a copy of the finished pattern...and the ladies at Sew Over It have ever so generously supplied me with a second copy to give away to my lovely readers. All you need to do to enter is follow my blog (by any method you prefer, Bloglovin'Feedly, email subscription in the sidebar) and leave a comment below. I'd love to know your initial thoughts on fabric choices if you were the lucky winner but that's not essential, juts me being nosey! Please make sure your email address is clearly visible in your profile or comment as I will contact the winner that way to get your address. The giveaway is open internationally and will close on Sunday 14th August at midnight GMT. Good luck!

Diary of a Chain Stitcher: Tropical Palm Print Sew Over It Rosie Dress

Monday, 7 December 2015

Pattern Testing: Mila Shirt from Itch to Stitch

Yes, it's another post about fabric I got from Mood Fabrics on my trip to LA! But it's another gorgeous bit of yardage which I feel like I made a good decision about what pattern to pair it with! I vaguely knew what I wanted to make with it when I spotted it on the shelves. I love a classic plaid flannel shirt and the check of this Marc Jacobs cotton crepe really reminded me of that style of plaid. However, instead of a snuggly flannel this is a super fine, silky cotton crepe with a lovely drape, ideally suited to a very different type of shirt, one for layering under snuggly jumpers! I really liked the idea of a different kind of plaid shirt and set about finding the perfect pattern.

Diary of a Chainstitcher: Itch to Stitch Mila Shirt in Marc Jacob Sheer Plaid Cotton from Mood Fabrics

My first thought was a Grainline Archer as I already own and love the pattern but in my head I was imagining something a little more oversized that would show off the drape and flow of this lovely lightweight fabric. Then Kennis from Itch to Stitch put out a call for testers for her Mila Shirt, I looked at the line drawing and I was sold! It was just what I was picturing and I knew I could rely on Kennis for a good pattern with detailed instructions for all the fiddly shirt elements after making her Marbella Dress last year and being seriously impressed with the level of thought that went into it. I can also speak very highly for how well Kennis uses the testing process to make sure her pattern is the best it can be. A Facebook group was set up for all the testers to discuss the pattern with her and each other and a second test version was sewn up by testers who had time to make sure all the changes after the first round were just right. The shirt you see here is based on the first test version of the pattern so it's slightly different from the final release; the most noticeable changes were that the collar was reshaped (mine is much larger than the final version) and that a couple of inches of ease was removed from the waist to give the shirt some more shape.

Diary of a Chainstitcher: Itch to Stitch Mila Shirt in Marc Jacob Sheer Plaid Cotton from Mood Fabrics

Itch to Stitch sizing is super thorough and as with my Marbella dress I was very happy with the fit of this shirt straight 'out of the envelope', which I think is partly to do with the fact that sizing for cups from A-DD is included. It means I get a nice close fit at the upper chest and shoulders where I'm quite small whilst still having room in the bust without having to do any alterations. Using the D cup size, I cut the size 0 at the bust and waist and graded out to a 4 at the hips. I tend to usually fall within the one pattern size with most companies so I'd say Kennis drafts for a more top heavy shape and a slimmer hip than perhaps is standard. Grading between sizes is very simple and clear instructions for doing so are included in the pattern.

Looking at the pattern pieces I thought that the sleeves looked mega long so I gave the pattern pieces a quick measure (remembering to add on the depth of the cuff and remove the seam allowances) and compared it to my arm measurement. I took 2" off the sleeve length at the lengthen/shorten line as a result of this and probably could have done with a little more but I'll only ever wear them rolled up anyway so it's not important.  The sleeves were shortened before the pattern was released but only by about 1/2", I'm quite short but I'd recommend giving them a measure to check! Speaking of rolled up sleeves the pattern does include the option of adding button up sleeve tabs to hold your rolled up cuffs in place but they're not a design feature I'm particularly fond of so I opted to do without.

Diary of a Chainstitcher: Itch to Stitch Mila Shirt in Marc Jacob Sheer Plaid Cotton from Mood Fabrics

As well as shortening the sleeves I removed some length from the hem to make it less of a tunic length as I thought I'd get more wear out of it as a shirt. The back hem line is slightly longer than the front so I levelled that off a bit while I was at it. Bearing in mind that I'm 5ft 3", this is the shirt with 2" removed from the front and sides of the hem, increasing to 3" at the back. I used my rolled hem foot as the fabric was so fine and the curves of the hem are quite tight so required a very narrow hem. A few different hemming options are thoroughly explained in the instructions which is great.

Diary of a Chainstitcher: Itch to Stitch Mila Shirt in Marc Jacob Sheer Plaid Cotton from Mood Fabrics

I managed to just about squeeze the shirt out of the 1.5 yards of beautiful plaid I had bought. The pattern recommends 2.25 yards and I would definitely say get at least two as I had to do a fair bit of juggling around and cut each piece individually without folding the fabric to get it all in! As the check is so small I wasn't overly concerned about pattern matching but I did make sure it lined up horizontally at the side seams and that my front and back pattern pieces were placed so the check was symmetrical either side of the centre. I made my life a bit easier by cutting the yoke and pocket pieces on the bias so they didn't have to be matched, mainly because I just love the look of that as a design feature anyway! That's actually a suggestion in the pattern instructions.

Various elements of the shirt need interfacing and as my fabric was so sheer I opted to use silk organza for mine rather than a fusible. I'm really pleased I did as I think a fusible would have changed the hand of the fabric too drastically, rather than just giving it a little strength and body as the organza did. I basted it to the areas that required it by hand, which didn't take long, then removed the basting when the shirt was assembled.

Diary of a Chainstitcher: Itch to Stitch Mila Shirt in Marc Jacob Sheer Plaid Cotton from Mood Fabrics

I had very little trouble with the instructions and really liked Kennis's techniques for all constructing all those fiddly, detailed elements of a shirt. I was particularly happy with the instructions for the centre front placket and the result I achieved. It's drafted beautifully too. One of those patterns where all the notches match up and everything comes together like it feels like it should. I veered off of the instructions only ever so slightly and mainly because I wanted to use techniques which I thought would be better for my delicate fabric than the standard shirt making techniques. For example I french seamed my side seams. I also used the burrito method to construct the yoke as I've done this a few times and love it. Peter from Male Pattern Boldness describes it really well in his shirt sew-along. Kennis did mention that she chose not to use this method in the instructions to keep the pattern more accessible for inexperienced sewers which I absolutely understand. I think this pattern would be a great one to try for your first shirt as the preparation notes and instructions are so through. 

Diary of a Chainstitcher: Itch to Stitch Mila Shirt in Marc Jacob Sheer Plaid Cotton from Mood Fabrics

I surprised myself and actually abandoned my beloved collar construction method (using this tutorial from Four Square Walls) in order to give the more traditional Itch to Stitch method a try. I loved it and am really proud of how neat this turned out in such a shifty and fine fabric. I also think the cuffs are my neatest yet. Thanks Kennis! The only element of the pattern that I would change (and it's purely because of personal preference) is to have a placket on the cuffs instead of using a continuous lap of binding to finish the vent. Firstly, I prefer how a placket looks and secondly I love sewing plackets! Trying to bind that tight corner in this fabric was not fun. 

Diary of a Chainstitcher: Itch to Stitch Mila Shirt in Marc Jacob Sheer Plaid Cotton from Mood Fabrics

If you're thinking about making this pattern it's worth noting now that the seam allowances are 3/8" as standard. I have a hard time remembering it with any pattern where that is the case; I'm a 5/8" kind of girl! Also I'd recommend stay stitching the neckline as soon as possible. It might be because of the delicate nature of the fabric I chose but I definitely feel like there was a lot of potential for that area to get stretched out of shape.

Diary of a Chainstitcher: Itch to Stitch Mila Shirt in Marc Jacob Sheer Plaid Cotton from Mood Fabrics

All in all I'm delighted with the shirt and really enjoyed the process of making it too. As with any shirt it was a time consuming process but I like taking my time and breaking it down into small steps. I'm so pleased I chose to keep it classic with this fabric. There are some other amazing plaid's in the Marc Jacob's range on the Mood site which I'm now keeping a keen eye on; loads of voiles which would make beautiful shirts or maybe even shirt dresses...it might be a winter of plaid for me!

Wednesday, 23 September 2015

Pattern Testing: Sew Over It Joan Dress (and a giveaway!)

Diary of a Chain Stitcher: Bottle Green Wool Sew Over It Joan Dress

I have been super excited about sharing this dress with you since I made it a couple of months ago! When Sew Over It got in touch about testing their next pattern I said yes straight away. The Joan Dress (inspired by Mad Men's infamous Joan Holloway and her wiggle dresses) is an absolute stunner. It has some lovely design details like the elbow length sleeves, shoulder darts and neck tie; it nails that balance between vintage and wearable for me. Despite being a slight departure from my usual day to day style I'd had great previous experiences testing for them and just with their patterns in general so I decided it would be a great way to give a new look a whirl! The garment you see today is sewn up from the test version of the pattern so comments I make are based on that rather than the finished product. I feel like it's important to say that I think Sew Over It value and use the feedback that they get from their testers in a great way. I've often seen changes to the finished pattern based on comments I've made and it's a really open process.

Diary of a Chain Stitcher: Bottle Green Wool Sew Over It Joan Dress

For my dress I chose this bottle green wool blend from the Sew Over It online shop, which was kindly provided for me. It's got a bit of weight to it but isn't super heavy so worked out great for a winter dress with a bit of structure like this. I also think it would make a fab version of their Ultimate Pencil Skirt. I'm absolutely in love with this shade of green, there's something really festive about it! Unfortunately there's not a lot of room for festive eating in this dress so perhaps not a dress for Christmas Day but maybe the perfect outfit for mulled wine and mince pies?! Somebody stop me talking about Christmas already! Alex recommended choosing one of their great selection of rayon prints for a lining and she was right. I'd definitely consider using one of their rayons for lining again; it feels great against the skin and is super lightweight. I chose this monochrome print which I actually used at their summer party last year to make the lampshade which is now hanging in my bedroom! I love how it looks against that intense green and that it adds a bit of a excitement to the inside of the dress. I only used 1.9m of the wool and 1.5m of the lining as both fabrics were quite wide.

Diary of a Chain Stitcher: Bottle Green Wool Sew Over It Joan Dress

Choosing a good lining is important for this design as it is fully lined and fits closely all over. One of the things I was most impressed about when following the construction instructions for this pattern is the amazing clean finish you get inside. It does involve a fair bit of hand sewing but I enjoy that. The lining is attached at the neckline, cuffs, centre back zip, kick pleat and hem so all your raw edges are concealed within. This means you don't need to finish your seam allowances at all but I did choose to pink just the wool as it was so prone to fraying. I particularly liked the way the lining was attached around the hem, which involved tacking the two raw edges together before folding up the hem as one. Such a lovely professional looking finish!

Diary of a Chain Stitcher: Bottle Green Wool Sew Over It Joan Dress

I usually cut midway between the size 8 and 10 on Sew Over It patterns but looking at the ease in the finished garment measures and based on the fact that I've lost a bit of weight over the last few months I cut the straight size 8. It fit like an absolute glove when I finished it. Of course over the last month or so my weight has fluctuated ever so slightly again (I blame that stateside holiday!) and now it is verging on a bit too snug! Should have stuck to my usual. I think the ease is just about perfect for a wiggle dress if you go exactly by the measurement chart.

Diary of a Chain Stitcher: Bottle Green Wool Sew Over It Joan Dress

I'm fairly lucky in that I think my proportions suit the Sew Over It block so fitting their patterns is generally super straightforward for me and in this instance I made no changes at all! It's a longer length than I usually like and is probably longer than intended on me (I'm 5ft3" for reference) but in this style I quite like it! The drafting throughout is really great, those sleeves went in so easily without a bump or pucker! It helped that the wool I was using responded really well to steam and therefore shaped beautifully.

Diary of a Chain Stitcher: Bottle Green Wool Sew Over It Joan Dress

Pattern testing wise I didn't have many notes at all; I would have been very impressed if I had purchased the pattern as it was. I've already received my copy of the final pattern and could see that feedback had been taken on board again as some extra changes had been made since the testing stage; well thought out 'lengthen/shorten here' lines had been included and an extra notch added at the centre back of the hem to make trimming off the vent on one side of the back skirt piece even easier.

Diary of a Chain Stitcher: Bottle Green Wool Sew Over It Joan Dress

As usual the instructions were really thorough and included some great tips such as pressing the darts in the lining the opposite direction to how they are pressed in the main fabric to reduce bulk. There's a couple of trickier construction steps where it would be possible to get in a bit of a tangle, particularly when you attach the lining to the vent at the back of the skirt. But if you take it slow and make use of the lovely illustrations it all comes together smoothly. It was a really enjoyable sewing experience; there's notches where you need notches and everything lined up for me first go.

Diary of a Chain Stitcher: Bottle Green Wool Sew Over It Joan Dress

!GIVEAWAY NOW CLOSED!
And the good news for you guys is that Sew Over It have kindly provided me with an extra copy of the paper pattern to give away to you! All you need to do to enter is follow me on Facebook/Twitter/Instagram/Bloglovin' if you don't already and leave a comment on this post. If you want to tell me about what kind of fabric you'd make Joan in if you won then feel free to include that too as I love to hear about other people's sewing plans! The giveaway is open internationally and please make sure to include your email address in your comment if it is not easily available in your blogger profile. The giveaway is open until midnight on Saturday 26th September and I will announce the winner here on Sunday 27th. Good Luck!
!GIVEAWAY NOW CLOSED!

Friday, 3 July 2015

A Summery Voile Zeena Dress

I'm sure many of you will have seen by now the latest release from By Hand London, the Zeena Dress. I'm also sure those of you who don't live in London will have heard about the little heatwave we've had here recently as when we British get a bit of proper summer sunshine we do like to shout about it from the rooftops! Well Zeena has been my saviour in the muggy heat of the last week or so and has rapidly proved itself to be somewhat the perfect summer dress.

Diary of a Chain Stitcher: Zeena Dress in Silk/Cotton Voile from Mood Fabrics

I tested this pattern and as BHL are no longer producing patterns in a printed format it was my first experience with one of their PDF patterns. I had absolutely no problems printing or assembling mine, just make sure to check that your printer is printing at 100% scale and not shrinking anything to fit or your dress will end up too small! There's a post here if you need any tips. From a testing point of view I thought the instructions were as thorough and clear as I have come to expect and include some great tips such as how to tell when you've reached the ideal point to pivot when sewing up the side seams and around the pocket pieces.

Diary of a Chain Stitcher: Zeena Dress in Silk/Cotton Voile from Mood Fabrics

What you see here isn't actually my test version of the dress as I felt the bodice on that one was a little too roomy particularly at the neck and shoulders. This is mainly due to my weight fluctuating a little recently and my own personal fitting preferences with a design with a relaxed fit. As I'm quite petite but am by no means straight up and down I often feel like loose fitting clothing doesn't suit my proportions and a bit less fabric hanging around the body makes me feel more comfortable. I also often find By Hand London patterns to be big through the shoulders on me as I am quite narrow and taking a wedge out of the neckline is a common adjustment for me to make.

Diary of a Chain Stitcher: Zeena Dress in Silk/Cotton Voile from Mood Fabrics

I cut my usual By Hand London size UK10 when testing but the version you see here is actually the UK8. I chose to use view 2 which has the shorter sleeves, shorter skirt length and lower/wider neckline. I took 1" out from each side of the front neckline which I did by slashing and overlapping the pattern from the required amount at the neckline to nothing at the bottom of the armhole. If you're after a bit more in depth guidance to do this yourself I referred to Sonja from Ginger Makes' tutorial on how to do the same thing to the back bodice of the Anna Dress. I'm so much happier with how the neckline sits now. The only other adjustment I made was to shorten the bodice by 3/4". I'm slightly short waisted so this is probably an adjustment I should make on more patterns than I actually do! As I had my test version to hand this time I took the extra couple of minutes it warranted to get this spot on. I was worried about the skirt ending up too short as it is described as mini length but it's turned out ideal for me personally. The length you see here is as the pattern comes and I'm 5ft 3".

Diary of a Chain Stitcher: Zeena Dress in Silk/Cotton Voile from Mood Fabrics

The fabric is actually a very special piece which it has taken me ages to decide what to make with as I really didn't want to waste it on the wrong project! It's an absolutely stunning silk/cotton voile which I purchased in Mood Fabrics when visiting NYC with my sister over two years ago now and before I was a member of the Mood Sewing Network. I was pretty overwhelmed by the amount of choice in Mood (and my non-sewing sister showed amazing levels of patience considering the amount of time i spent browsing on two separate occasions!) but this fabric leapt out at me as something I just could not leave without. I've considered pairing it with various patterns over the last couple of years but nothing seemed 100% right and I couldn't bear to cut into it until I was certain! I wanted something simple that would showcase the beautiful print but also something I would get a lot of wear out of as I didn't want to wear this fabric just once to a wedding. After testing Zeena I knew I had found just the thing and luckily managed to squeeze it out of just the 1.6 yards I had.

Diary of a Chain Stitcher: Zeena Dress in Silk/Cotton Voile from Mood Fabrics

The voile is so fine and lightweight that it is very sheer and so both the bodice and skirt needed to be underlined. I found the perfect mint green silk/cotton voile in Classic Textiles on Goldhawk Road for £4/m. I've used this before for lining my circle-skirted Elisalex dress and they usually carry a good selection of colours. I'm really pleased with how the mint green backing increases the intensity of the colours in the print. I could have lined it rather than underlined but I thought the voile was so sheer that there would be a risk of seam allowances showing through and decided to keep it as simple as the pattern is intended to be. Underlining the skirt has given it a bit of body but avoided adding too much fluffy volume which a separate lining layer might have done.

Diary of a Chain Stitcher: Zeena Dress in Silk/Cotton Voile from Mood Fabrics

Ignoring the amount of time it took to hand baste the pattern pieces to the underlining this is such a speedy garment to sew! The bodice pleats are much quicker than darts and kimono sleeves cut out so much construction time. No faffing about setting in sleeves! The pattern is unlined and the neckline is finished with a simple facing so there's no fiddly bias binding to contend with either. To add to the speed of this project I finished all the seam allowances on my overlocker using a light grey thread.

Diary of a Chain Stitcher: Zeena Dress in Silk/Cotton Voile from Mood Fabrics

I had some problems with the facing flipping out even when tacked down at the shoulder seams and to the zip tape at the centre back. I had under stitched the neckline and vigorously clipped and pressed the seam allowances but it didn't want to behave. As I had underlined the fashion fabric I was able to slipstitch the facing to the underlining all the way around and eliminate this problem. The printed voile is so fine that any catch stitching to the outer layer would have shown right through however neat.

Diary of a Chain Stitcher: Zeena Dress in Silk/Cotton Voile from Mood Fabrics

Of course no practical summer dress is complete without pockets and these are set into the side seam and cleverly concealed beneath the pleats. This is the one step when I veered off of the instructions slightly as I chose to finish the edges of the pocket pieces before attaching them to the skirt pieces and the side seams after but before putting the skirt together. I also under-stitched the pocket openings which isn't strictly necessary but as I had so little of my printed voile I used the plain mint green for the pocket linings and didn't want to risk them poking out.

Diary of a Chain Stitcher: Zeena Dress in Silk/Cotton Voile from Mood Fabrics

What makes this design a firm favourite for me among the By Hand London collection is that it can be so easily dressed up or down depending on fabric choice. Lots of my BHL dresses are party dresses or suitable only for weddings and events rather than being right for everyday wear so I love that this one can be in regular rotation. It's so great to throw on on a hot day as the loose fit makes it less sticky and obviously the silk/cotton content of the fabric I've used is super breathable. It's so great in fact that I've actually already made another in an equally breezy fabric which some of you may have spotted on Instagram last week. I can't wait to share all the details of that one with you soon! What are your favourite fabrics to sew with for summer?