At the turn of the New Year my sew-jo was lacking. I was enjoying planning my #makenine challenge choices and hunting through my fabric and pattern stash but couldn't find the motivation to actually get on the machine. I eventually persuaded myself to cut out a bunch of fairly simple and quick knit projects and that turned out to be just the thing to get me excited about sewing again! Completing a few straight-forward projects was really satisfying, plus comfy jersey clothes are all I want to be wearing right now in lockdown. Actually being able to wear the garments as soon as the final stitch had gone in was motivating. Has anyone else found themselves feeling like making 'going out' or work clothes is a bit pointless of late? Without anywhere to wear my more involved projects the shine was slightly wearing off.
Showing posts with label T-Shirt. Show all posts
Tuesday, 26 January 2021
Sunday, 28 October 2018
Striped MIY Collection T-Shirt from Beginner's Guide to Dressmaking
I feel like I've been on the hunt for my ideal t-shirt pattern for the entire time I've been sewing and it is a subject I've returned to a couple of times here on the blog. It may seem like a simple garment but finding the right pairing of fabric and pattern and getting the cut and fit just so for your body shape can be really tricky. I hadn't been entirely satisfied with any of my handmade tees before and find myself falling back on old RTW favourites which are looking quite worn now. That is until I discovered this MIY Collection pattern and hit upon success.
Wendy Ward has recently released some of the designs from her first book 'The Beginner's Guide to Dressmaking' as stand alone PDF patterns. When she offered one to me to try I snapped up the T-Shirt pattern as I thought it was about time I tried a tee from a different designer. This is a less structured style than those I have sewn before and actually than in my wardrobe. To be honest I thought I would prefer a more fitted style with a deeper neckline but I gave it a whirl and think I have accidentally discovered just what I was looking for!
I went a little bit nuts for this striking striped jersey when I spotted it on the Girl Charlee Instagram months ago and they very kindly sent me a length to play with. I adore the seventies feel of the vivid colours and retro stripe design. It has taken me a shamefully long time to get around to finding the right pattern for it and sewing it up. But it has been worth the wait as this simple style really showcases the stripe and beautiful colours. It is lightweight but opaque and the rayon content gives it a lovely drape. I've found with some fine jerseys that they have a weird slightly grainy texture and are easy to stretch out of shape permanently but this has a gorgeously smooth soft hand and a bouncy stretch. Perfect for a little tee.
The sizing on this pattern (and I think with the other patterns from the book) is quite generic with just three sizes covering busts from 31.5" to 40". I absolutely don't think there needs to be more detailed sizing on a knit style like this. My bust and waist measurements actually fell just between the small and medium sizes but I opted to cut the small based on the finished measurements. I figured 2" of ease around the bust on a t-shirt, even that has a relaxed fit, would be plenty. I'm very happy with the fit of this, it has the perfect amount of ease and length for me. I am sometimes concerned about fine, very stretchy knits like this clinging and showing all the lumps and bumps but this skims the body really nicely. I am getting a couple of drag lines around the bust but I think that's more to do with the way this fabric hangs on the body than anything being too small.
It has a similar amount of ease around the body to the Pattern Fantastique Equinox which is the last t-shirt pattern I made. But I feel like my Equinox tees shift around on the body in a weird way throughout the day so I'm constantly fiddling with them. Not the case with this one. I prefer the cut of this, particularly the bateau neckline. It is perhaps a fraction wide on me as a hint of bra strap peaks out. I have quite small shoulders so may rectify this next time by taking a small wedge out of the centre front of the pattern piece. Here's a photo with hair up so you can really see that lovely neckline shape!
Of course when working with knit fabrics, even when using exactly the same pattern, in exactly the same size with the same construction techniques the result can be completely different in one fabric to another. I adore this pattern in a lightweight drapey knit like this but I'm not sure I'd like it in a more structured knit. It would be quite boxy and that isn't a particularly flattering or comfortable shape on my body type. I've certainly noticed that I wear my lightweight grey Equinox Tee a lot more than the heavier white cotton jersey version.
I was initially unsure about the lack of neckband; the neckline is simply turned back and stitched (I did this with a twin needle). I've come to quite enjoy sewing neckbands now I've done quite a few a love that finish, particularly a nice skinny one. However simply hemming this edge is much better for the bateau shape as it would be difficult to set a band into that tight corner on each shoulder without distorting the shape. This finish also suits the relaxed style of the tee.
My favourite thing about this design is the sleeve. I've always been a fan of a small cap proportional on me and this one sits really well. Even in a fine knit like this it holds its shape well as the entire sleeve piece is doubled back on itself rather than hemmed. It makes for a lovely clean finish and a much better defined edge in a lightweight fabric.
A big part of making this top was of course the stripe matching, made even more complicated by the fact that this fabric was very shifty to cut out and work with! What did make the job a little easier is that you're only contending with two pattern pieces. One for the front and back bodice and one for the sleeves! I cut the front by cutting one half, drawing onto the pattern piece where the stripes were then flipping the pattern piece along the centre line to cut the other half. I used the stripes drawn on the pattern to line up the piece when cutting the back. The sleeves I didn't attempt to match with the body in any way but made sure to cut two that matched. I used lots of pins when assembling and am delighted with how that turned out.
I thought the instructions were great, with nice clear illustrations. They're laid out slightly differently to what many of us may be used to and each point is fairly brief but there is a tonne of information about sewing with knits and relevant techniques included before you even get to the step by step method. I think a lot of the information has probably come from the book the pattern originated from which is a real bonus. I particularly enjoyed the additional instructions for hacking your pattern to do some colour blocking by adding a vertical c/front or back seam or alternatively a diagonal or horizontal seam. A great way to push beginners on to get creative with their sewing.
I've taken the photos with the tee untucked over skinny jeans so you can see the cut of the whole thing but my favourite way to wear it at the moment is tucked into high waisted trousers like these; really making the most of that seventies vibe. It is also great for layering under overalls/dungarees. These trousers are my new Persephone pants...blog post on these coming soon!
I think my wardrobe could probably do with some slightly more fitted tees and different necklines but this is certainly a winner in the relaxed style category. I think a number of these made up in lightweight viscose or linen jerseys are going to be great in South Africa and the Philippines; those fabrics will feel cool against the skin and the loose fit won't cling in the heat.
Wednesday, 2 May 2018
Jersey Equinox Tees and a Striped Merino Molly Top
Me-Made-May has arrived! For those of you who haven't come across it before Me-Made-May is a challenge dreamt up by Zoe of 'So Zo...' designed to encourage home garment makers to appreciate and wear their handmade wardrobes more. You set your own pledge for the month which generally focuses on how many handmade items of clothing you want to wear a day/week/during the month and usually document your progress with photos. The biggest challenge for me as always will be finding ways to take the photos every day! I'll be sharing mine on my Instagram Stories if you'd like to follow along. I like to use the month to check on the success of my handmade wardrobe and identify any wardrobe gaps that need filling so I can focus my sewing plans on them. Like last year I'm aiming to wear something handmade every day, and as many completely handmade outfits throughout the month as possible. I could have challenged myself to wear entirely handmade but there are a few things like RTW jeans that I really rely on to wear to work and just didn't have the time to make handmade equivalents for. I actually did a bit of forward thinking this year and identified that my wardrobe was missing a handful of staple everyday items to get me through the month and put in a big old order with The Fabric Store to get me started.
First up were some basic tees. I already own the Sewaholic Renfrew Top pattern which is great and I've made quite a few of but I was after something with a slightly more relaxed style and higher neckline for layering this time around. I looked at probably every t-shirt pattern going (using The Foldline Sewing Pattern Database) before settling on the Pattern Fantastique Equinox Tee as the one with the ideal combination of elements. I was drawn to the slightly sixties vibe of this design particularly the little cap sleeve and flattering 'slightly wider than a crew' neck. You can bet I'll be trying that bell sleeve out at some point too.
Fabric-wise although it was tempting to order something fun I opted for classic white and grey marl options that will work with multiple items in my wardrobe throughout the summer. I went with this white Lightweight Cotton Jersey and the grey Lightweight Jersey Knit. As they were both described as lightweight I imagined they'd be very similar but I failed to note that the grey is 100% viscose so is fine and semi sheer with some drape and the white cotton jersey is actually fairly robust with some body to it. The cotton jersey is actually very opaque and you could get away with making a summer dress out of it. The differences in them has made for two contrasting tees and a varied construction process as the white was nice and stable and the grey super shifty and curly at the edges! The required patience was worth it for that one though! I cut the straight size ten and both of these are sewn up as intended with no adjustments or length taken off, with the exception of a slight tweak at the neckline which I'll get on to in a moment. I used a metre of each fabric with some fairly large scraps left over.
The pattern is available in both PDF and printed format and I went with the PDF for speed and also because a tee shouldn't mean too many pages to assemble. I found the PDF format a little frustrating. The pattern pieces are whole rather than a half to be cut on the fold so it feels like you are wasting quite a bit of paper and printing. There is no layout provided in the instructions to see which sheet contains what but I've got into the habit of looking through the PDF to check if there are any pages I won't need to print for my size or the view I have chosen. As I was doing the short sleeves I discovered I could get away without pages 13-14 and 17-18 but that's still 27 pages to print for a t-shirt pattern! I also thought there was a page missing from the PDF and presumed it was because there is nothing on it as it is one of the central pieces of the back piece. But no! It turns out page 1, which looks like an explanation page is actually that missing piece as it has the grainline running down the side! I presumed it was just an explanation but there is in fact a code on each page with symbols in grid to show you where that page fits in to the pattern as you assemble it. There are three different symbols, one for each part of the pattern. Page one has the symbol for the back piece on it. I was very confused and if it was my first PDF pattern I would have been really stumped as I was looking everywhere for a note in the instructions explaining this. I'm all for not wasting that first page with the scale square on but I think numbered pages would be a lot more straightforward!
The instructions for the pattern are on the website rather than as part of the download; the file that comes with the pattern is just a few pages with a cutting layout, size chart (which I loved as it is so thorough and means you can really see the adjustments you might need to make) and basic information about the design, fabric and notions required. The online instructions are generic for pretty much any t-shirt pattern and cover set in and raglan sleeves and various hemming options. I liked that options are presented for a more experienced sewer to choose their preference depending on fabric as we all know knits can behave so differently but I must admit I found this method of presenting pattern instructions a little odd. I'm used to having specific instructions and illustrations for the pattern I'm working on. It made them feel a little vague and I didn't feel like I achieved the best result I could; I certainly wouldn't have done if I was a knit/tee sewing newbie!
The tees still came together pretty quickly as I have made so many knit garments now and go on autopilot with my own construction method so I didn't rely on the instructions much. I sewed twill tape to the shoulder seam allowances for stability rather than the iron on tape they recommend. The one stumbling block I came across was the neckband which I didn't get a very good result on first time around. This is the Pattern Fantastique online tutorial to follow. A fairly wide neckband comes with the pattern which I think adds to the retro feel and I love the grey contrast used on this in the sample. The pattern doesn't come with a specific length of band for each size but rather suggests cutting a strip and assessing how much you should stretch it out as you pin it on. Whilst I understand that this is to do with the fact that different knits have varying amounts of stretch and recovery I've always achieved better results with patterns that do specify a length on the pattern pieces and generally find 10% less than the length of the neckline works well. Both of these knits are fairly stable and don't have that 'ping back' that you get in a lycra blend so I was wary of stretching them out too far but because of this that wide neckband really didn't want to lay flat around the inner edge, particularly at the tight corners of the slight boat neck. I was working on the white tee first and to solve the problem on this one I simply resewed the neckline with a large seam allowance, making the band skinnier and the neckline wider. This worked out quite well but I wonder if the wider neckline is what makes me prefer the grey over this one. When I came to make the grey tee I cut down the width of the band before construction so I've ended up with a skinny band which lays flat but the intended width of neckline.
Anyway, once I'd battled through those little frustrations and have started wearing the tees they've become very valuable additions to my wardrobe and I plan on making more! Despite having reservations about how the fine lightweight jersey would work for this pattern as I had envisioned something a little more stable I've actually been getting a lot more wear out of the grey tee! It sits a little better on the body and looks neater tucked in to high waisted trousers and skirts. There's something about the white one that I'm not quite sure on and I'm wondering if I should go down a size for a neater fit on the shoulder (although it is designed to be slightly dropped) and do a bit of an FBA as I'm seeing some drag lines around the bust.
When I was ordering the tee fabric I decided a long sleeve warmer version would definitely be useful too, especially to wear under my ever-growing collection of dungarees so I got a metre and a half of this Mushroom Merino Jersey Stripe too although I didn't have a pattern in mind at the time. Once it arrived I commenced another great big sewing pattern search but started with the PDF pattern stash on my computer first and found the perfect thing. Its too easy to overlook those digital files we have hidden away and get carried away with something new and shiny isn't it?!
That pattern was the Molly Top & Dress from the Sew Over It My Capsule Wardrobe: City Break ebook and is this is the surprise star of this post! The fit is bang on and the striped merino is amazing, I just feel super comfortable and great in this top. I tested the Mia Jeans pattern way back when this was released and can't believe I overlooked so many of the other patterns in the ebook. It really is a great little wardrobe to sew up and I've got the Erin Skirt lined up next although perhaps I could do with a Molly Dress first!
This pattern ticks so many boxes for me. Firstly the slim fitted sleeves. This is always my personal preference as I have very small wrists and forearms and don't like to feel like I'm swimming in fabric. It makes it feel like the top fits right when the sleeves are nice and snug. But the design of these sleeves is an added bonus as the top portion is 'grown on' to the body pattern piece and the shoulder seam is actually down above the elbow. Kind of similar to a dropped shoulder but the top portion of the sleeve is still fitted. This detail really lifts an otherwise fairly basic design. Plus I LOVE how this feature works in stripes. The top sleeve has the grain running one way and the lower the other so the stripes change direction and you get a lovely v-shaped intersection of stripes along the shoulder seam running down the arm. I'm particularly happy that I managed to nail the stripe matching for this!
As well as the sleeves I really like the relaxed but flattering fit through the body which has just the right amount of ease. The size and shape of the neckline is also spot on for my preferences. The width and depth shows off a bit of collar bone without being so wide that it shifts about and slips off the shoulder and it works both layered under other tops/dungarees or on its own.
I'm used to Sew Over It instructions so this came together incredibly smoothly and was such an enjoyable sew because the merino jersey behaves so well. I wash it in the machine on a 30 degree gentle cycle and use a cool to medium setting on the iron which it responds to really well. I absolutely love this stuff and can't get enough. I've not yet used much merino jersey in paler shades and I was concerned with this one that it would be a little see through as it is on the lighter end of the weight scale but it is nice and dense, the perfect thickness for a warm tee. I love the subtlety and scale of the mushroom stripe although it was a tough choice as The Fabric Store have got a great range of stripes in at the moment. I considered using the stripes in the opposite direction on the neckband as Lisa has in one of her Breton samples but thought it might look a little odd in a stripe of this width and am glad I kept it clean and simple cutting down the centre of one of the wide cream stripes.
As I did with the Equinox Tees I used my usual construction method with knits and assembled the seams with a narrow and short zig zag stitch on my machine for accuracy and then finished them off on the overlocker. Hems I used a twin needle in my regular machine for. A stretch needle rather than ballpoint worked best on all of these fabrics. I have recently repaired some of the zig zag stitching on my well worn activewear and twin needled hems on other garments using this Maderia Aeroflock thread in the bobbin but didn't use it on these as I still only have black and was impatient! I picked up a cone from Barnyarns to try at the Knitting & Stitching Show and have been so impressed with the resilience it has given my stretch seams and hems! Similar to woolly nylon thread this slightly fluffy thread has some elasticity in it and also has a soft finish so is great for activewear seams in particular which may rub. I'll be purchasing a white/cream and grey cone for use on other projects for sure.
So there we have it. Three incredibly useful knit garments to have in the wardrobe, in quality fabrics, all whipped up in an afternoon! I have a feeling you'll be seeing a lot of all three of these as part of my ensembles during May!
Wednesday, 24 June 2015
A Knit Scout Tee Duo
So ok, this is basically a post about t-shirts so may not seem that exciting but bear with me here because I'm super happy with how these turned out and the fabrics themselves are lovely! I have (on a number of occasions!) previously documented my love for the Grainline Studio Scout Tee pattern. It's such a great simple, wearable wardrobe staple and I think my favourite pattern to use as a basis to play around with my ideas. Over time I've used it almost as a block to create different styles of loose fitting woven tops. My hammered silk version with a dipped hem got worn literally to death (I was so sorry to see that go!) and I keep meaning to make another with a chevron of diagonal pleats across the front after the success I had hacking the pattern for my pleated cotton voile version. I love the neckline, cap sleeves and the way it fits around the shoulders so when I spotted that a few of you had made it up in knit fabric rather than woven I had a bit of a moment of revelation...this may be my perfect pattern for a relaxed fit tee!
The fabric for both of these tops came from the crazy 
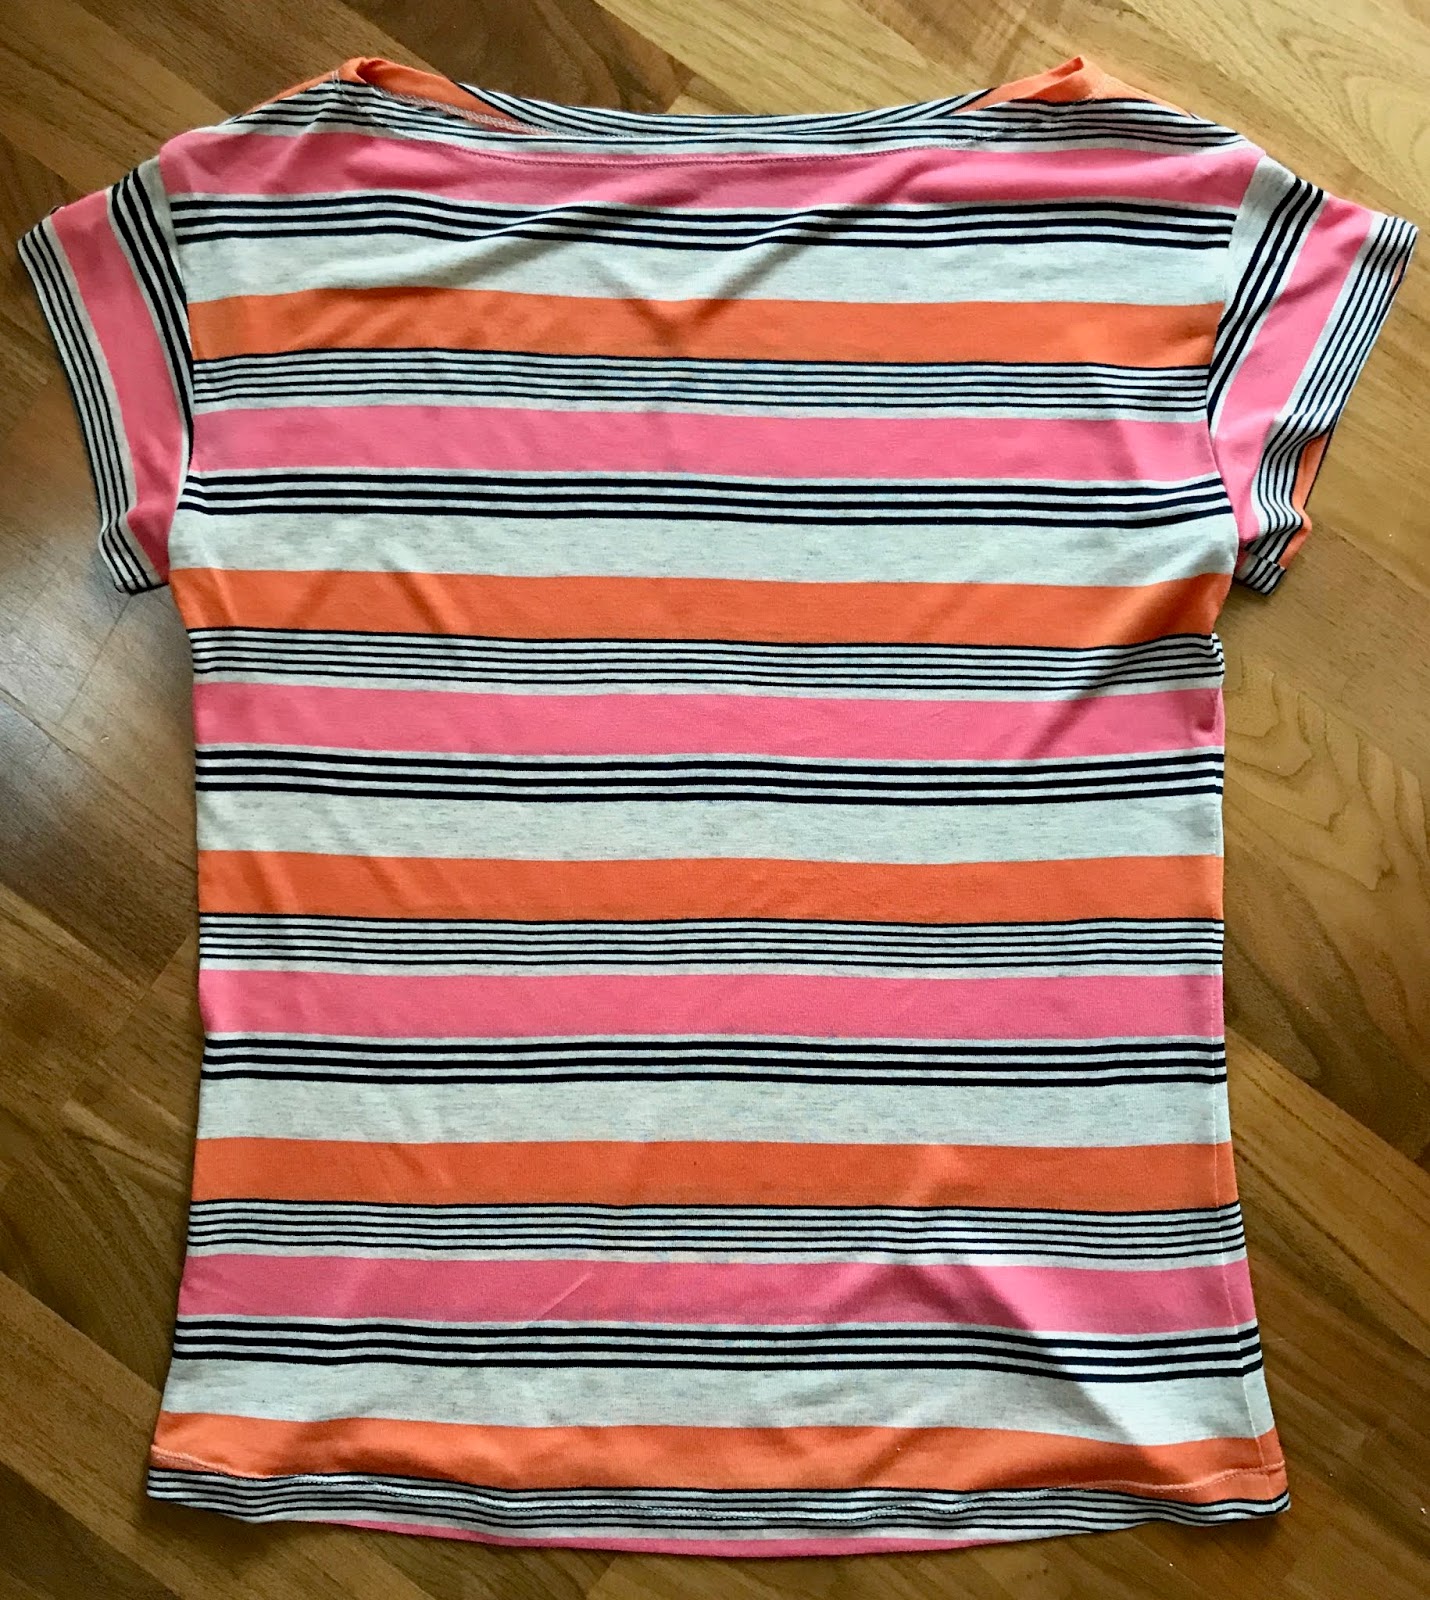
Cloth House moving sale a couple of months ago. I can't remember exactly how much they were to begin with but both were in the £10-15/m price bracket and were down to just £1/m! I had to show some serious restraint and only allow myself to buy fabrics which I could 100% imagine as a particular type of garment and that I could see myself wearing. The inky blue burnout jersey jumped straight out at me as it was so unique and the striped cotton jersey was a must buy after I touched it and discovered how beautifully soft it is! I needed less than a metre for each so as I already had the pattern these are a total bargain at £1 each!
I'd previously fiddled around so much with the Scout Tee pattern, changing the hemline e.t.c that rather than try and work out what changes my currently traced version of the pattern involved I decided to revert back to the original. I cut a straight size 4 as the size guide indicated despite briefly considering going down the 2 as I was using a stretch fabric. I'm pleased I did this as I like the relaxed fit and also the burnout jersey doesn't actually have a huge amount of give.
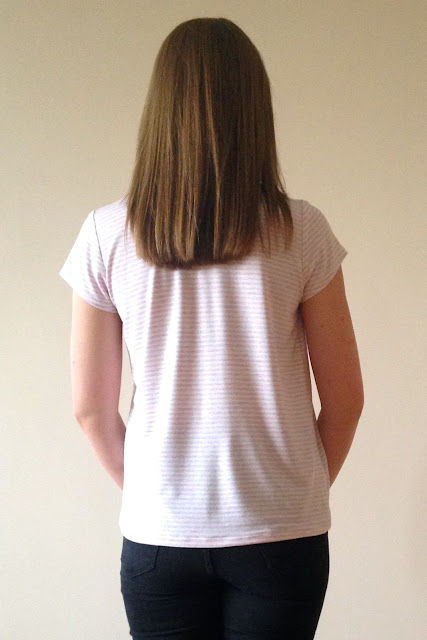
I like how these each turned out so differently because of the varied stretch and drape of the two jerseys. The blue burnout is closer fitting, the pink and white stripe is much more relaxed and slouchy; I think the colours and designs of the fabric suit the fit of each one! The pink and white stripe is also slightly heavier which means the hem hangs a little little longer when worn oddly enough. The stripes are so fine that I wasn't all that bothered about matching them. I simply made sure that the same coloured stripe was at the armhole and hem of the side seams on both front and back pattern pieces then lined everything up when I was pinning.
As has become usual practice for me with knits now I used a narrow zig zag stitch on my regular machine to assemble all the seams then overlocked them for a nice professional finish. I love how this looks on the inside of the pink striped version especially. I always have to remind myself as I go that Grainline patterns have a 1/2" seam allowance - that tripped me up on the Archer Shirt before!
I used a stretch needle in my regular machine for both, but for some reason it didn't like the burnout jersey as much and I had some issues with skipped stitches. I think it struggled moving so regularly between the two thicknesses of fabric where it was and wasn't 'burnt out'. The burnt out areas are super fine and basically sheer. I have to wear a little black cami under this one!
My stretch twin needle worked great on both tops to finish the hem, cuffs and neckband. I turned up a slim hem twice to give some weight and body but turned up the cuff hems just once as I didn't want those little sleeves to end up so short they looked odd. I just stitched with the twin needle close to the edge and left it raw as you don't have to worry about knits fraying like wovens.
Apart from altering the stitches I used and adding a little piece of twill tape to the shoulder seams to stop them stretching out, I pretty much sewed these up following the same instructions as for a woven version. The major difference was of course the neck band as I didn't need to use a bias tape facing as my fabrics had stretch. I cut the band on the cross grain (so the stretch was running through it) and looked at the width of bands on other tops I own before settling on cutting them at 1.75" wide including seam allowance. After a bit of blog research I decided to make the band 7/8 of the length of the neckline. It needs to be shorter than the neckline opening as stretching the band out slightly as you sew will help it sit flat against the body when worn. I attached it in the same way I've attached every other knit neckband I've sewn and really feel like I've got this technique nailed now!
I'm sure this is the way that everyone else does it but following these steps has given me the best results:
- Sew together the two short ends of the band then fold it in half lengthways and press.
- Divide both the band and the neckline into four equal quarters and mark these with chalk or a washable pen.
- Pin the band to the right side of the neckline, aligning raw edges and lining up these marks. By dividing both pieces into equal quarters the stretch of the band ends up more evenly distributed around the neck.
- Sew the band to the neckline using a narrow zig zag stitch.
- Press the band up towards the neck and the seam allowances towards the body of the top.
- Stitch with a twin needle or zig zag stitch around the neckline, close to the seam line to secure the seam allowances in place.
I have previously finished the seam allowances at the neckline on my overlocker but with both of these tops I just trimmed it right down as close as I could get to the twin needle stitching. This is much less bulky and looks a lot better with the sheer burnout jersey.
It is well worth trying this pattern in a knit fabric in my opinion and it's got me thinking outside the 'recommended fabric choice' box looking at my other patterns now too. I think the key to why I love these is in the close fit around the shoulders so I don't feel swamped by them as I sometimes do when I try on oversized ready to wear tops. I'm glad I turned my head away from some more exciting and intricate sewing projects for a while to whip these up as they are the perfect additions to my summer wardrobe; comfortable, washable and infinitely wearable.
Subscribe to:
Posts (Atom)