Showing posts with label Colette. Show all posts

Sunday, 14 February 2016

Floral Silk Laurel Blouse

Despite the blog being a little quite recently I've had a surge of sewing time over the last couple of weekends and the completed projects for 2016 are starting to build up! Today I've got one of my favourite's so far to share with you. It involves one of those fabrics which you just don't want to waste on a project which doesn't work out so I resorted to an old faithful pattern which I knew it would be perfect for; the blouse version of the Colette Laurel. I like the finished garment so much that I wore it the day after I finished it which I always thinks tells volumes about a project and also how much you enjoyed making it! If I've really struggled with a garment it often gets put in the wardrobe for a good while before I can enjoy wearing it without being reminded of my frustration!

Diary of a Chain Stitcher: Floral Silk Laurel Blouse with Bell Sleeves

Fit wise I don't have a huge amount to say as I've made this blouse twice before (once in polka-dot poly crepe for me and once in a cotton print for my Mum) and the dress a couple of times too. I cut the size 2 as before, with the adjustment I made to the armhole on my Mum's version as my blouse has always been slightly tight across the chest. I've discussed previously my confusion about the drafting of the armholes on this pattern (the dress version's are an entirely different shape to the blouse despite using the same sleeve piece!) and as usual had some trouble getting these set in completely smoothly. I do have much more movement in the arms now though thanks to the increased width across the chest. I love the way it fits through the body with those double darts and central seam at the back providing some lovely shape, so it's a shame I've never been able to quite figure out those sleeves!

Diary of a Chain Stitcher: Floral Silk Laurel Blouse with Bell Sleeves

I did have much less trouble getting the neckline to sit flat than I have done on my previous dress and blouse versions. I think this is mostly down to my increased sewing experience in general more than anything. I again opted to use a facing instead of the bias tape finish recommended by the pattern, I've previously found this to be really tricky to get to sit flat around the tight corners of this boat shaped neck. I throughly clipped the seam allowances once I'd attached the facing, gave it a good steamy pressed and under stitched all the way around before catching the edges of the facing down at the centre back and shoulder seams. This seemed to do the trick and everything is staying put so far.

Diary of a Chain Stitcher: Floral Silk Laurel Blouse with Bell Sleeves

I bought this stunning floral silk crepe at the House of Hackney sample sale back in November/December. I love the colours, matt finish and depth in the painterly design. I was actually slightly disappointed by the range of fabrics on offer this time as the majority of what was left when I arrived (on the first day) was furnishing weight. But this silk leapt out at me so I didn't have to leave empty handed! As it was the end of the bolt I got about a metre and a half for the price of a metre which escapes me now but was around about £20. A bargain for such quality stuff! I so love this floral that I made sure to be super careful not to waste anything when cutting out so I could use it in another project too. I was considering using it for a yoke or something but actually think I've got just enough to squeeze out a camisole from using the T&TB Fifi Pyjamas which I've been meaning to make in a silk for ages.

Diary of a Chain Stitcher: Floral Silk Laurel Blouse with Bell Sleeves

My machine really didn't get on with this fabric and despite using a fine sharps needle it was punching through the silk making a funny noise. Some experimentation later it turned out it was the thread that was causing the problem. I was using a big reel of black Moon thread which is 100% polyester but switching to a reel of Gutermann Sew All (also 100% polyester) resolved the issue. I've encountered this before when working with this weight and type of silk and am not sure why it makes such a difference when they are actually quite similar threads...does anyone know any more about this than I do?

Diary of a Chain Stitcher: Floral Silk Laurel Blouse with Bell Sleeves

Now I'm looking at photos I slightly wish I'd thought about pattern matching the centre back seam but I kind of forgot it was there as all my other versions I just pull on and off over my head. I tend to think it's not worth pattern matching florals as they tend to be quite random but the large scale of these buds does really necessitate it. It would have been quite the challenge to get the intricacies of this pattern matched up exactly! At least it's at the back and it would have used more of my precious fabric anyway!

Diary of a Chain Stitcher: Floral Silk Laurel Blouse with Bell Sleeves

Apart from the fabric choice the other difference with this blouse is my choice to add on the bell shaped gathered cuffs from variation 3. I'm loving all the 1970s style sleeves in RTW at the moment and thought these might be a subtle way to try the look of those lovely trumpet sleeves without it getting too impractical! I'm really enjoying wearing them (especially in this print) and have got my eye on the newly released New Look 6414 to give a more extreme version a try. Thank you for the great gathering tips you left on my last post by the way! They would have come in handy when assembling these cuffs but I'd already done the gathering on this by then so still found the process slightly painful! Sewing the gathered cuff on evenly was trickier than I expected and some areas are still a little too poofy for my liking, partly because of the body two layers of this silk has. I do love how beautifully crisp the hems are though because of the instruction to under-stitch them!

Diary of a Chain Stitcher: Floral Silk Laurel Blouse with Bell Sleeves

I had no time to sew in January so once I finally got some time on the machine I will admit I fell into the trap of just wanting to get something finished. I probably should have taken the time time to use french seams wherever I could but actually silk in this form is so tough that overlocking actually worked beautifully on it, once I'd got the tension right. I also think in certain areas a french seam would have been too bulky because of the way this design is drafted. The sleeves are troublesome enough to set in without having to fuss around with sewing the armhole seam twice and you don't want extra bulk in the seam of the cuffs as it would effect the gathering and the way they sit.

Diary of a Chain Stitcher: Floral Silk Laurel Blouse with Bell Sleeves

Looking at it with jeans here I'm wondering if it's a little short and perhaps it could have benefited from a baby/rolled hem to give it an extra inch but I think I'm quite likely to wear this top tucked into high-waisted pencil skirts so it's fine as it is. I don't want to be unpicking anything from this silk, the needle holes would definitely remain a permanent feature! It's actually a great top for tucking in as the shaping provided by the darts means that it remains quite slim through the waist so there's not too much excess fabric to tuck in.

Despite my uncertainty about certain elements of this pattern I do keep picking it up again and again as I just love wearing it and it looks great in such a variety of fabrics and prints. This might just be my favourite version to date and it probably won't be my last!

Wednesday, 14 October 2015

Simple Striped T-Shirt Dress

I've just got a simple outfit to share with you today as the garment I was planning for this month's Mood Sewing Network project has taken slightly longer than anticipated, plus my weekend sewing plans were scuppered by lack of a zip! Aargh! Luckily I picked up quite the selection of gorgeous fabrics in the Mood Fabrics Los Angeles branch when I visited the U.S. last month and I've got a little backlog of speedy projects to show you.

Diary of a Chain Stitcher: Seamwork Mesa Dress in Theory striped jersey from Mood Fabrics

As I said in the post about my trip I loved the LA Mood store and found all the staff to be so welcoming; helping me pull out bolt after bolt as I was being my typically indecisive self! I was pretty overwhelmed by the size of the place and variety of fabrics available when I first got there and spent a good couple of hours looking around. With limited suitcase space I was trying to make careful choices and only buy things which I had a project idea for. This striped Theory jersey was one of the first things I picked, it practically jumped off the shelf and into my hands! It was screaming at me to become a simple shift style t-shirt dress and that's exactly what I turned it into pretty much as soon as I got back to the UK. It's unfortunately sold out online but I'm generally tempted by every other Theory fabric that pops up on the site!

Diary of a Chain Stitcher: Seamwork Mesa Dress in Theory striped jersey from Mood Fabrics

As I hoped it turned out to be the perfect fabric for this kind of garment. It is a fairly thick and stable jersey and actually has a double faced quality as the stripe is woven into just the right side of the fabric and the reverse is a plain grey/blue marl. As the stripe is so fine I didn't attempt any sort of pattern matching. It was genuinely a pleasure to cut and sew with this stuff. It's really stable and didn't fray at all; I had lovely crisp edged pattern pieces to work with. 

Diary of a Chain Stitcher: Seamwork Mesa Dress in Theory striped jersey from Mood Fabrics

I employed my standard knit-sewing techniques to make this. I assembled the seams with a narrow zig zag stitch on my machine (using a ball point needle) and finished them together on my overlocker. I personally find this to be the most accurate and robust method. I chose to use a grey thread despite the fabric being a dusky blue as I didn't have anything on hand to match and grey is great for becoming fairly invisible next to most colours. I used a twin needle to finish my hem and cuffs and also to topstitch round the neckline. My twin needle and I got off to a rocky start but now it's my favourite finishing technique for knits and I use it whenever I can!

Diary of a Chain Stitcher: Seamwork Mesa Dress in Theory striped jersey from Mood Fabrics

I used the Mesa Dress pattern which is from Seamwork Magazine a couple of months ago and only needed a yard of the 1.5 yards of fabric I bought. It's actually my third version of the dress (I haven't got around to blogging the other two yet!) and I'm still fiddling with the fit as I hope it will become my go-to pattern for something both speedy to make and easy to wear. My first version was a size S with no adjustments and while it fits as I think is intended it was a little too clingy for me. I wanted a looser shape.

I had experimented with adding some width to the side seams on my second version but while this helped a little the main area I had fit problems with was the shoulders and bust. Surprisingly the shoulders seemed too narrow for me (I usually have the opposite problem) and that was causing everything to ride up and the neckline to sit funny whenever I moved. On this dress I tried adding width down the centre front fold line (1.5" total) so I had more room at the shoulders and bust and kept the looser fit I liked at the waist and hips. It also meant I didn't add anything to the back pattern piece as I liked the amount of ease in that area, although looking at these pics I think I could stand to attempt to add some shaping at the waist. 

Diary of a Chain Stitcher: Seamwork Mesa Dress in Theory striped jersey from Mood Fabrics

Along with the adjustments I made, this fabric really helped me to achieve something closer to the fit I wanted to. It's got a bit more body and structure than something like a viscose jersey so it holds a shape and doesn't cling. The slightly spongy feel means it does need a really good press though. Despite being slightly wary of how mini the skirt length was in the promo pictures for the pattern I didn't adjust the length for the version and I really like it. I did choose to omit the hem slits at the side seams as I didn't love that feature on my first version. I just wanted something super simple and easy to wear.

Diary of a Chain Stitcher: Seamwork Mesa Dress in Theory striped jersey from Mood Fabrics

Despite the not yet quite perfect fit this is a garment that I am totally in love with and has received a tonne of wear since I finished it a couple of weeks ago. I like the shape of the neckline and the length of the sleeves in particular. I'm really excited to share my almost complete intended Mood project for the month with you soon... I'm determined not to rush it though, I'm pretty happy with how it's turning out so far!

Tuesday, 16 June 2015

Striped Linen Laurel Dress (and giveaway winner!)

Today I've got a garment to share with you that I'm actually not all that pleased with now it's done. It's been one of those projects that just doesn't quite turn out as you imagined it in your head. I had high hopes for this one too after the success of my Little Black Laurel Dress. I was convinced this gorgeous Theory Striped Linen from Mood Fabrics would be the perfect match for the pattern and I was excited about creating the perfect chic Parisian shift dress for throwing on on hot summer days! However, although I have had a lot of wear out of black version and was really pleased with it I've never quite nailed my perfect fit for this pattern. Despite the fabric being gorgeous and so easy to sew with it does have a crisper hand which seems to emphasise the fit issues. I think I'd have better success with a fabric with more drape or at least something softer.

Diary of a Chain Stitcher: Theory Striped Linen Laurel Dress from Colette Patterns

I cut the size 2 again and repeated the side seam alteration from my black version to slim it down a little. Luckily I had transferred the amount I removed from the side seams to my pattern pieces so this was easy! I can still just about get this on and off comfortably without a zip. I also lowered the bust point by 1/2" which seems to be a fairly common adjustment among the sewing community with patterns from Colette. I retained the pattern's original length, despite shortening it for my black version, as I wanted to feel comfortable wearing this one without tights.

Diary of a Chain Stitcher: Theory Striped Linen Laurel Dress from Colette Patterns

I'll admit this isn't a silhouette I wear a lot anyway but even after fiddling with the fit this still feels a little sack-like. The double ended darts in the back are lovely and I like the shape through the waist and hips from front on but it just doesn't sit right across the chest. I'd be tempted to go down a size and try a full bust adjustment if I made this again but to be honest I'm not sure I'm keen enough to make this again to put in the effort of making that adjustment and fiddling around with the sleeve heads (which I'll get onto in a minute!). Maybe I'd get better results if I used the pattern pieces for the blouse and lengthened them as I've been much happier with the tops I've made using this pattern. Colette patterns do seem to be the one's that I have the most trouble fitting and it's usually something to do with the armhole or bust. I must just have a very different body shape to what their blocks are drafted from.

Diary of a Chain Stitcher: Theory Striped Linen Laurel Dress from Colette Patterns

I've never really got on with the sleeves on the Laurel Dress and with this version I had real trouble setting them in as there is so much fullness in the sleeve head. When I had trouble with this on the blouse I thought it was because I had redrafted the armhole on the bodice piece slightly as it dipped inwards making the garment tight across the upper bust. However I noted last time that the armhole shape was different on the dress pattern pieces and I didn't need to do that. The fact that the same sleeve pattern piece is used for both versions might explain it not fitting particularly well into the armhole but I'm not sure. I unpicked and restitched my sleeves a number of times but in the end gave up and settled on this being the best I could do. It's definitely not my best sewing and the sleeve is hanging somewhat strangely with weird folds forming from the excess fabric. They're slightly gathered along the seam line too which is disappointing.

Diary of a Chain Stitcher: Theory Striped Linen Laurel Dress from Colette Patterns

One thing I am delighted with on this garment is my stripe matching! Despite risking cutting the pattern pieces on the fold instead of in a single layer (which I should really develop the patience for  when trying to match a print!) it turned out beautifully across both side seams and the centre back. I was careful to make sure everything looked like it line up when pinning but t didn't really require any extra effort at that stage.

Diary of a Chain Stitcher: Theory Striped Linen Laurel Dress from Colette Patterns

As with all my versions of the Laurel I used a facing I drafted off the main pattern pieces instead of finishing the neckline with bias binding. The under-stitched neckline sits MUCH better than on my previous versions because this lovely linen presses up so beautifully. I also simply turned the hem of the sleeves up twice and topstitched it instead of using bias tape as recommend in the pattern; partly because I like the length they then end up finishing at and partly through laziness!

Diary of a Chain Stitcher: Theory Striped Linen Laurel Dress from Colette Patterns

I finished all my seams on my overlocker using a mid grey thread. I treated myself to a new set of grey thread cones a little while ago as I felt like just having black and white wasn't covering all my bases. I'd heard a myth that a nice mid grey was great for blending in with pretty much any colour and print and after a couple of months of sewing with it I've found that to be nearly always true!

Diary of a Chain Stitcher: Theory Striped Linen Laurel Dress from Colette Patterns

It's a shame I'm not happy with the overall look and fit of this as I'm really pleased with my finishing! This might be getting sent straight to the charity shop... I have been sewing up a storm recently though and this appears to be the only real wadder I've made so stay tuned for some more successful stories!

And finally, selected from a whopping 95 entries by random number generator, the winner of the Sew Over It Vintage Shirt Dress sewing pattern is Lara from Dreaming of Avonlea! Congratulations Lara, I really hope you enjoy sewing it up. I'll be sending you an email to get your postage details and then the ladies at Sew Over It will send out your prize!

Sunday, 22 February 2015

A Cotton Laurel Blouse for my Mum

Diary of a Chain Stitcher: John Lewis Heritage Collection Cotton Laurel Blouse from Colette Patterns

Today I've got a completed garment to share from last year which for once isn't for me to wear! When I made my polka dot blouse version of Colette Pattern's Laurel back in June last year my Mum spotted it and decided she quite liked the simple lines of it for herself which I wasn't surprised about as I had thought it was just her sort of top! I really love the proportions of it and particularly the shape of the neckline and length of the sleeves. A few weeks later she popped in to see me when I was taking part in the John Lewis Sewing Bee and while she was in the store chose fabric for her own version. It's a quilting weight cotton from the Heritage Collection they released for their 100 year anniversary and I only needed just over a metre even with cutting the pieces to line up the coloured stripes. I don't usually sew with this sort of cotton as I prefer to wear drapier fashion fabrics so it was a bit of a treat for me to work with a fabric which is so straightforward to cut, sew and press!


Diary of a Chain Stitcher: John Lewis Heritage Collection Cotton Laurel Blouse from Colette Patterns


The main reason I don't usually sew garments for other people is because I am nervous about achieving a good fit, particularly when that person isn't around to try it on throughout the construction process. However, with this I felt fairly confident as my Mum is a very similar size, shape and height to me and tried on my top for me! It was a good fit so I cut the same size 2 for her; the only issue she had was the same as mine which was feeling a bit restricted above the bust. (I made this before my Black Laurel Dress and so before I discovered the strange difference in the drafting of the armholes!) I made the adjustment I was planning on doing for my next version for myself to add a bit of width at this point. I simply taped a scrap of paper behind this part of the pattern piece and drew in a new curve at the point where the armscye dips in, adding about 1/2" at the narrowest point and smoothly blending it back into the original line. I just did this to the front pattern piece as the back fit beautifully. I did however measure the length of the total armhole (subtracting the seam allowances) and check that it was still roughly the same as the length of the sleeve head so I didn't end up with too little or too much to ease in when setting the sleeves.

Diary of a Chain Stitcher: John Lewis Heritage Collection Cotton Laurel Blouse from Colette Patterns

In general the stripe matching wasn't too tricky on this as there are not many pattern pieces to match (just side seams and a centre back seam) and the bold bands of colour are quite wide. The only thing which bothered me for a while is that the bands are made up of a series of smaller stripes which kind of wiggle across the fabric and this means the widths of the bands vary at different points. After a bit of thought I decided there was no way to conquer this irregularity and I just had to accept that the widths of the bands may be slightly different where they met at the side seams. I'm really happy with how the placement of the pattern works with the darts and how that orange stripe appears to curve down over the bust. I won't lie...that was a happy accident!

Diary of a Chain Stitcher: John Lewis Heritage Collection Cotton Laurel Blouse from Colette Patterns


Because of the irregular widths of the bands I wasn't too bothered about any exact matching at the armholes but I did know I needed to consider the placement of the stripes on the sleeves to avoid it looking like a hot mess where things intersected and also to keep the design of the top looking balanced. Once I had cut my front pattern pieces I marked on the tissue where the bands of colour began and ended then used this to roughly work out where I wanted the orange and green bands to lie on the sleeve head, using the notches as a guide to match things up. I drew this onto the sleeve pattern pieces so it was super simple to cut. I was really happy to have the paper version of the pattern opposed to the PDF at this point as I could see straight through the tissue! I'm really pleased with how the sleeves turned out as when Mum's arms are by her sides the colours appear to run straight across the garment, through the body and sleeves.

Diary of a Chain Stitcher: John Lewis Heritage Collection Cotton Laurel Blouse from Colette Patterns

I again used a facing I drafted myself to finish the neckline rather than using the bias tape recommended in the pattern instructions as I found this really tricky to manage around the tight curves at the shoulder seams. As with my original Laurel blouse and subsequent versions I still had real trouble getting the neckline to lay flat, particularly in this crisper cotton despite vigorous pressing. I clipped the seam allowances right up to the stitching line every half inch or so and then under stitched all the way round. Once the edges of the facing were then tacked down by hand at the shoulder seams and centre back I was happy with the finish. On my polka dot version I had to resort to topstitching to stop the facing flipping out to the right side and I really didn't want to have to do that on this one as it would have been much more obvious crossing the various colours.

Diary of a Chain Stitcher: John Lewis Heritage Collection Cotton Laurel Blouse from Colette Patterns

The only other change I made this time was to turn and press a small hem on the sleeves rather than using bias tape. It is a lovely clean finish which worked well in this weight of cotton but I might revert back to using a bias tape on future versions. On my polka dot blouse I used a lovely soft inch wide rayon binding which makes the sleeve edge really comfortable and also the width of it seems to help the sleeve sit nicely against the arm.

Diary of a Chain Stitcher: John Lewis Heritage Collection Cotton Laurel Blouse from Colette Patterns

I finished all my seams on the overlocker and turned the hem up twice before machine stitching which turned out beautifully in this lovely cotton. The insides look really clean and tidy and you get a really nice crisp edge when pressing.

After seeing the things that I have been sewing Mum has been tempted recently to buy herself a sewing machine; all I need to do now is persuade her that she'll love sewing as much as I do and she can make herself some more blouses!

Wednesday, 14 January 2015

Little Black Laurel Dress

The first completed garment I've got to share with you in 2015 is actual one of my final projects of 2014. It racked up a fair few wears in those last few weeks of 2014 too! They don't lie when they say having a classic little black dress in your wardrobe will save your bacon for any occasion; this dress worked perfectly for pre Christmas cocktails, pub drinks, lunches and even an afternoon tea!

Diary of a Chain Stitcher: Little Black Colette Laurel Dress in Mood Fabrics Wool Sateen

Ever since making my polka dot version of the Laurel blouse from Colette Patterns I'd had a plain black version of the dress variation on my mind. I'd had such success with the style and fit of the blouse on me that I'd been dreaming about it in all kinds of fabrics and variations to be honest! For this dress I used this gorgeous wool sateen from Mood Fabrics and only needed just over a metre. It's kind of like a fairly lightweight suiting with a small amount of stretch, I bet it would make a lovely pair of trousers. It's hand is very smooth and it was lovely to sew with. I pre washed it on a gentle cycle in the machine as I was hoping this would be a big success and I'd want to be able to easily and regularly wash it. Then I gave it a good steamy press and it came up beautifully. It didn't need any other special treatment and I finished all the seams on my overlocker.

Diary of a Chain Stitcher: Little Black Colette Laurel Dress in Mood Fabrics Wool Sateen

I dove straight in and cut the size 2 as I had done with the blouse, presuming that it was drafted exactly the same. Spoiler alert, they're not! If you lay the front blouse piece onto of the front dress piece you'll see that the main difference is in the shape of the armhole. On the blouse pattern piece the armsyce dips inward quite dramatically just above the bust which seems a little odd to me and incidentally my blouse is slightly tight across the chest at this height. The dress pattern piece doesn't dip in in the same way and the armhole shape looks much more normal so I didn't make my planned alteration of adding some width in this area. The fit turned out fairly well but I do have a couple of small wrinkles here which I think indicate that I need a little more room across the lower bust next time. I think the bust points could also do with being lowered a tiny bit.

Diary of a Chain Stitcher: Little Black Colette Laurel Dress in Mood Fabrics Wool Sateen

Once the basic shift was assembled and before the sleeves were set in I popped it on to assess the fit. To be honest it felt like a bit of a tent and not the flattering, figure skimming shift I imaged. Comparing the pattern pieces the width of the dress and blouse are very similar but I think the blouse still feels flattering with this much ease because of the shorter length and the fact that you are not hiding any of your shape below the waist. A bit of pinching and pinning later, I decided that it could be salvaged by taking it in down the side seams. I took out 1" on the double from each side seam from the waist to hem and graded out to nothing at the underarm as I didn't want to loose any ease across the bust. That's 4" in total that I removed from below the waist!

Diary of a Chain Stitcher: Little Black Colette Laurel Dress in Mood Fabrics Wool Sateen

My rather makeshift fitting worked out pretty well as I love the shape of it now. I've transferred the alteration to the pattern pieces so I can copy it next time. However, it does tend to ride up a little/not fall back into place without a tug when I stand so I think I could do with a little more room around the bum. I'll probably take slightly less out of the side seams from just above the hip to the hem. The only other change I made was to take 1 1/2" off the length. I expected that I would need to as I'm fairly short and (after pinning the hem up at different heights and inspecting in the mirror) I found going as short as I dared made this silhouette work better for me. After a number of wears I feel like I got the length spot on as I feel comfortable sitting, standing and even going up and down the escalators from the tube! It's not really practical for work but I've got a lot of evening and weekend wear out of it as I say. I hemmed it with two turns of 1/2" before machine stitching.

Diary of a Chain Stitcher: Little Black Colette Laurel Dress in Mood Fabrics Wool Sateen

I omitted the zip in this as I knew from making the blouse that I could get it on and off without a fastening. Thankfully, partly due to the stretch in this sateen, this still worked once I had taken in the side seams! If making in a fabric with no stretch whatsoever I would need to include the zip now I have slimmed it down. You can see from the rear picture that I had some trouble setting in these sleeves and I'm not particularly happy with the final result but they are at least comfortable and wearable. I'm wondering if the issues I had with easing the sleeve heads in compared to blouse version were caused by the fact that the armholes are different shapes so the length the sleeve head has to be eased into is different? Despite my issues with the sleeve heads I do love this length of sleeve!

Diary of a Chain Stitcher: Little Black Colette Laurel Dress in Mood Fabrics Wool Sateen

I drafted my own facing for the neckline (as I did for the blouse) instead of using bias binding to finish it as recommended by the pattern. I don't often have much success with this technique and trying to get the binding to sit flat around this shape of neckline on my first version of Laurel was a total nightmare which I ended up giving up on. I still had some trouble getting the neckline to lay flat but clipping, under stitching and thoroughly pressing the edge sorted that out. I also caught the facing down with a few hand stitches at the centre front and back and shoulder seams to prevent it trying to flip to the outside.

Diary of a Chain Stitcher: Little Black Colette Laurel Dress in Mood Fabrics Wool Sateen

Despite the construction issues and tweaking of the fit that I still need to do on this pattern I'm delighted with this super wearable addition to my wardrobe! It dresses up or down with different shoes and I love it with a skinny belt too. Have any of you got any other pattern recommendations for a classic little black dress?

Tuesday, 9 December 2014

Striped Italian Cotton Shirt

I've got a bit of unselfish sewing to share with you today and one of my first ventures into sewing menswear. This is actually the second shirt I've made from scratch, plus I did a bit of shirt customising earlier in the year too which I fully intend to share with you but I'm so pleased with this one I couldn't wait to blog about it! For my stepdad's birthday this year I promised to make him a shirt. This was way back in April and we had the fabric picked out and ordered by May so considering I finished this just a few weeks ago I was a bit slow about getting it done; sorry Peter! I'm blaming a hectic summer of work and feeling a bit nervous about getting this as close to perfect as possible without much practice! I'm pleased to report he was very happy with it though (and I'm delighted!) so hopefully it was worth the wait.

Diary of a Chain Stitcher: Green Striped Colette Negroni Shirt with Stand Collar

He picked out this gorgeous 
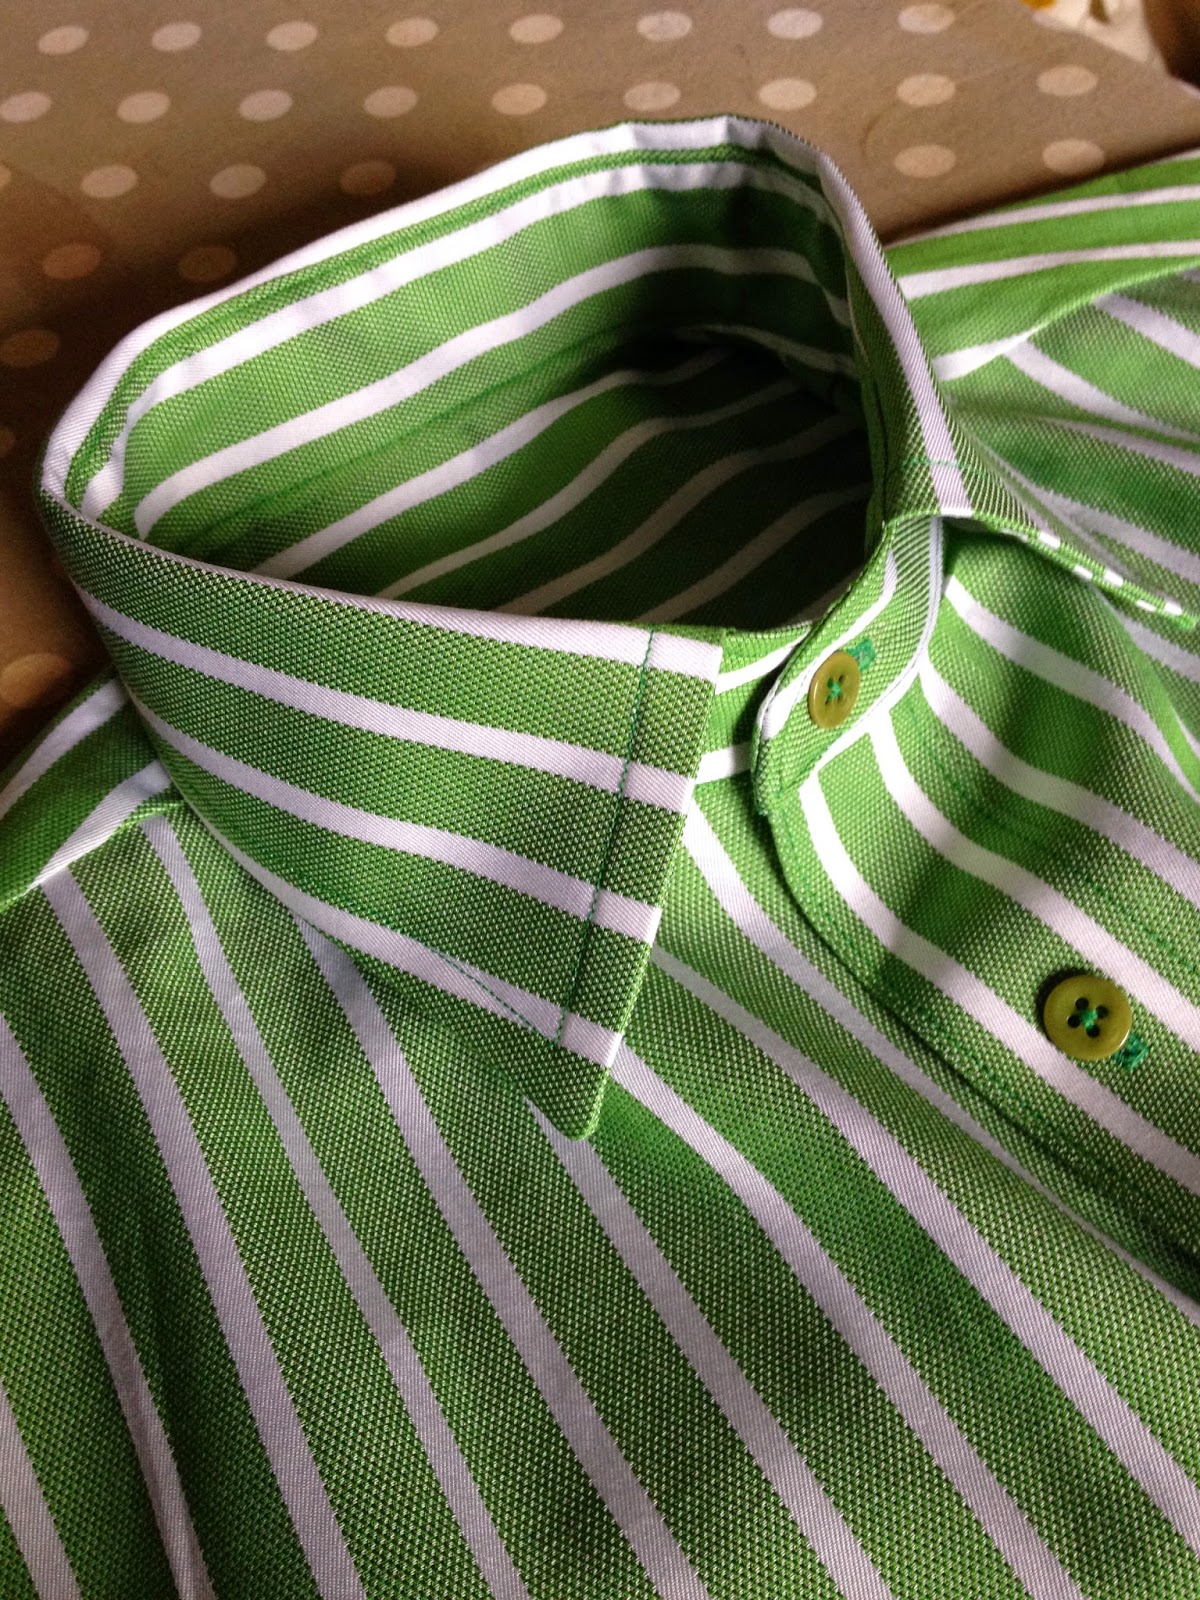
Italian cotton shirting from the Mood Fabrics website and it was a brilliant choice. It's great quality and so lovely to work with. The green is actually a bit brighter than it came out in photos. I'm not going to lie the stripe matching was another big reason for my nervousness about even getting started with this project but I enjoyed the extra challenge and it turned out to be really motivating and satisfying to work with a fun fabric rather than a plain colour or basic white.

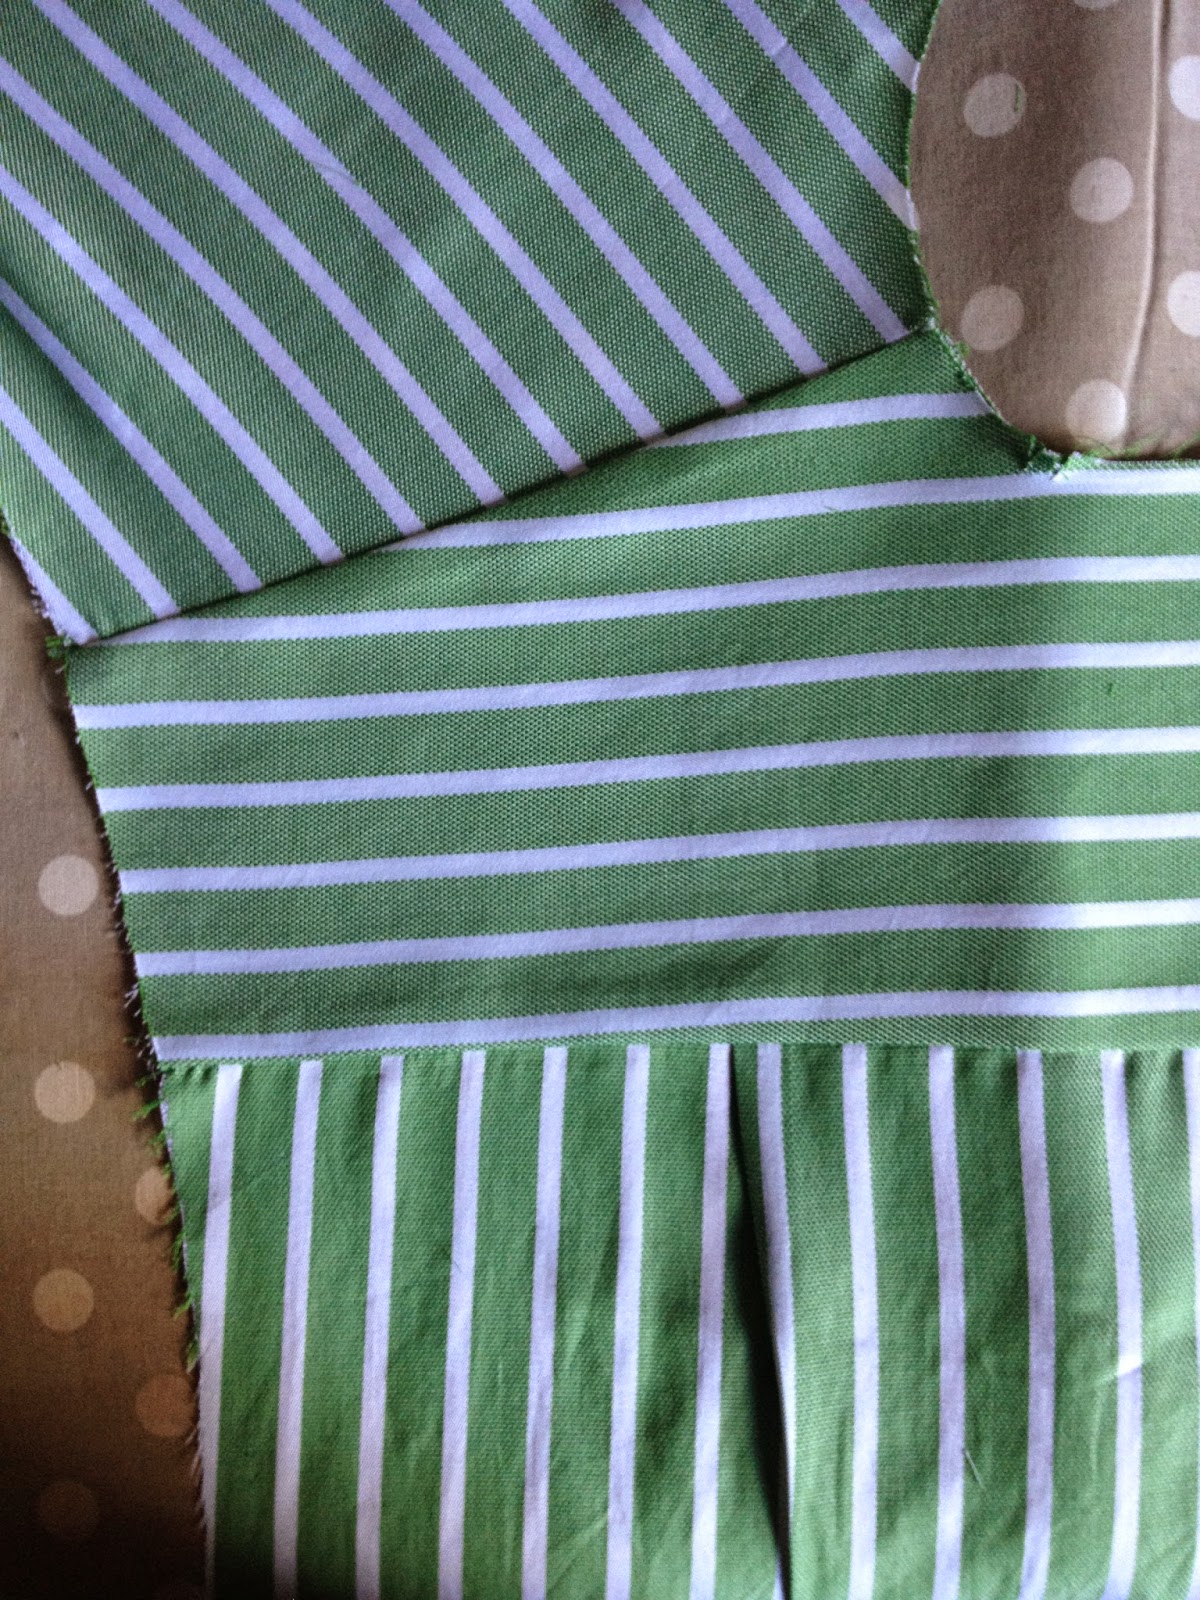
I haven't done a lot of pattern matching before, especially not in wovens and with such a bold stripe. I spent a long time staring at the fabric and moving things around. I cut everything that needed matching on a single layer and pieces that were to be cut on the fold I traced out into one large piece so I could cut it flat. It took a bit of maths to work out the spread of the stripes across the two front pieces and placket but I got there in the end. I'm really pleased with how it turned out with the exception of the sleeve plackets which I didn't attempt to match at all. I hadn't made enough of them to be able to even begin to fathom what stripe was going to end up where once they were folded and turned through!

Diary of a Chain Stitcher: Green Striped Colette Negroni Shirt with Stand Collar

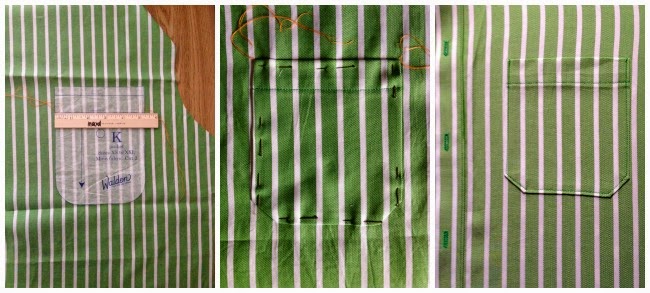
I am so pleased with how the pocket lines up. I cut this piece by laying the paper pattern piece onto the fabric shirt front piece, lining it up with the placement markings and factoring in the seam allowance. Then I used a pencil to mark where each of the stripes were around the top and bottom edges of the pocket. I could then simply match up these marks with the stripes of the fabric as I laid out out to be cut. It worked out perfectly and the pocket almost disappears into the shirt front! I picked up this pattern matching tip from Sew Busy Lizzy's post on her gorgeous waterfall coat.

Diary of a Chain Stitcher: Green Striped Colette Negroni Shirt with Stand Collar
I love the burrito method for constructing the lined yoke!

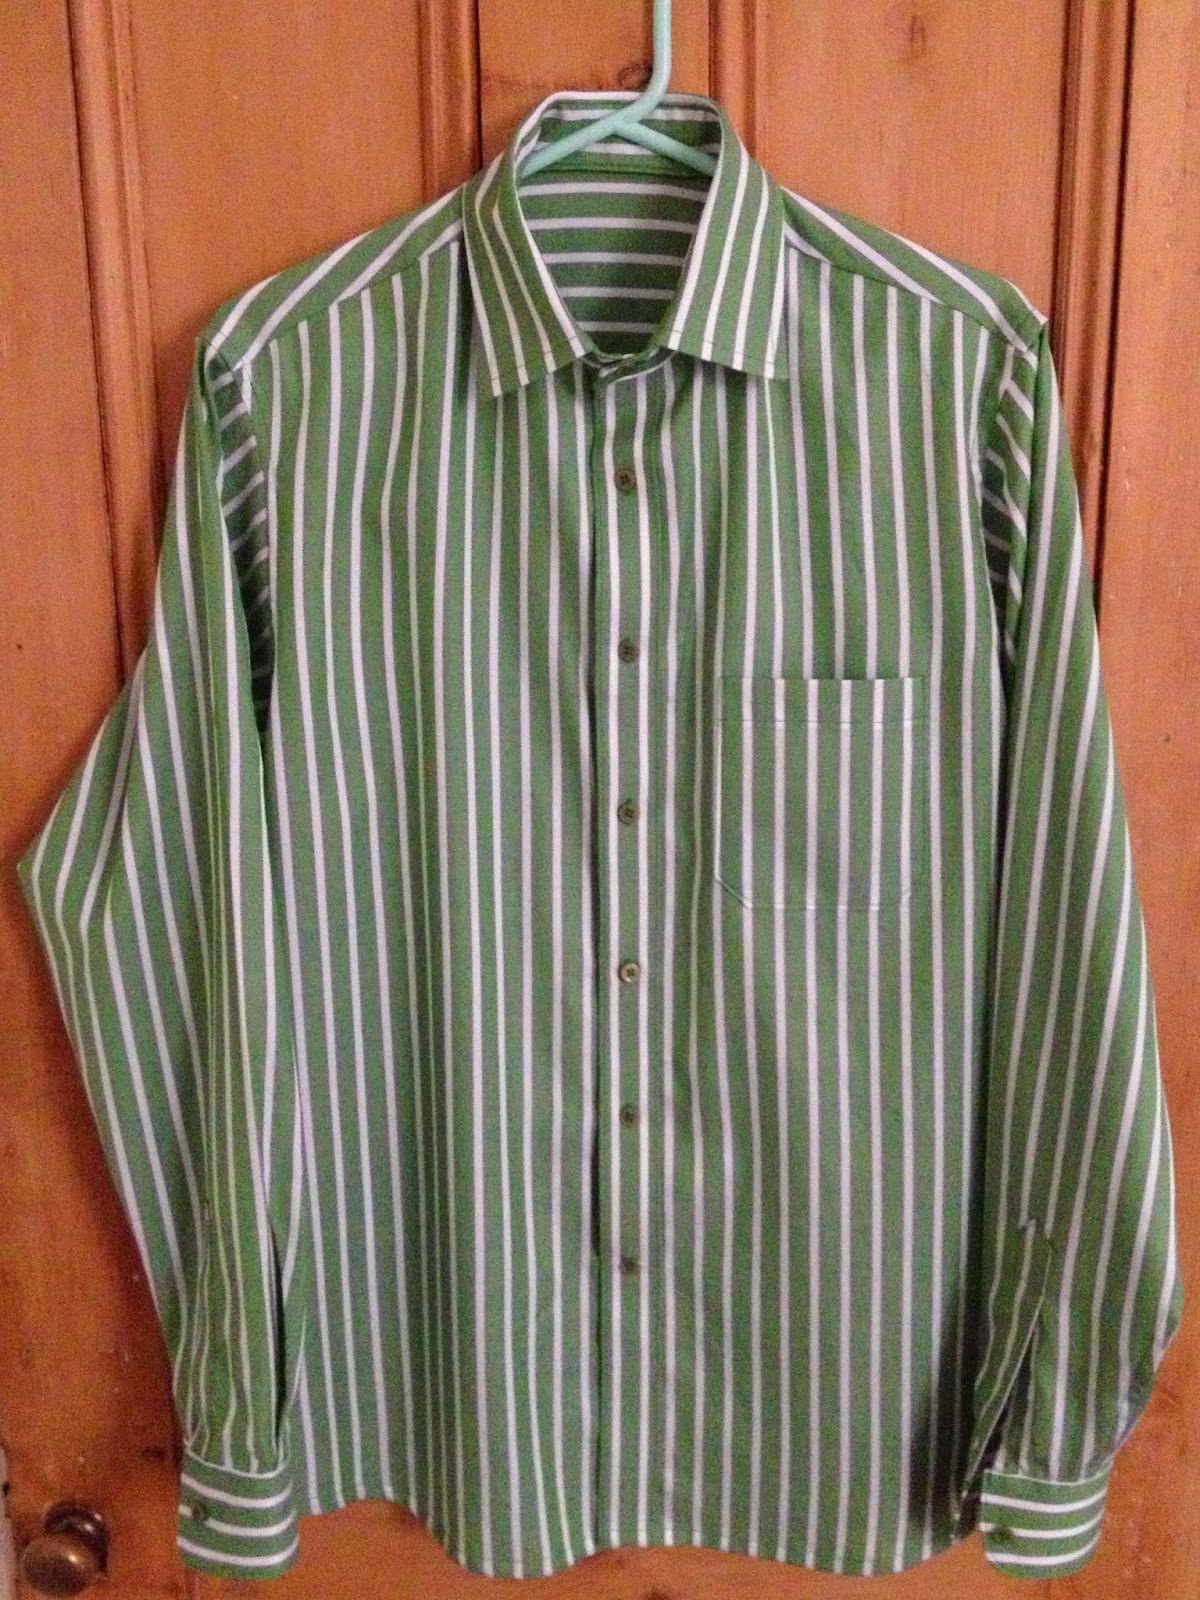
The other bit of pattern matching I did was to have the stripes running across the yoke and continuing down the sleeves. I had done a lot of looking at RTW striped shirts to help me decide on placement of the stripes but, although I knew I wanted to cut the yoke on the cross-wise grain, when it came to cutting out the sleeves I couldn't think of what exactly I was trying to match. With a ladies top I might match stripes where they intersect at the front and back of an armscye and use a notch to do so but for the life of me I couldn't work out the best thing to do with the shirt. I was watching a bit of Modern Family that evening when I suddenly spotted the stripes running across the yoke and down the sleeves of Cam's shirt! I literally jumped up out of my seat and Ste thought I'd gone a bit nuts. I was thinking 'thank goodness I've over-ordered on the fabric and still have enough to cut new sleeves'...but when I checked the sleeve pieces I had cut I realised by very happy accident they were just about going to match up anyway!

Diary of a Chain Stitcher: Green Striped Colette Negroni Shirt with Stand Collar

So enough about stripes. You probably want to know what pattern I used. It is in fact the Negroni from Colette Patterns with a few noticeable modifications. I used the Negroni patten for the first shirt I made (which was very similar in style to this one when finished) despite it having a casual convertible collar rather than the stand you see here and a simple front facing instead of a button placket. You might wonder why I picked it when such a main feature of the design isn't what I wanted but I had various reasons. Firstly, I couldn't find a single pattern (big 4, indie, bursa or vintage) which incorporated all the design elements I wanted so knew I'd have to make some changes. Secondly, it was my first foray into shirt making and following indie pattern instructions for new to me techniques had served me well thus far (and they did not let me down here). Thirdly, Peter from Male Pattern Boldness had run a very thorough shirt sew-along based on the Negroni which includes a brilliant post on how to add a more formal collar, stand and button plackets to the shirt. Finally, there are may design elements I do like about this pattern like the slim, modern cut and flat felled seams.

Diary of a Chain Stitcher: Green Striped Colette Negroni Shirt with Stand Collar
The seams are all flat felled or concealed as part of the construction

I asked my stepdad to let me borrow a shirt which he was happy with both the fit and collar style of. It came in so handy to have a shirt next to me throughout the entire construction process; both to check fit and what certain elements should look like when complete. So I highly recommend you have one to hand if making your first shirt. To begin with I measured this shirt against the main pattern pieces and found that the Colette size medium appeared to be a good match. I just took 1/2" off the sleeve length. I didn't have the luxury of having my stepdad around or even close by enough to try on the shirt throughout construction so measuring it up in this fashion was a nice reassurance that it wouldn't end up miles too small or big!

Diary of a Chain Stitcher: Green Striped Colette Negroni Shirt with Stand Collar

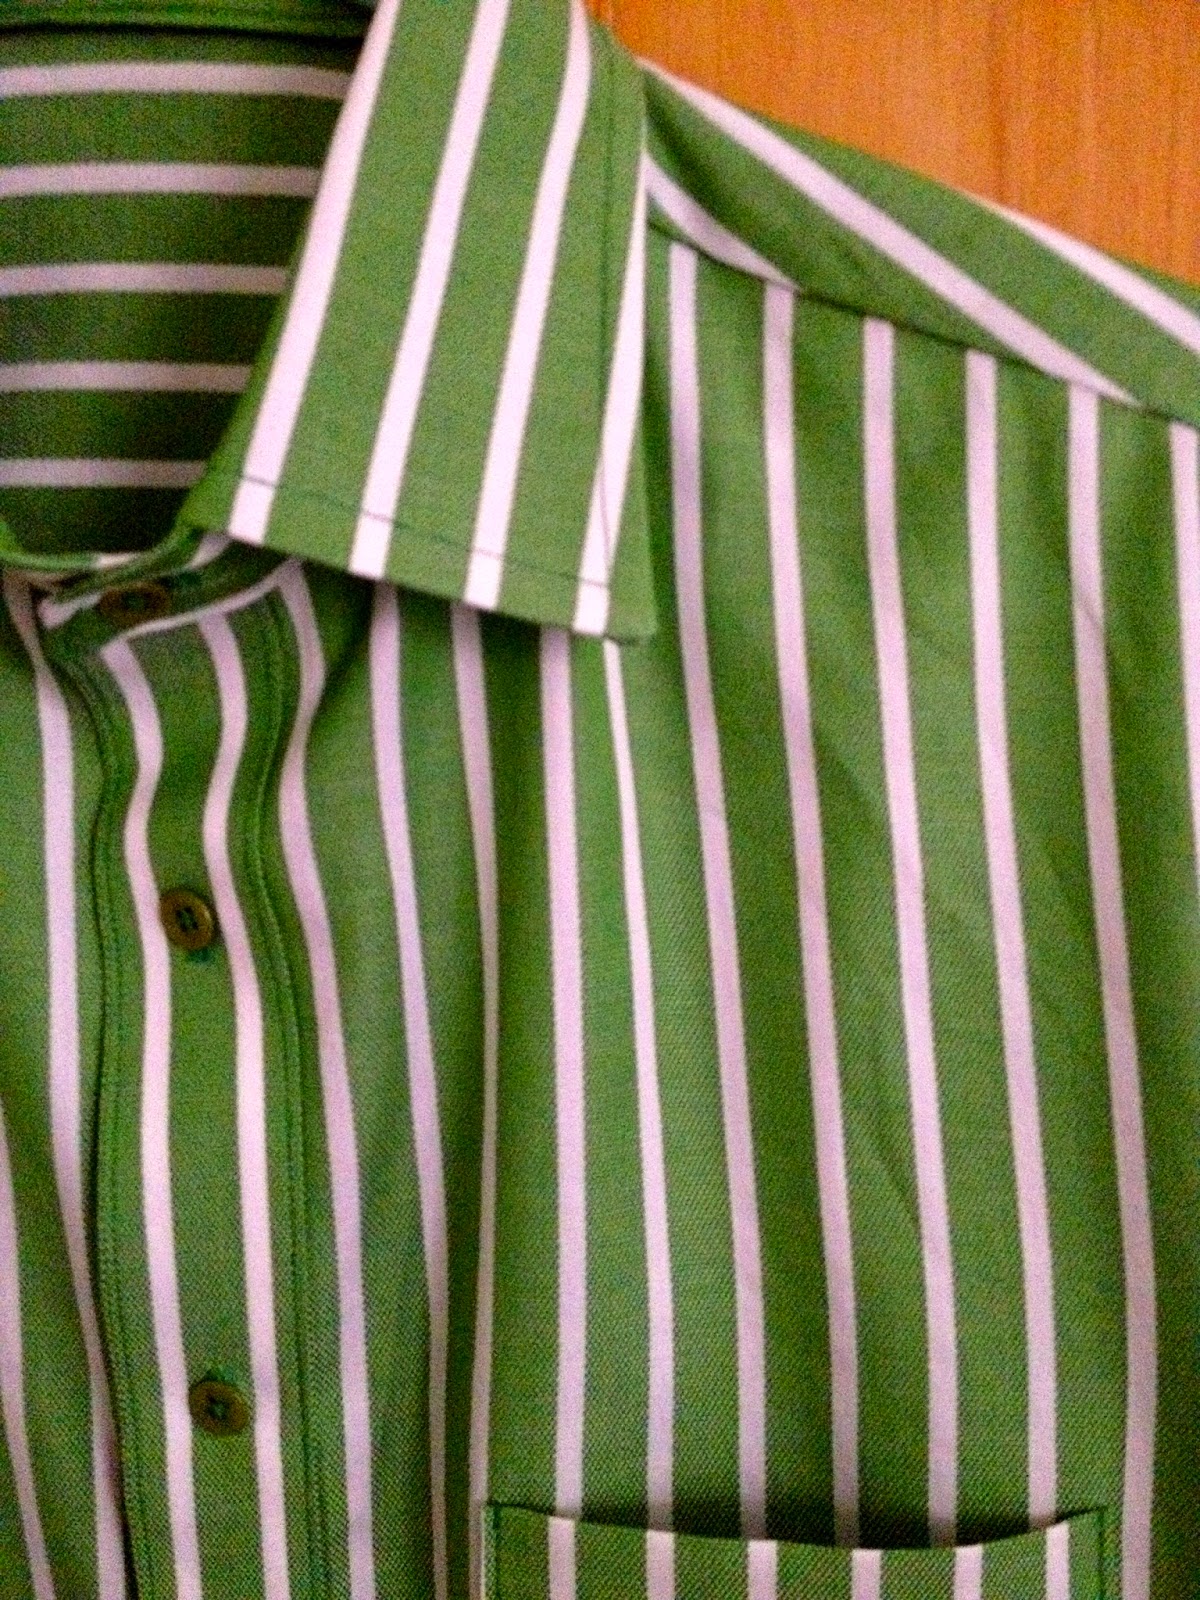
The next thing I used the RTW shirt for was to draft my new collar and collar stand. Following Peter's instructions you basically trace the collar and stand pieces of the shirt onto paper and then add seam allowances all around. I did a quick check to make sure that these pieces would fairly closely match the neckline of the Negroni and thankfully everything was looking good. I don't imagine, if you have chosen the pattern size based on the size of the RTW shirt as I did, that you would end up with much of a difference as the collar size increases on the Negroni in tandem with the chest size as it generally does in RTW. I was really apprehensive about the new collar the first time around but it worked out great with that shirt so I felt entirely confident in this method this time. After all, if you've lifted the collar size and shape directly from a shirt which fits you're pretty much guaranteed to get a result if you stick accurately to your seam allowances. I also followed Peter's instructions to draft and construct the left and right front plackets which was super simple as it's basically two long rectangles of the right width.

Diary of a Chain Stitcher: Green Striped Colette Negroni Shirt with Stand Collar

One more change I made was to add slots for collar stiffeners (or stays/bones if that's what you call them!) to the underside of the collar. This was actually pretty straightforward and I worked out how to do it by looking at the collar of the borrowed shirt. These need to be added before you start assembling the collar and involve using a second under collar piece. I'm thinking about doing a brief tutorial about it if anyone is interested? I'm so, so pleased with how this feature turned out. In fact it may be my favourite thing about the whole garment! As with my Archer Shirt I used Andrea from Four Square Walls' tutorial to guide me through the construction of the collar and this is absolutely my neatest one yet. All her little tips such as trimming down the interfacing and the under collar before construction really make such a difference to the finished result.

Diary of a Chain Stitcher: Green Striped Colette Negroni Shirt with Stand Collar

Another feature I'm really pleased with (despite the lack of stripe matching!) are the sleeve plackets. Now I get why Lauren says that she uses the Negroni placket pieces and construction method on all of her own shirts; the instructions are awesome, the process is much less fiddly than my other placket experiences plus all six I've done have turned out pretty fantastically with no unpicking. These are again my best yet, no doubt helped by how crisply this fabric pressed.

Diary of a Chain Stitcher: Green Striped Colette Negroni Shirt with Stand Collar

The one element I'd like to work on next time are the cuffs. I'm fairly pleased with them but think they could be a little neater, plus I really struggled when attaching them to the shirt to get the corners to meet the placket neatly. I'd like to try trimming down the inside cuff pieces just by 1/8" as I did with the under collar and inner collar stand as I think this would keep everything tight and flat and help the seam line roll away from the outside. Does anyone know of any wonderful shirt cuff tutorials which will improve my construction of them as much as Andrea's advice has improved my collars?!

Diary of a Chain Stitcher: Green Striped Colette Negroni Shirt with Stand Collar

To finish it off I considered using a bias facing to hem the curved edge as I've seen this mentioned a few times recently and on my archer is ended up a little twisted. However I found the curve of this hem shallow enough that the hem pressed in nice and flat when turned and stitched. The buttons Peter bought when he was with my Mum at a local sewing/craft fair which he said he was lucky to make it out of alive as everyone was going so crazy over fabric...sound familiar to anyone?! I sewed the bottom buttonhole horizontally and with white thread instead of green for a bespoke touch and dotted a little bit of fray check onto them once cut open to increase their durability. I ended up unpicking and redoing quite a few of the buttonholes to get them just right, I wasn't about to let down a good job with an uneven buttonhole!

I'm foreseeing some more menswear sewing in my future; I'll definitely be making some more shirts as I've enjoyed the experience so much. I picked up some light blue Paul Smith shirting from Fabrics Galore at the Knitting and Stitching Show a couple of months ago which feels so smooth on the skin so I can't wait to make that up. Just got to decide who the lucky recipient will be this time!

Tuesday, 10 June 2014

Polka Dot Laurel Blouse

Diary of a Chainstitcher: Polka Dot Laurel Blouse from Colette Patterns

Today I've got a make to share with you which I briefly mentioned in my round up of Me-Made-May. I finished this project at the start of the final week and it's such a success that I wore it twice before the end of the month and it's been on at least once again since then!

It's the blouse variation of Colette's Laurel shift pattern which my wonderful Dad treated me to for Christmas last year. I nudged him in that direction as I loved the style of it despite the reservations I had about how it might work on me as I've tried on many an unflattering shift dress in the past. However, despite the lack of waist darts I don't at all feel like I'm wearing a sack and I am absolutely delighted with the result! 

Diary of a Chainstitcher: Polka Dot Laurel Blouse from Colette Patterns

The only other Colette pattern I have made up for myself is their free Sorbetto Blouse which I had some real fit issues with. For this make I cut the size 2 and overall was pretty delighted with it straight out of the envelope. It's very slightly tight above the bust when I move about so I might adjust this on my next version but apart from that it's a real winner and has definitely made me want to try out some more Colette patterns. The only other thing I have to say about the fit is that I feel this is a perfect length on me at 5ft3" so if you are taller I would consider whether you need to lengthen the bodice and/or sleeves.

Diary of a Chainstitcher: Polka Dot Laurel Blouse from Colette Patterns

I love the chic figure skimming fit of the blouse, which is largely created by a pair of double ended darts in the back. It was my first time sewing this type of dart but it was very straightforward, not much different to a normal one! I think this is a great pattern for a beginner seamstress as it's not too involved and includes a couple of different techniques like these darts and the bias tape finishings which are well explained and illustrated in the instructions.

Diary of a Chainstitcher: Polka Dot Laurel Blouse from Colette Patterns


The only change I made in terms of construction was the finishing of the neckline. The instructions call for you to use bias tape on the edges which worked perfectly on the cuffs (I did cheat and machine stitch it down rather than slipstitch by hand as it barely shows on the dark crepe). However when it came to the lovely shape of that neckline I could not get the bias tape to sit nice and flat for the life of me. I think to finish it that way I would have needed very narrow bias tape and I was unsure about how neat I would be able to make it. I know opinions about facings vary quite widely but I personally love them so I decided to unpick my binding and draft my own for Laurel. This is very easy to do and Colette actually have a fab tutorial on it here (using another of their patterns to show it but it's exactly the same thing!).

Diary of a Chainstitcher: Polka Dot Laurel Blouse from Colette Patterns

This worked out so much better than the binding but despite clipping seam allowances and under stitching (which also stops the facing flipping out to the right side) still the neckline was not quite flat! I felt with this style of neckline and shape of top this was really important so just bit the bullet and topstitched it very close to the edge. You can actually hardly see the stitching and it 100% solved the problem so I'm happy with that solution. I think it would have been less of an issue in a fabric which doesn't have as much body.

All of the seams and the edge of the facing I finished on the overlocker which worked fantastically with the weight of the fabric; I'm super proud of my professional looking insides!

Diary of a Chainstitcher: Polka Dot Laurel Blouse from Colette Patterns

I used a polyester crepe which I picked up in John Lewis's January sale. I was a little apprehensive about the poly but it felt so lovely with great thickness and weight to it that I took the plunge anyway. I'm glad I did as it doesn't feel particularly synthetic at all and was fantastic to work with. I initially picked this up with the intention of making a La Sylphide Blouse (after seeing Lauren's gorgeous polka dot version for the sew-along) but at the last minute before cutting I decided that maybe I should go for a simpler silhouette and make something more easily wearable. I still couldn't resist a little bit of extra something though so cut out the 1960s style gathered cuffs which were eventually vetoed, I need to learn that sometimes plain and simple is the way to go! Discounting the cuffs but including my extra facings I could get the pieces for this out of just 90cm of 150cm wide fabric.

Diary of a Chainstitcher: Polka Dot Laurel Blouse from Colette Patterns

It's exactly the kind of garment that I need to be making as it's something I will get a huge amount of wear out of: I feel comfortable yet pulled together in it whether it's paired with jeans for work or with a pencil skirt for dinner/drinks. I'm really looking forward to making up one of the dress variations too so expect to see a lot of this little pattern around here!