Showing posts with label shirt. Show all posts

Wednesday, 18 March 2020

Vintage Rose Rayon Kalle Shirt Hack

I can't remember which image I saw that inspired this top. I possibly spied it on Pinterest or while I was scrolling through Instagram. All I can remember is that I couldn't find a sewing pattern for it! Again I'd limited my options by wanting to make it last minute before holiday so it had to be a PDF download but it sort of surprised me as I felt sure I'd seen many boxy little button up tops with v-necks around. Anyway, admitting defeat I turned to my pattern stash to see what I could use as a starting point.

Diary of a Chain Stitcher: Closet Case Patterns Kalle Shirt Hack in Rayon Crepe from The Fabric Store

The closest to the vision in my head was the Kalle Shirt & Shirtdress from Closet Case Patterns. I've made a maxi length version of this before which incidentally I also wore a lot on holiday and got a lot of compliments on! This time around I started with the cropped length of the pattern and I cut the size 8 as before. I'm sort of between the 6 and 8 on my top half and could probably stand to go down to the smaller size but I'm happy with the relaxed look of this. It sits nicely across the shoulders and doesn't shift about.

Diary of a Chain Stitcher: Closet Case Patterns Kalle Shirt Hack in Rayon Crepe from The Fabric Store

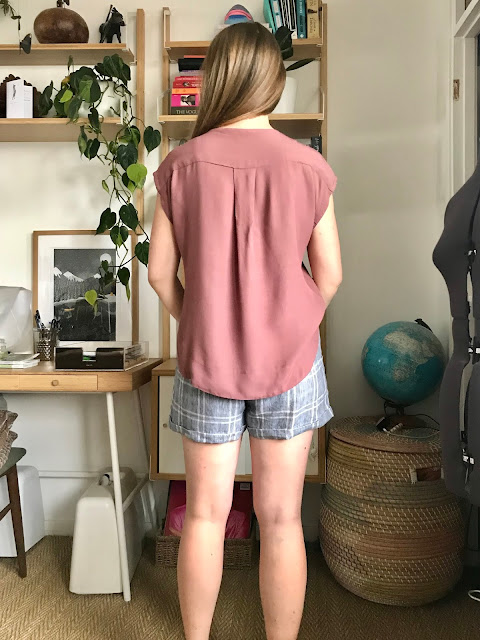
My first pattern hacking step was the lengthen the shirt by 5cm using the lengthen/shorten lines on the pattern. I decided to do this after seeing Lauren's version and liking how that added bit of length looked. I wanted to have the option to tuck the top in to high waisted bottoms which I now can. I also reduced the size of the centre back pleat in the same way as Lauren by shifting the pattern piece over the edge of the fold of the fabric by 1". This is a really easy way to reduce the roominess of the top without sizing down and potentially ruining the fit across the shoulders.

Diary of a Chain Stitcher: Closet Case Patterns Kalle Shirt Hack in Rayon Crepe from The Fabric Store

Next to create the v-neck I set aside the centre front placket, collar and stand pattern pieces and drew a straight line on my front pattern piece from the edge of the neckline at the shoulder down to the centre front. I used a pattern piece from the Sutton Blouse as a guideline for how deep to go. I think I could have got away with a couple of inches deeper as this is quite modest but very wearable! I then drafted a facing for the new neckline and centre front by tracing the shape of the front edge from the front pattern piece and making it 2" wide (including 5/8" seam allowance) all the way along. The back of the neckline remained the same shape and would now be finished using the yoke so there was no need to draft a facing for that.

Diary of a Chain Stitcher: Closet Case Patterns Kalle Shirt Hack in Rayon Crepe from The Fabric Store

When constructing this new neckline and centre front finish I first attached the facings along the centre front, under-stitched them and pressed them back to the wrong side. I then attached the back of the top to the front following the burrito method in the instructions. This means the whole front including the facings is sandwiched between the yoke pieces giving a clean finish. When 'burritoing' the yoke and front together sewing the shoulder seams I continued right the way along the back neckline, sewing the two yoke pieces together wrong sides together. I then turned the top to the right side through an armhole opening and the back neckline was finished neatly along with the shoulder seams. I wasn't 100% sure it would work (sometimes these trial and error methods of bagging out have resulted in a tangled loop of fabric!) but luckily it did and I'm so pleased with the clean interior finish.

Diary of a Chain Stitcher: Closet Case Patterns Kalle Shirt Hack in Rayon Crepe from The Fabric Store

Rayon and viscose are my absolute favourite type of fabric to wear; it so perfectly suits a whole variety of garments. It is not that easy to come by in good wearable prints so whenever I see it in a print or solid colour that I love I can't resist it and my stash has been growing! I've been adding the solid colour rayon crepes from The Fabric Store to my orders for a little while now and have a nice array of them in my stash. I tend to order just a metre or metre and a half as I see them all as little sleeveless tops or camis but recently I've been drawn to various styles of big billowing sleeves which require rather more fabric...Anyway for this top I decided to use the vintage rose colour, of which I had a metre and thought was a nice modern neutral to pair with other garments.

Diary of a Chain Stitcher: Closet Case Patterns Kalle Shirt Hack in Rayon Crepe from The Fabric Store

Rayon crepe like this can be a little shifty to work with particularly when cutting. I often cut it out on carpet rather than a smooth table surface or wooden floor as it has a little grip to keep it in place. To help keep everything on grain when you lay your pattern pieces out I often pin the selvedges together - if you're working on carpet you can even pin into it! Working with a rotary cutter can also help cut accurately as cutting with sheers lifts the fabric off the cutting surface slightly and can distort your pattern pieces. When sewing up be careful not to stretch it out and make sure to stay-stitch where required. Use lots of fine pins and keep your pins within the seam allowance if possible so as not to mark your delicate fabric.

Diary of a Chain Stitcher: Closet Case Patterns Kalle Shirt Hack in Rayon Crepe from The Fabric Store

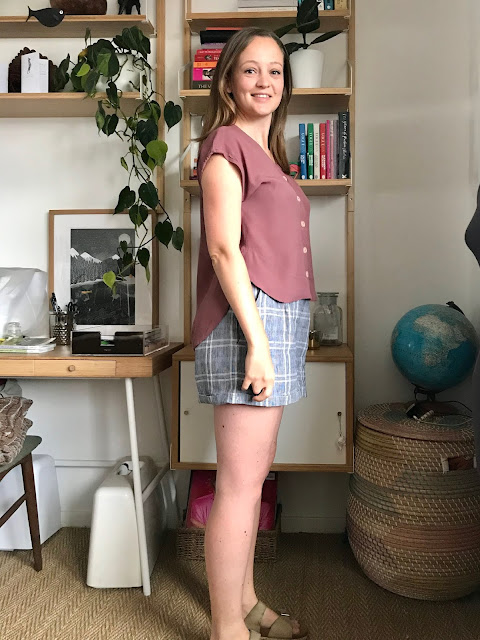
As the fabric was only 126cm wide and I had only one metre I had to play pattern piece tetris and omit the sleeve cuffs from the original pattern. This was a design choice I was considering anyway and I'm pleased with the resulting look. I only had teeny scraps of fabric left when I finished cutting. I could have chosen to leave off the hem facing and chose an alternative finishing method but I love the dramatic curve of the hemline which is only possible because of that facing. A regular turned and stitched hem which wouldn't work around such tight corners and a rolled hem wouldn't give the same weight and structure as the facing which emphasises the shape.

Diary of a Chain Stitcher: Closet Case Patterns Kalle Shirt Hack in Rayon Crepe from The Fabric Store

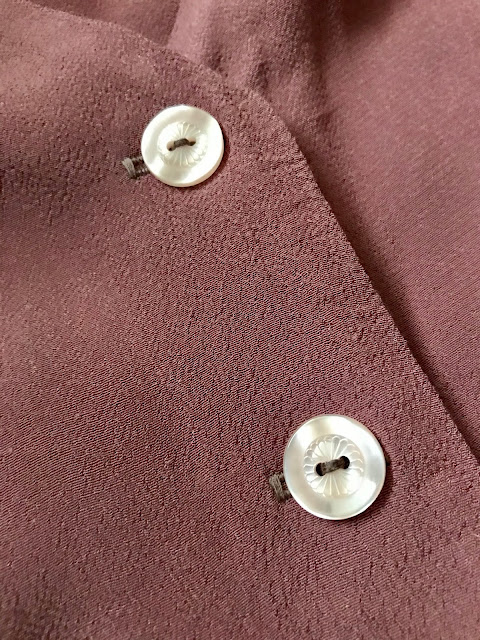
I've been trying to use buttons from my button box rather than buying new as I have so many. There were a few I tried out and I was initially after a more organic natural looking button but these one out in the end as they tie in tonally with the pink very nicely. Size wise they're spot on. I love a statement button. As I can just about get the neckline over my head without unfastening the top I faked the buttonholes. I love the automatic buttonhole function on my machine (the Brother Innov-is F420). However it creates such beautiful buttonholes I can hardly bear to cut them open! For these I sewed the buttonholes on the machine (so quick and easy!) then hand sewed the button on top, right through both layers.

This weight of rayon crepe is perfect for this oversized style of top, it hangs well without clinging and has beautiful movement. I can see me making a few more of these perhaps with different shaped necklines, a square hem and with sleeve cuffs to use up some of those small cuts of viscose lurking in my fabric hamper. Plenty of time to sew at the moment anyway. Stay safe and healthy everyone.

Saturday, 29 February 2020

Stitched Silk/Cotton Olya Shirt and Washed Linen Persephone pants

If you follow me on Instagram you might have seen that Ed and I went back to Africa for a couple of weeks in January. Ed has spent a lot of time in a number of countries there but last year's big trip to Botswana and South Africa was my first and I completely fell in love with the continent. We couldn't resist returning and this time travelled around Uganda, again camping in a tent attached to the roof of our hired 4WD. The absolute best way to experience the wilds of Africa! We had another amazing experience including trekking to see the mountain gorillas in Bwindi and the chimpanzees in Kibale plus a whole heap of other adventures on our self drive safari. I'll write another post with more details of our itinerary if anyone is interested but for now I'll try to stick to the sewing!

Diary of a Chain Stitcher: Paper Theory Olya Shirt in Stitched Silk/Cotton from The Fabric Store and Anna Allen Persephone Pants in Washed Linen from The Cloth Shop

Saturday, 25 January 2020

Grey Chambray Fairfield Button Up Shirt

Diary of a Chain Stitcher: Thread Theory Fairfield Button Up Shirt in Grey Cotton Chambray

I made a few presents this Christmas including a double gauze Named Lahja dressing gown for my Mum, a Deer & Doe Sirocco jumpsuit for my sister (which I love and will definitely be making one for myself so expect a review of that pattern in future) and this shirt for my brother. I’ve made a fair number of shirts for men now (my first here about 5 years ago!) but thought it was worth posting this particular one as I used a different pattern which is very worthy of sharing. The previous shirts I’ve made have all been based on the Walden/Colette Negroni pattern and the pattern has required a bit of work to get the look I want; namely taking the pattern for a traditional collar with stand off of a RTW shirt and adding that and a classic front placket (following this shirt sew-along from Male Pattern Boldness) to replace the Negroni’s facing. As this was the first shirt I have made for my brother and I was therefore essentially starting from scratch I decided to take a look at other shirt patterns which might make my life a bit easier.

Diary of a Chain Stitcher: Thread Theory Fairfield Button Up Shirt in Grey Cotton Chambray

There quite a number more shirt patterns for men available than when I made my first shirt years ago but the clear choice for me to try first was the Thread Theory Fairfield Button Up. I liked that it is a very classic shirt style that can easily be made more or less casual/formal by fabric choice but also by tweaking the pattern details. You have the choice to add sleeve tabs to fasten the sleeves in a rolled up position, add a chest pocket and also whether to choose a centre back box pleat or long darts in the back for a more fitted silhouette. It has quite a contemporary neat cut without veering too far towards slim fit and actually includes patten pieces to make all sizes in a cut more suitable for someone with a fuller stomach which I think is a fantastic touch.

Diary of a Chain Stitcher: Thread Theory Fairfield Button Up Shirt in Grey Cotton Chambray

I would highly recommend this pattern as a starting point for anyone who hasn’t made a shirt before. The illustrated instructions are clear and thorough and guide you through many traditional shirt making techniques such as flat felled seams for a professional finish inside and the burrito method for assembling the back yoke. on how formal you want the shirt to be. For example you might interface both collar pieces and both stand pieces for a crisp, formal shirt but only one side of the collar and stand for a softer and more relaxed look. This impressive amount of detail continues throughout the instructions. You can tell that this pattern has been well researched and each construction technique considered and thought through.

Diary of a Chain Stitcher: Thread Theory Fairfield Button Up Shirt in Grey Cotton Chambray

The collar on this pattern is quite slim which is worth bearing in mind when choosing this pattern. For my brother it is exactly the kind of look I was after. In the instructions the collar is assembled using my preferred method which is from this popular tutorial from Four Square Walls. I find it so much easier to get a clean finish this way. A fairly quick and easy addition you can make to a more formal shirt (which I didn’t do here as this is for more casual wear) is to add slots for more collar stays to the under collar. If you’re interested in doing this I’ve got an old tutorial here.

Diary of a Chain Stitcher: Thread Theory Fairfield Button Up Shirt in Grey Cotton Chambray

What is interesting about this pattern is that there is no separate pattern piece for the front placket. It is drafted onto the front pattern piece and you create the illusion of a seam by sewing a sort of pin tuck right down the front. A very clever way to save pattern matching stripes or checks at the front. It was quite enjoyable to try a different way of doing things, although it was nice to realise when using tried a tested method for the collar and cuffs that these fiddly bits of sewing don’t faint me in the way they used to.

Diary of a Chain Stitcher: Thread Theory Fairfield Button Up Shirt in Grey Cotton Chambray

The thing I liked most about the Negroni pattern was the tower plackets on the sleeves. Every time I sewed them it amazed me how a bit of careful folding, pressing and stitching created those little contraptions! I’ve actually used the pattern piece and instructions for those tower plackets on various other projects over the years, I remember them working really well on the Grainline Archer Shirt instead of the binding. I was therefore delighted to see that the Fairfield includes tower plackets too! The method is slightly different but achieves a result just as good.

Diary of a Chain Stitcher: Thread Theory Fairfield Button Up Shirt in Grey Cotton Chambray

The fabric I used is a grey cotton chambray from John Lewis. I was initially looking for a heavier kind of brushed cotton for a casual winter shirt but couldn’t find quite what I was after. I’m actually really pleased that I ended up using the chambray as I think it puts the shirt in the smarter end of casual and hopefully this will mean my brother gets a lot of use out of it! The fabric was an absolute joy to work with, lightweight, crisp and presses like a dream. It made getting all those precise little shirt elements neat and tidy so much easier. I debated using white thread of the top stitching but eventually opted to keep it simple with a matching grey, reserving a little punch of white for the buttons.

Diary of a Chain Stitcher: Thread Theory Fairfield Button Up Shirt in Grey Cotton Chambray

I can’t really comment on the fit as I haven’t seen it on yet! Plus I didn’t measure my brother as I wanted the shirt to be a surprise. Luckily working in costume has made me pretty good at guessing clothing sizes! My brother assures me that it fits perfectly and as he is of quite average build and height I’d say the fit is true to size.

Diary of a Chain Stitcher: Thread Theory Fairfield Button Up Shirt in Grey Cotton Chambray

I’m so proud of the finishing on this shirt, all the top stitching and neat little corners that a project like this involves. I think it is definitely my best shirt to date and I’m eager to make more with this pattern. It was one of those projects that came together just the way it should; notches matching, seams aligning and no guesswork with the techniques. What are your favourite shirt patterns (male or female)? And do you have any shirt making tips to share?

Friday, 9 November 2018

Big Cat Cotton Hot Patterns 1237 Shirtdress

I've finished my first project for my holiday wardrobe and it is probably the one I was most excited about because of the fabric! For those of you who haven't read my handmade travel wardrobe post I'm going on a safari holiday in January so when I spotted this beautiful cotton charting with mini big cat print stocked by The Fabric Store I couldn't resist ordering it. I had in mind a crisp little sleeved shirtdress with breast pockets and all those classic safari chic details and I'm delighted with what I ended up with, although I didn't get there without a bit of a struggle.

Diary of a Chain Stitcher: Hot Pattern 1237 Shirtdress in Mini Big Cat Cotton Shirting from The Fabric Store

I've been meaning to try a design from Hot Patterns for quite some time. For a long time I've been eyeing them up on the Sewbox stand at the big craft shows and been intrigued by the big strong envelopes and wearable styles packed with interesting details. Sewbox stock a huge range of these patterns along with a good selection from other independent designers. I was having a little look through these styles when I spotted Hot Patterns 1237 - the Plain & Simple Favourite Shirt, Tunic and Shirtdress and it jumped out to me as having a lot of the features I was after; a relaxed fit and breast pockets with optional flaps, long sleeves with tabs plus lots of opportunities for topstitching along the princess seams and rear yoke.

Diary of a Chain Stitcher: Hot Pattern 1237 Shirtdress in Mini Big Cat Cotton Shirting from The Fabric Store

In general I really enjoyed sewing this pattern and liked the construction methods, details and drafting...it just came up really huge! Part of the trouble is entirely my fault as I had been warned that they run large so I should make a muslin. However a drought of sewing time over the summer has led to me being quite impatient recently with getting stuck into a project and as it was an oversized style I figured I could think carefully about the size I cut and adjust as I went. This approach was not right for what turned out to be a HUGE amount of ease! There is a very detailed body measurement chart on the back of the envelope but no finished measurements which would have been really useful. The patterns include an impressive range of sizes from 6-26 and I came up between the 8 and 10 so went with the smaller. I probably should have started from an even smaller size but there wasn't much smaller I could go.

Diary of a Chain Stitcher: Hot Pattern 1237 Shirtdress in Mini Big Cat Cotton Shirting from The Fabric Store

The recommended seam allowance is 3/8" and I used 1/2". After basting together the side seams I ended up taking out a whopping 1.5" on the double extra out including down the underarm seam grading gradually out to nothing at the cuff. That's 6" total and it still feels pretty roomy. I then lopped 6" off the hem; bringing it above the knee really helped to balance out the size of it as it was completely overwhelming my fairly petite stature. It wasn't just the general size that felt big, every aspect of the design felt large. Sort of as if if owned a PDF copy of the pattern I would have printed everything at a much smaller scale and it would have fit better proportionally. The breast pockets were extraordinarily large and I reduced them by 2" in both width and height to leave me with a 5" x 4" rectangle instead. By that point was fed up with fiddling around to make things work and abandoned the pocket flaps! I might return to them at a later date as I like the idea of them buttoning.
The only aspect that I still feel lis a little on the large side and I haven't been able to do anything about as it is finished quite early on in the construction process is the collar. It is growing on me but I feel like I want to reduce it by a centimetre or so. Any tips?!

Diary of a Chain Stitcher: Hot Pattern 1237 Shirtdress in Mini Big Cat Cotton Shirting from The Fabric Store

What was strange is that the whole thing is large apart from apart from the sleeves which are a good couple of inches short on me. Luckily I wanted to wear them rolled up and fixed with the tab feature but had I wanted to wear them long they look rather silly! The instructions tell you to sew the tab in place permanently but if you wanted the option to roll the sleeves down again you could easily do so by only fixing one end of the tab and sewing a buttonhole in the other end.

Diary of a Chain Stitcher: Hot Pattern 1237 Shirtdress in Mini Big Cat Cotton Shirting from The Fabric Store

I'm used to designs from one of the big four pattern companies including a lot of ease and this felt similar to working with one of those patterns in a lot of ways. The pattern sheets are laid out similar to the big four patterns with instructions and illustrations printed on to the pattern pieces rather than a separate booklet. It felt like there was a lot less of the information included at the start of the instruction booklet than by lots of indie companies but there were cutting layouts and brief sewing tips included. I don't usually pay that information much attention nowadays but like to look them over when I am trying a pattern company for the first time.

Diary of a Chain Stitcher: Hot Pattern 1237 Shirtdress in Mini Big Cat Cotton Shirting from The Fabric Store

In terms of the instructions I loved that the first steps were all about constructing the individual little bits like pockets, collar, sleeve tabs and facings so they are ready to apply to the main body further along. This is the way I usually sew. I often look ahead in the instructions and batch sew any bits like this. It is not only really satisfying to have all these bits ready when you need them but I also feel speeds me up as you can pin lots of little bits, then sew lots of little bits, then press lots of little bits rather than moving from station to station repeatedly.

Diary of a Chain Stitcher: Hot Pattern 1237 Shirtdress in Mini Big Cat Cotton Shirting from The Fabric Store

I would recommend sewing another shirt with more detailed instructions or researching shirt sewing techniques before tackling this pattern. The construction method is excellent but each step of the instructions is only explained fairly briefly and relies on you having some sewing knowledge. I don't think there is anything wrong with that and the pattern certainly provides you with everything you need but lot of indie sewing patterns have instructions so detailed you can basically learn to sew from them so be warned if you are a beginner, you will need to do a bit of extra research to achieve the best finish.

Pay attention to both the illustrations and the written instructions and look them over more than once. They don't include a lot of information but it is important to look at the stitching lines and where to clip etc. The yoke is cleanly finished but there is no mention of when and how to finish seams which is weird as if you don't you can end up with raw edges under the pocket flaps, along the major seams and raw facings. Having said that there are some great tips included, such as to sew both your patch pocket pieces together, press and the unpick to give you two perfectly even pocket shapes.

Diary of a Chain Stitcher: Hot Pattern 1237 Shirtdress in Mini Big Cat Cotton Shirting from The Fabric Store

I particularly liked the method for constructing and finishing the sleeve plackets. So quick and neat. The sleeves are two piece which is a lovely feature and gave me scope for more topstitching! I also love the curved shirt-tail hem shape but would recommend making that hem as narrow as you can to help you deal with easing it around those tight curves.

Diary of a Chain Stitcher: Hot Pattern 1237 Shirtdress in Mini Big Cat Cotton Shirting from The Fabric Store

There is no topstitching included in the instructions as the pattern is designed to have a clean look but I added in lots of it! Partly because that was the look I was after and partly because I just love doing it. I used the same standard white sew-all thread I was using for the constructiosn and did most seams as a faux flat fell by overlocking the allowances together and pressing to one side before top-stitching. This was rather than pressing them open which the instructions recommend for most seams.

Diary of a Chain Stitcher: Hot Pattern 1237 Shirtdress in Mini Big Cat Cotton Shirting from The Fabric Store

I'm wondering if the extra ease would bother me less in a softer, drapier fabric. The crisp finish of this cotton does give the dress some body and in something like a silk crepe or viscose challis it might hang closer to the body. As it is I'm enjoying styling it with a belt at the moment but I'm sure I'll be wearing it without and will appreciate all the extra room around the body in the heat!

The crisp finish of the cotton is actually what I like about it most. It is a very fine cotton (I will probably make myself a little cotton lawn slip to wear underneath this for modesty) but it has a really wonderful natural texture in the weave with you might be able to make out in some of the close up photos. Despite the crisp hand it is soft and smooth against the skin. It was delightful to work with as it holds such a lovely crease or clean edge when pressed. It made all of those little shirt details such a pleasure to construct. I didn't attempt any pattern matching as the big cats are so randomly placed but part way through construction I wondered if I should have as there are a lot of seam-lines going on with all those separate elements which has equalled lots of dissected cats!

Diary of a Chain Stitcher: Hot Pattern 1237 Shirtdress in Mini Big Cat Cotton Shirting from The Fabric Store

I used a lightweight woven cotton interfacing for the collar, cuffs and sleeve tabs. I wouldn't recommend interfacing the facing on this style as you want the front to hang nice and softly. As the cotton is so fine when you have two layers of the cotton together the big cats from underneath show through and I thought this might look a bit messy and chaotic so I cut the inside yoke from some plain white cotton lawn and underlined my breast pocket pieces with the same. I did consider cutting the front facing pieces from the same but then realised they are turned back to form part of the collar so stuck with the big cats both there and under the collar. I got a bit stuck with what direction to cut the collar piece in as cutting it on the recommended cross grain would have meant cats standing on their heads and tails at the front. In the end I cut it along the grain so at least on one side the cats are standing up. The cuff pieces I cut on the cross grain so the cats faced the same way as they did on the sleeves.

Diary of a Chain Stitcher: Hot Pattern 1237 Shirtdress in Mini Big Cat Cotton Shirting from The Fabric Store

The buttons I think really pull the look together and I'm pleased I went with a darker choice. I love the natural wooden finish of these. I randomly had a couple of them in my button box which I must have sampled and not used for a show at work at some point but liked them so much for this project I put them in my purse to see if I could track down some more on my travels somehow. Luckily I found them again easily in John Lewis and they had just enough for my project! The pattern doesn't include any guidance for the placement or spacing of your buttons so that was quite interesting to figure out! I wasn't sure how far to overlap the centre front or how high the first button should be so I just went with what I felt looked right. The pattern calls for 8 buttons to fasten the dress but I've used 9, despite shortening it quite a bit so I'd recommend purchasing a few spare buttons. As my sleeves are permanently rolled up I didn't use the four recommended for the cuffs, just two on the tabs to finish them off.

Diary of a Chain Stitcher: Hot Pattern 1237 Shirtdress in Mini Big Cat Cotton Shirting from The Fabric Store

Thanks to Susan at Sewbox for giving me the opportunity to try out a Hot Patterns design. I'll certainly be giving another a try in future as the drafting and construction are great and they have such a wide selection of styles but I'll be sure to make a thorough muslin next time! I'm keen to make up one a more fitted style as I'm unsure how much of the size issue was due to the ease included in their drafting as standard and how much was down to the fact that this is an oversized style.

Sunday, 27 August 2017

Military Inspired Archer Shirt

Today I've got a garment to share with you which hasn't turned out as successfully as I hoped but was still an enjoyable project which I learnt a lot from. I spend less time on Pinterest nowadays but still enjoy a browse from time to time and the board I probably pin to most is my Sewing Inspiration board. It's an accumulation of all kinds of things that inspire my sewing, from complete outfits, to fabric, to little details I'd like to incorporate. For the last year or so I've been making more of a conscious effort to look back through these pins and actually make something of them! At the moment I can't stop pinning maxi wrap dresses and solid tops with interesting sleeves. Over a year ago I had a spate of pinning military green shirts in a slightly heavier weight, to be worn open over vests and t-shirts almost as a kind of lightweight jacket.

Diary of a Chain Stitcher: Military Inspired Grainline Archer Shirt

Around the same time I came across the perfect shade and weight of khaki green oxford cotton in Classic Textiles on Goldhawk Road and decided to go for it and make my own. I combined it with the Archer Button Up Shirt from Grainline Studio as it is a pattern I already own plus has all the lovely classic details I was after including two patch breast pockets. I have already used this pattern once, pairing it with some white swiss dot cotton a couple of years ago. That version I felt was a little snug across the bust and at the time I mentioned using the size 4 at the waist and shoulders as I did but grading out to a 6 at the bust. Now my knowledge of fitting has improved I realised that a full bust adjustment would probably do the job better so I spent some time doing this using the size 4 as my starting point. I used this a no dart tutorial (I can't remember which now but here are a few clear ones from Paprika Patterns, Helen and Maria Denmark) and spread my pattern 1cm width ways and 2.5cm downwards. I also added 2cm to the length. I needed almost the full two metres I had to cut this size.

Diary of a Chain Stitcher: Military Inspired Grainline Archer Shirt

The FBA has helped but I think maybe I should have just gone up a size or even two to achieve the relaxed look I desired. I should have looked more carefully at the relaxed, loose fit of my inspiration pictures and gone more oversized but I think I was tentative as it isn't my usual style. I wish I'd read my previous blog post more thoroughly and remembered that when I made my white version I was keen to have a closer fit than the pattern samples so opted to stick with the smaller of the two sizes I fell between. I think a softer draper fabric would also make a huge difference as both of mine have been quite crisp so stick out below the bust, although this fabric has softened up nicely with a wash.

Diary of a Chain Stitcher: Military Inspired Grainline Archer Shirt

As well as the general fit of the pattern I don't think the length (or lack of it) is helping. I haven't seen anyone else mention that they felt this pattern came up short but I'm quite petite and do feel like I could do with an extra inch or so. Perhaps I was expecting more of a relaxed fit than it is. The arms also seem strangely short which doesn't bother me as I've been wearing the cuffs rolled up anyway but I would need another inch again to make them the length I prefer.

Diary of a Chain Stitcher: Military Inspired Grainline Archer Shirt

As you can probably guess from when I found the inspiration and fabric for this project it's been a long time coming! I actually made the majority of this shirt shortly after buying the fabric but things ground to a halt when I came to attach the cuffs. I didn't like the finishing of the slits in the sleeve where the cuff attaches last time as it's just bound and is tricky to get looking neat. This time I wanted to switch in the sleeve placket pieces from the Colette Negroni Shirt pattern as I love the professional look of these and have had great results every time I've made with it. Silly me didn't think through the fact that this style of packet would add a little width to the end of the sleeve so when I came to attach the cuffs I found they were too short to fit.

Diary of a Chain Stitcher: Military Inspired Grainline Archer Shirt

At the time I lost the patience to cut a new pair of cuffs to fit, despite being so close to finishing and the shirt then sat around for a year before I went back to it again. I don't usually have UFO's on the go (discounting projects I've cut out and not started yet) so this is definitely a record length of project for me; I think I even moved house with it in pieces! This seems silly now as it was of course so quick and easy to recut and interface slightly larger cuffs and I had the whole thing finished within a matter of hours of returning to it. Lesson learned to never leave a project with a step you're dreading as the next one as it will put you off picking it up again!

Diary of a Chain Stitcher: Military Inspired Grainline Archer Shirt

Anyway enough about what I found tricky about this project, I actually love shirt making and am really pleased with my finishing and what I learnt on this one. The fabric is exactly as I had imagined it and with the closer fit I'm wondering if I might get more wear out of it layered under dungarees which are my new favourite thing! The way this pattern is constructed means it is easy to get a lovely inside finish; I did a good old burrito on the yoke and only needed to overlock the side seams.

Diary of a Chain Stitcher: Military Inspired Grainline Archer Shirt

I used a lightweight black woven fusible interfacing and would recommend always using a lightweight for shirt plackets even if you use something a bit heavier for your collar as you want to keep that centre front fairly soft so it doesn't do strange things when you sit down. I did all the topstitching in a slightly darker green standard thread rather than thicker topstitching thread as I wanted to keep it subtle. All the topstitching involved in this design is perfect for the utilitarian feel I was going for. I love topstitching so really enjoyed that part of the process. My trick is to make a note of exactly where seam you are topstitching along hits your presser foot or throat plate so you can keep the width even throughout. I try and make it easy for myself by choosing something obvious to line it up with like the edge of the foot. Keep your eyes on that mark when you sew rather than the needle.

Diary of a Chain Stitcher: Military Inspired Grainline Archer Shirt

Another top tip for shirt making is to invest in a point turner. They're pretty inexpensive but will make such a difference to getting nice crisp corners on your collars, plackets and cuffs. If you haven't got one a chopstick or similar works pretty well too. As always I followed the Four Square Walls tutorial for assembling your collar in a slightly different order and think this is the neatest I have managed yet. The buttons I hit upon I believe in MacCulloch & Wallis and knew they were just what I needed. I wanted to keep them standard shirt size or only very slightly bigger but wanted them to have a practical, heavier duty feel to fit with the military style. These little brass shank buttons make the shirt feel a little more like outerwear.

Diary of a Chain Stitcher: Military Inspired Grainline Archer Shirt

I've had this finished for a while now and in all honesty it hasn't seen a lot of wear. Now my sewing has improved I feel like if something doesn't feel quite right on and I feel like I could have done a better job of some aspect of it it's not going to win out over some of my other favourite handmade garments when it comes to deciding what to wear in the morning. I do feel like having this kind of shirt in my wardrobe would be handy though so I might revisit this style in the future.

Monday, 7 December 2015

Pattern Testing: Mila Shirt from Itch to Stitch

Yes, it's another post about fabric I got from Mood Fabrics on my trip to LA! But it's another gorgeous bit of yardage which I feel like I made a good decision about what pattern to pair it with! I vaguely knew what I wanted to make with it when I spotted it on the shelves. I love a classic plaid flannel shirt and the check of this Marc Jacobs cotton crepe really reminded me of that style of plaid. However, instead of a snuggly flannel this is a super fine, silky cotton crepe with a lovely drape, ideally suited to a very different type of shirt, one for layering under snuggly jumpers! I really liked the idea of a different kind of plaid shirt and set about finding the perfect pattern.

Diary of a Chainstitcher: Itch to Stitch Mila Shirt in Marc Jacob Sheer Plaid Cotton from Mood Fabrics

My first thought was a Grainline Archer as I already own and love the pattern but in my head I was imagining something a little more oversized that would show off the drape and flow of this lovely lightweight fabric. Then Kennis from Itch to Stitch put out a call for testers for her Mila Shirt, I looked at the line drawing and I was sold! It was just what I was picturing and I knew I could rely on Kennis for a good pattern with detailed instructions for all the fiddly shirt elements after making her Marbella Dress last year and being seriously impressed with the level of thought that went into it. I can also speak very highly for how well Kennis uses the testing process to make sure her pattern is the best it can be. A Facebook group was set up for all the testers to discuss the pattern with her and each other and a second test version was sewn up by testers who had time to make sure all the changes after the first round were just right. The shirt you see here is based on the first test version of the pattern so it's slightly different from the final release; the most noticeable changes were that the collar was reshaped (mine is much larger than the final version) and that a couple of inches of ease was removed from the waist to give the shirt some more shape.

Diary of a Chainstitcher: Itch to Stitch Mila Shirt in Marc Jacob Sheer Plaid Cotton from Mood Fabrics

Itch to Stitch sizing is super thorough and as with my Marbella dress I was very happy with the fit of this shirt straight 'out of the envelope', which I think is partly to do with the fact that sizing for cups from A-DD is included. It means I get a nice close fit at the upper chest and shoulders where I'm quite small whilst still having room in the bust without having to do any alterations. Using the D cup size, I cut the size 0 at the bust and waist and graded out to a 4 at the hips. I tend to usually fall within the one pattern size with most companies so I'd say Kennis drafts for a more top heavy shape and a slimmer hip than perhaps is standard. Grading between sizes is very simple and clear instructions for doing so are included in the pattern.

Looking at the pattern pieces I thought that the sleeves looked mega long so I gave the pattern pieces a quick measure (remembering to add on the depth of the cuff and remove the seam allowances) and compared it to my arm measurement. I took 2" off the sleeve length at the lengthen/shorten line as a result of this and probably could have done with a little more but I'll only ever wear them rolled up anyway so it's not important.  The sleeves were shortened before the pattern was released but only by about 1/2", I'm quite short but I'd recommend giving them a measure to check! Speaking of rolled up sleeves the pattern does include the option of adding button up sleeve tabs to hold your rolled up cuffs in place but they're not a design feature I'm particularly fond of so I opted to do without.

Diary of a Chainstitcher: Itch to Stitch Mila Shirt in Marc Jacob Sheer Plaid Cotton from Mood Fabrics

As well as shortening the sleeves I removed some length from the hem to make it less of a tunic length as I thought I'd get more wear out of it as a shirt. The back hem line is slightly longer than the front so I levelled that off a bit while I was at it. Bearing in mind that I'm 5ft 3", this is the shirt with 2" removed from the front and sides of the hem, increasing to 3" at the back. I used my rolled hem foot as the fabric was so fine and the curves of the hem are quite tight so required a very narrow hem. A few different hemming options are thoroughly explained in the instructions which is great.

Diary of a Chainstitcher: Itch to Stitch Mila Shirt in Marc Jacob Sheer Plaid Cotton from Mood Fabrics

I managed to just about squeeze the shirt out of the 1.5 yards of beautiful plaid I had bought. The pattern recommends 2.25 yards and I would definitely say get at least two as I had to do a fair bit of juggling around and cut each piece individually without folding the fabric to get it all in! As the check is so small I wasn't overly concerned about pattern matching but I did make sure it lined up horizontally at the side seams and that my front and back pattern pieces were placed so the check was symmetrical either side of the centre. I made my life a bit easier by cutting the yoke and pocket pieces on the bias so they didn't have to be matched, mainly because I just love the look of that as a design feature anyway! That's actually a suggestion in the pattern instructions.

Various elements of the shirt need interfacing and as my fabric was so sheer I opted to use silk organza for mine rather than a fusible. I'm really pleased I did as I think a fusible would have changed the hand of the fabric too drastically, rather than just giving it a little strength and body as the organza did. I basted it to the areas that required it by hand, which didn't take long, then removed the basting when the shirt was assembled.

Diary of a Chainstitcher: Itch to Stitch Mila Shirt in Marc Jacob Sheer Plaid Cotton from Mood Fabrics

I had very little trouble with the instructions and really liked Kennis's techniques for all constructing all those fiddly, detailed elements of a shirt. I was particularly happy with the instructions for the centre front placket and the result I achieved. It's drafted beautifully too. One of those patterns where all the notches match up and everything comes together like it feels like it should. I veered off of the instructions only ever so slightly and mainly because I wanted to use techniques which I thought would be better for my delicate fabric than the standard shirt making techniques. For example I french seamed my side seams. I also used the burrito method to construct the yoke as I've done this a few times and love it. Peter from Male Pattern Boldness describes it really well in his shirt sew-along. Kennis did mention that she chose not to use this method in the instructions to keep the pattern more accessible for inexperienced sewers which I absolutely understand. I think this pattern would be a great one to try for your first shirt as the preparation notes and instructions are so through. 

Diary of a Chainstitcher: Itch to Stitch Mila Shirt in Marc Jacob Sheer Plaid Cotton from Mood Fabrics

I surprised myself and actually abandoned my beloved collar construction method (using this tutorial from Four Square Walls) in order to give the more traditional Itch to Stitch method a try. I loved it and am really proud of how neat this turned out in such a shifty and fine fabric. I also think the cuffs are my neatest yet. Thanks Kennis! The only element of the pattern that I would change (and it's purely because of personal preference) is to have a placket on the cuffs instead of using a continuous lap of binding to finish the vent. Firstly, I prefer how a placket looks and secondly I love sewing plackets! Trying to bind that tight corner in this fabric was not fun. 

Diary of a Chainstitcher: Itch to Stitch Mila Shirt in Marc Jacob Sheer Plaid Cotton from Mood Fabrics

If you're thinking about making this pattern it's worth noting now that the seam allowances are 3/8" as standard. I have a hard time remembering it with any pattern where that is the case; I'm a 5/8" kind of girl! Also I'd recommend stay stitching the neckline as soon as possible. It might be because of the delicate nature of the fabric I chose but I definitely feel like there was a lot of potential for that area to get stretched out of shape.

Diary of a Chainstitcher: Itch to Stitch Mila Shirt in Marc Jacob Sheer Plaid Cotton from Mood Fabrics

All in all I'm delighted with the shirt and really enjoyed the process of making it too. As with any shirt it was a time consuming process but I like taking my time and breaking it down into small steps. I'm so pleased I chose to keep it classic with this fabric. There are some other amazing plaid's in the Marc Jacob's range on the Mood site which I'm now keeping a keen eye on; loads of voiles which would make beautiful shirts or maybe even shirt dresses...it might be a winter of plaid for me!

Tuesday, 9 December 2014

Striped Italian Cotton Shirt

I've got a bit of unselfish sewing to share with you today and one of my first ventures into sewing menswear. This is actually the second shirt I've made from scratch, plus I did a bit of shirt customising earlier in the year too which I fully intend to share with you but I'm so pleased with this one I couldn't wait to blog about it! For my stepdad's birthday this year I promised to make him a shirt. This was way back in April and we had the fabric picked out and ordered by May so considering I finished this just a few weeks ago I was a bit slow about getting it done; sorry Peter! I'm blaming a hectic summer of work and feeling a bit nervous about getting this as close to perfect as possible without much practice! I'm pleased to report he was very happy with it though (and I'm delighted!) so hopefully it was worth the wait.

Diary of a Chain Stitcher: Green Striped Colette Negroni Shirt with Stand Collar

He picked out this gorgeous Italian cotton shirting from the Mood Fabrics website and it was a brilliant choice. It's great quality and so lovely to work with. The green is actually a bit brighter than it came out in photos. I'm not going to lie the stripe matching was another big reason for my nervousness about even getting started with this project but I enjoyed the extra challenge and it turned out to be really motivating and satisfying to work with a fun fabric rather than a plain colour or basic white.

I haven't done a lot of pattern matching before, especially not in wovens and with such a bold stripe. I spent a long time staring at the fabric and moving things around. I cut everything that needed matching on a single layer and pieces that were to be cut on the fold I traced out into one large piece so I could cut it flat. It took a bit of maths to work out the spread of the stripes across the two front pieces and placket but I got there in the end. I'm really pleased with how it turned out with the exception of the sleeve plackets which I didn't attempt to match at all. I hadn't made enough of them to be able to even begin to fathom what stripe was going to end up where once they were folded and turned through!

Diary of a Chain Stitcher: Green Striped Colette Negroni Shirt with Stand Collar

I am so pleased with how the pocket lines up. I cut this piece by laying the paper pattern piece onto the fabric shirt front piece, lining it up with the placement markings and factoring in the seam allowance. Then I used a pencil to mark where each of the stripes were around the top and bottom edges of the pocket. I could then simply match up these marks with the stripes of the fabric as I laid out out to be cut. It worked out perfectly and the pocket almost disappears into the shirt front! I picked up this pattern matching tip from Sew Busy Lizzy's post on her gorgeous waterfall coat.

Diary of a Chain Stitcher: Green Striped Colette Negroni Shirt with Stand Collar
I love the burrito method for constructing the lined yoke!

The other bit of pattern matching I did was to have the stripes running across the yoke and continuing down the sleeves. I had done a lot of looking at RTW striped shirts to help me decide on placement of the stripes but, although I knew I wanted to cut the yoke on the cross-wise grain, when it came to cutting out the sleeves I couldn't think of what exactly I was trying to match. With a ladies top I might match stripes where they intersect at the front and back of an armscye and use a notch to do so but for the life of me I couldn't work out the best thing to do with the shirt. I was watching a bit of Modern Family that evening when I suddenly spotted the stripes running across the yoke and down the sleeves of Cam's shirt! I literally jumped up out of my seat and Ste thought I'd gone a bit nuts. I was thinking 'thank goodness I've over-ordered on the fabric and still have enough to cut new sleeves'...but when I checked the sleeve pieces I had cut I realised by very happy accident they were just about going to match up anyway!

Diary of a Chain Stitcher: Green Striped Colette Negroni Shirt with Stand Collar

So enough about stripes. You probably want to know what pattern I used. It is in fact the Negroni from Colette Patterns with a few noticeable modifications. I used the Negroni patten for the first shirt I made (which was very similar in style to this one when finished) despite it having a casual convertible collar rather than the stand you see here and a simple front facing instead of a button placket. You might wonder why I picked it when such a main feature of the design isn't what I wanted but I had various reasons. Firstly, I couldn't find a single pattern (big 4, indie, bursa or vintage) which incorporated all the design elements I wanted so knew I'd have to make some changes. Secondly, it was my first foray into shirt making and following indie pattern instructions for new to me techniques had served me well thus far (and they did not let me down here). Thirdly, Peter from Male Pattern Boldness had run a very thorough shirt sew-along based on the Negroni which includes a brilliant post on how to add a more formal collar, stand and button plackets to the shirt. Finally, there are may design elements I do like about this pattern like the slim, modern cut and flat felled seams.

Diary of a Chain Stitcher: Green Striped Colette Negroni Shirt with Stand Collar
The seams are all flat felled or concealed as part of the construction

I asked my stepdad to let me borrow a shirt which he was happy with both the fit and collar style of. It came in so handy to have a shirt next to me throughout the entire construction process; both to check fit and what certain elements should look like when complete. So I highly recommend you have one to hand if making your first shirt. To begin with I measured this shirt against the main pattern pieces and found that the Colette size medium appeared to be a good match. I just took 1/2" off the sleeve length. I didn't have the luxury of having my stepdad around or even close by enough to try on the shirt throughout construction so measuring it up in this fashion was a nice reassurance that it wouldn't end up miles too small or big!

Diary of a Chain Stitcher: Green Striped Colette Negroni Shirt with Stand Collar

The next thing I used the RTW shirt for was to draft my new collar and collar stand. Following Peter's instructions you basically trace the collar and stand pieces of the shirt onto paper and then add seam allowances all around. I did a quick check to make sure that these pieces would fairly closely match the neckline of the Negroni and thankfully everything was looking good. I don't imagine, if you have chosen the pattern size based on the size of the RTW shirt as I did, that you would end up with much of a difference as the collar size increases on the Negroni in tandem with the chest size as it generally does in RTW. I was really apprehensive about the new collar the first time around but it worked out great with that shirt so I felt entirely confident in this method this time. After all, if you've lifted the collar size and shape directly from a shirt which fits you're pretty much guaranteed to get a result if you stick accurately to your seam allowances. I also followed Peter's instructions to draft and construct the left and right front plackets which was super simple as it's basically two long rectangles of the right width.

Diary of a Chain Stitcher: Green Striped Colette Negroni Shirt with Stand Collar

One more change I made was to add slots for collar stiffeners (or stays/bones if that's what you call them!) to the underside of the collar. This was actually pretty straightforward and I worked out how to do it by looking at the collar of the borrowed shirt. These need to be added before you start assembling the collar and involve using a second under collar piece. I'm thinking about doing a brief tutorial about it if anyone is interested? I'm so, so pleased with how this feature turned out. In fact it may be my favourite thing about the whole garment! As with my Archer Shirt I used Andrea from Four Square Walls' tutorial to guide me through the construction of the collar and this is absolutely my neatest one yet. All her little tips such as trimming down the interfacing and the under collar before construction really make such a difference to the finished result.

Diary of a Chain Stitcher: Green Striped Colette Negroni Shirt with Stand Collar

Another feature I'm really pleased with (despite the lack of stripe matching!) are the sleeve plackets. Now I get why Lauren says that she uses the Negroni placket pieces and construction method on all of her own shirts; the instructions are awesome, the process is much less fiddly than my other placket experiences plus all six I've done have turned out pretty fantastically with no unpicking. These are again my best yet, no doubt helped by how crisply this fabric pressed.

Diary of a Chain Stitcher: Green Striped Colette Negroni Shirt with Stand Collar

The one element I'd like to work on next time are the cuffs. I'm fairly pleased with them but think they could be a little neater, plus I really struggled when attaching them to the shirt to get the corners to meet the placket neatly. I'd like to try trimming down the inside cuff pieces just by 1/8" as I did with the under collar and inner collar stand as I think this would keep everything tight and flat and help the seam line roll away from the outside. Does anyone know of any wonderful shirt cuff tutorials which will improve my construction of them as much as Andrea's advice has improved my collars?!

Diary of a Chain Stitcher: Green Striped Colette Negroni Shirt with Stand Collar

To finish it off I considered using a bias facing to hem the curved edge as I've seen this mentioned a few times recently and on my archer is ended up a little twisted. However I found the curve of this hem shallow enough that the hem pressed in nice and flat when turned and stitched. The buttons Peter bought when he was with my Mum at a local sewing/craft fair which he said he was lucky to make it out of alive as everyone was going so crazy over fabric...sound familiar to anyone?! I sewed the bottom buttonhole horizontally and with white thread instead of green for a bespoke touch and dotted a little bit of fray check onto them once cut open to increase their durability. I ended up unpicking and redoing quite a few of the buttonholes to get them just right, I wasn't about to let down a good job with an uneven buttonhole!

I'm foreseeing some more menswear sewing in my future; I'll definitely be making some more shirts as I've enjoyed the experience so much. I picked up some light blue Paul Smith shirting from Fabrics Galore at the Knitting and Stitching Show a couple of months ago which feels so smooth on the skin so I can't wait to make that up. Just got to decide who the lucky recipient will be this time!