
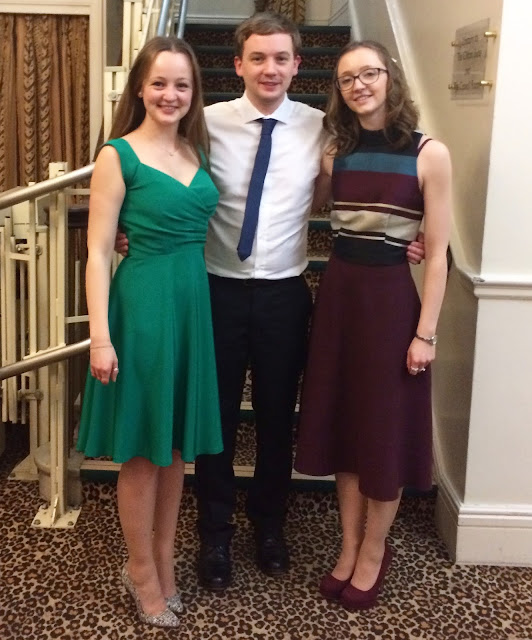
The dress I've got to share with you today has been a real labour of love and I enjoyed every single second of making it. Even the whole day spent fitting the bodice! I like nothing better than a reason to sew myself something special and challenging and what better reason could I have than the wedding of my step-sister 10 days ago? I mulled over what I wanted to make for over a year and bought the fabric long before I decided on a style and pattern. When I visited Mood Fabrics NYC last April I spent a good hour pawing at bolts in the glorious silk section and when I glimpsed this vibrant Kelly Green 4 Ply Silk Crepe it was love at first sight. It has got the most amazing thickness and weight to it combined with such a luxurious drape and sheen. Its similar to what I would call a silk morocain here in the UK. At $35/yard it was a real treat but similar silks this side of the Atlantic are likely to cost double. I on the spot decided that this was going to be used for my wedding outfit and bought 2.5 yards which turned out to be plenty for this design. I might even have enough left to piece together a slinky cami if I'm lucky.

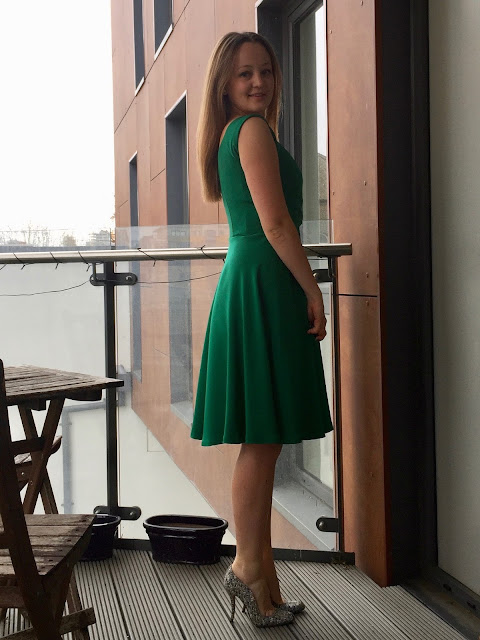
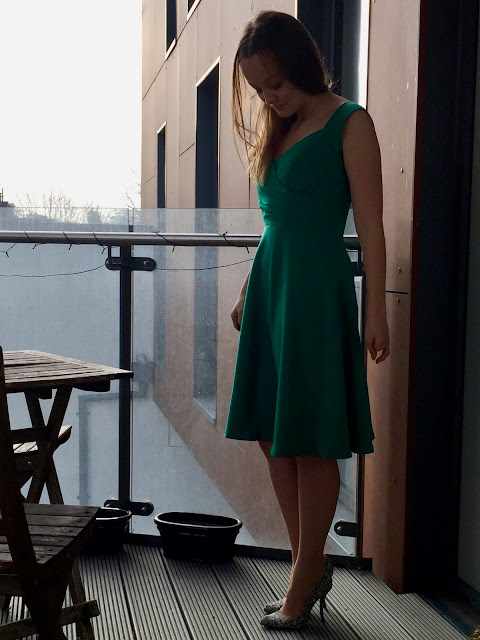
I've wanted to make B5814 (one of Gertie's designs for Butterick) for a really long time; I think I've had it pinned to my sewing pattern wish list on Pinterest since it was released! The one thing stopping me, apart from an occasion to wear it) was that I wasn't totally sold on the style of the skirt with the pleated drape at the hip. Once I had chosen the silk I pretty much ruled the pattern out as I wanted a style that would make the most of the amazing movement in it. Then it occurred to me one day that it would actually look beautiful used for the pleats of the bodice and I could switch out the skirt for a simple flippy half circle.
The silk was going to need some support to maintain the lovely crisp lines of the bodice so I underlined all the bodice pieces and sleeves with silk organza. I love doing this and find hand basting the pieces together so therapeutic. The organza has given just the right amount of structure to the bodice shape but still allows the pleats of the bodice to fall in lovely soft folds once the basting stitches were removed. I really wanted to go all out and make this dress the best it could be so I even used proper basting thread for the first time which breaks fairly easily to make it more simple to remove. I also actually used beeswax for all my hand sewing and was blown away by the difference it made. It certainly made those two hours hand sewing the hem more pleasant!

Looking at the sizing on the envelope I cut a muslin using the size 10 bust and 12 waist. I read a whole heap of fitting advice on Pattern Review which almost put me off! I went in with the mindset that I was going to need to send some time on the fit and was actually pleasantly surprised. Yes I needed to raise the neckline (Gertie herself says its not a modest dress) but it was amazing at how secure and comfortable I felt in the first muslin despite how exposed I was! To make this alteration as straightforward as possible I measured and wrote on the muslin how much higher I wanted it to be at various points across the front. The most was 1" at the centre front. I then added paper behind my pattern pieces, marked these points and joined them all using my french curve, grading to nothing at the ends where the edge meets another seam. I liked the way the right bodice piece dipped down under the left bust so didn't add any height there.

The rest fit so beautifully that the only other change I needed to make was to get the sleeves to stay put on the shoulder. Gertie's fitting post was invaluable to me at this point and the changes I made were pretty much exactly what she suggests. I pinned out a bit at each front raglan sleeve seam and pinned a wedge at the top so it fitted the curve of my shoulder then transferred those adjustments to the pattern pieces. If you are going to follow Gertie's advice take note that in her pictures she shaves of a wedge in the wrong place on the second one. You need to change the shape of the seam where the sleeve meets the bodice, not where the sleeve meets itself under the arm. Its pretty easy to get muddled at various points with these small bodice pieces so I was glad I made a muslin just to practice the construction! The sleeves fit so well now; not too tight or loose. Each adjustment was only tiny but made a huge difference. The neckline is quite wide so I expected to have to wear a strapless bra but I was pleased to find I could away with my normal one which has wide set straps. Its flesh coloured so if anything did peek out as I moved around you wouldn't really notice.

As I mentioned the fitting did take me a whole day as I made a second muslin to check my adjustments, inserted zips in both and painstakingly transferred all markings. These included seam allowances so I could press down the top edges accurately and bust point and waistline markings so I could accurately assess fit. All that time fitting was absolutely worth it to be able to forget I was even wearing something so special whilst whirling around dancing a ceilidh! I was wonderfully comfortable and happy in it all day.
The time taken on fitting a muslin gave me more confidence when the time came to cut into my fabric and I enjoyed the whole construction process even more knowing I had a dress which was going to work. A couple of days after cutting I went to see La La Land and like most of us was drooling over the dresses when I realised that what I was making was very similar to Emma Stone's green date night dress! Total happy accident that gave me even more confidence in my choices. Looking at pictures of that dress and the way it moves I've got my suspicions that this very fabric might have been the one used!
Construction-wise its one of those wonderful dresses that looks beautifully simple from the outside but has all sorts going on underneath to make it look that effortless! The instructions for this pattern are very thorough and include all kinds of well thought out techniques but I threw a few extra in there for good measure! Firstly do use tailors tacks to transfer all your markings. I always use them anyway as they are such an accurate way of working and for this design they are invaluably clear when matching up all those pleat lines. I wouldn't want to risk damaging the silk with a washable marker or even chalk. Luckily one of the bonuses of underlining with silk organza is that you can make all your markings nice and clearly onto that!

The bodice has boning along the front and back darts and set just back from the side seams. The pattern instructs you to use the kind of plastic boning which comes inside a removable fabric casing which is just what I did. There are quite a few different types of boning an ways to insert it into a garment which I might cover in a future post but the plastic boning provides all the shape you need for this style. If you are looking for more support you might want to consider spiral steel boning. My lining is a perfectly coloured satin remnant I picked up on my trip to Stoff & Stil. This has a tight weave and crisper hand than the silk and organza combo and provided a nice string base to sew the boning to.

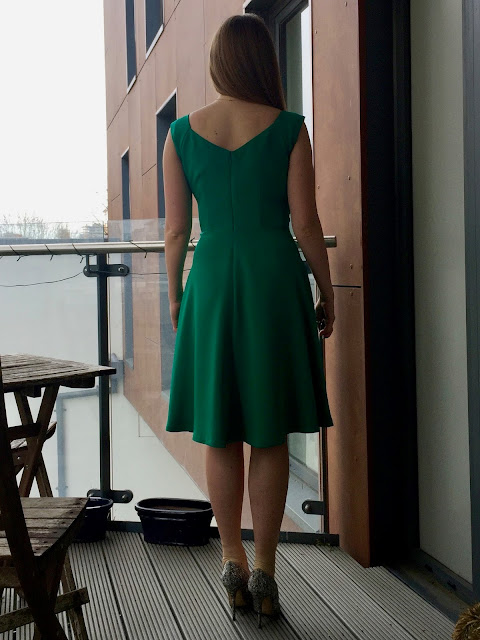
I was really worried about the neckline gaping as I know that is often a problem with low cut wrap styles and the fact that I had altered that area made me even more concerned. I stay-stitched this edge and then stabilised this edge with selvedge strips of the organza sewn close the stitching within the seam allowance. This edge is then under-stitched which is so satisfying to do and then look at! My mum pointed out that with the low wrap neckline it could have been a dress that I spent all day fiddling with, feeling self conscious but it sat so beautifully I couldn't be more pleased.

The wiggle skirt from the pattern is underlined rather than lined and as I really didn't want to change the movement or drape of the silk at all I opted to go without a lining in the skirt. This brings me on to the one thing I didn't like about this pattern; the finishing of the bodice down the centre back and waist. When a bodice is lined I would usually attach the skirt and insert the zip into the exterior fabric only then press under and stitch down the edges of the lining for a today finish. These instructions have you treat the lining and fashion fabric as one at this stage so you end up with visible seam allowances down the centre back and along the waistline. I'm not keen on how this looks but by the time I realised I would have had to unpick quite a lot of the bodice finishing and didn't want to damage my silk. This finish seems a little odd when you've made so much effort to finish the rest of the bodice beautifully; the lining is hand stitched in place at the underarms and side seams.

I bound the edges of the centre back seam with bias strips of the silk before inserting the zip in an attempt to make the exposed seam allowances as pretty as possible! The instructions have you turn down the top ends of the zip tape and tack them in place before putting it it which I found fiddly and also don't like the look of now its done. I must admit the closure at the top does look so neat and clean from the outside though. I think this is the first time I managed to get the placement of hook and eye just right so the two edges sit flush together. The waistline was a few millimetres away from matching first time around and when everything else was coming together so beautifully I couldn't stand it not to be perfect! I unpicked it once and am now super happy with it. I covered the bottom end of the zipper tape with a square of the silk folded around to enclose all the raw edges. As I left the skirt unlined I didn't want the raw end of the tape catching on the silk or my tights.

Because of the faux wrap style and the the way the lining is finished the waist seam does get quite bulky at points across the front. If you're making the skirt that comes with the pattern that has the lovely drop on the front this would get even thicker and I imagine be quite tricky to handle. Throughout the whole construction process I heavily trimmed and graded my seam allowances as I didn't want any bulk showing through this lovely soft silk. As the waistline was already a tad bulky I was reluctant to bind the raw edge as I had done with the centre back. Instead I resorted to pinking it, comforting myself with the fact that it is hidden behind the waist stay anyway.

To make the waist stay I used curved petersham from Maculloch & Wallis and followed the guidance in Claire Schaeffer's Couture Sewing Techniques. I got about as confused with them as I did when I made my chiffon dress a couple of years back so ended up getting that dress out and copying it! I absolutely recommend adding a waist stay to any special occasion dress or dress whose skirt has a bit of weight to it. When it fits your waist snuggly it keeps everything sitting in just the right place. To get the length right on mine I measured my waist and added what I needed to turn back to create the fastenings at the ends rather than use the guide provided with the pattern. The sizing on this seemed to be a bit off.
Once the dress was completed I left it to hang for a good 48 hours as parts of that semi circular skirt are on the bias and would likely stretch out. It dropped all kinds of wonky and I had to put my dress form to good use, measuring up from the floor and marking an even height to level it off. I took off between 2-5" in the end, using two 1/2" turns for the hem to give it a bit of body. I'm sure it still looks uneven on the hanger but in the pictures it looks good to me!

I did have a mini disaster right at the final hurdle. I had been so careful with the silk all the way through, using an organza pressing cloth and having total paranoia about pricking my finger and bleeding on it when hand sewing! I was giving it the final press after finishing the hem and my iron decided to clean itself out all over the back of the bodice. I could have cried. I gave myself a stern taking to and carefully wet the spots a little more to 'blur' the edges and prevent water rings then dried it out the best I could by gently using the heat of the iron through layers of paper towel. Thankfully by next morning not a mark could be seen.
If you've made it to the end of the post well done! There's nothing I like more than talking about the nitty gritty of sewing techniques and once I get going there's no stopping me! I can't wait to find an excuse to take this dress for another spin, I'll have to resist making any more party dresses for a while...or just find more parties

I've wanted to make B5814 (one of Gertie's designs for Butterick) for a really long time; I think I've had it pinned to my sewing pattern wish list on Pinterest since it was released! The one thing stopping me, apart from an occasion to wear it) was that I wasn't totally sold on the style of the skirt with the pleated drape at the hip. Once I had chosen the silk I pretty much ruled the pattern out as I wanted a style that would make the most of the amazing movement in it. Then it occurred to me one day that it would actually look beautiful used for the pleats of the bodice and I could switch out the skirt for a simple flippy half circle.

The silk was going to need some support to maintain the lovely crisp lines of the bodice so I underlined all the bodice pieces and sleeves with silk organza. I love doing this and find hand basting the pieces together so therapeutic. The organza has given just the right amount of structure to the bodice shape but still allows the pleats of the bodice to fall in lovely soft folds once the basting stitches were removed. I really wanted to go all out and make this dress the best it could be so I even used proper basting thread for the first time which breaks fairly easily to make it more simple to remove. I also actually used beeswax for all my hand sewing and was blown away by the difference it made. It certainly made those two hours hand sewing the hem more pleasant!

Looking at the sizing on the envelope I cut a muslin using the size 10 bust and 12 waist. I read a whole heap of fitting advice on Pattern Review which almost put me off! I went in with the mindset that I was going to need to send some time on the fit and was actually pleasantly surprised. Yes I needed to raise the neckline (Gertie herself says its not a modest dress) but it was amazing at how secure and comfortable I felt in the first muslin despite how exposed I was! To make this alteration as straightforward as possible I measured and wrote on the muslin how much higher I wanted it to be at various points across the front. The most was 1" at the centre front. I then added paper behind my pattern pieces, marked these points and joined them all using my french curve, grading to nothing at the ends where the edge meets another seam. I liked the way the right bodice piece dipped down under the left bust so didn't add any height there.

The rest fit so beautifully that the only other change I needed to make was to get the sleeves to stay put on the shoulder. Gertie's fitting post was invaluable to me at this point and the changes I made were pretty much exactly what she suggests. I pinned out a bit at each front raglan sleeve seam and pinned a wedge at the top so it fitted the curve of my shoulder then transferred those adjustments to the pattern pieces. If you are going to follow Gertie's advice take note that in her pictures she shaves of a wedge in the wrong place on the second one. You need to change the shape of the seam where the sleeve meets the bodice, not where the sleeve meets itself under the arm. Its pretty easy to get muddled at various points with these small bodice pieces so I was glad I made a muslin just to practice the construction! The sleeves fit so well now; not too tight or loose. Each adjustment was only tiny but made a huge difference. The neckline is quite wide so I expected to have to wear a strapless bra but I was pleased to find I could away with my normal one which has wide set straps. Its flesh coloured so if anything did peek out as I moved around you wouldn't really notice.

As I mentioned the fitting did take me a whole day as I made a second muslin to check my adjustments, inserted zips in both and painstakingly transferred all markings. These included seam allowances so I could press down the top edges accurately and bust point and waistline markings so I could accurately assess fit. All that time fitting was absolutely worth it to be able to forget I was even wearing something so special whilst whirling around dancing a ceilidh! I was wonderfully comfortable and happy in it all day.

The time taken on fitting a muslin gave me more confidence when the time came to cut into my fabric and I enjoyed the whole construction process even more knowing I had a dress which was going to work. A couple of days after cutting I went to see La La Land and like most of us was drooling over the dresses when I realised that what I was making was very similar to Emma Stone's green date night dress! Total happy accident that gave me even more confidence in my choices. Looking at pictures of that dress and the way it moves I've got my suspicions that this very fabric might have been the one used!

Construction-wise its one of those wonderful dresses that looks beautifully simple from the outside but has all sorts going on underneath to make it look that effortless! The instructions for this pattern are very thorough and include all kinds of well thought out techniques but I threw a few extra in there for good measure! Firstly do use tailors tacks to transfer all your markings. I always use them anyway as they are such an accurate way of working and for this design they are invaluably clear when matching up all those pleat lines. I wouldn't want to risk damaging the silk with a washable marker or even chalk. Luckily one of the bonuses of underlining with silk organza is that you can make all your markings nice and clearly onto that!

The bodice has boning along the front and back darts and set just back from the side seams. The pattern instructs you to use the kind of plastic boning which comes inside a removable fabric casing which is just what I did. There are quite a few different types of boning an ways to insert it into a garment which I might cover in a future post but the plastic boning provides all the shape you need for this style. If you are looking for more support you might want to consider spiral steel boning. My lining is a perfectly coloured satin remnant I picked up on my trip to Stoff & Stil. This has a tight weave and crisper hand than the silk and organza combo and provided a nice string base to sew the boning to.

I was really worried about the neckline gaping as I know that is often a problem with low cut wrap styles and the fact that I had altered that area made me even more concerned. I stay-stitched this edge and then stabilised this edge with selvedge strips of the organza sewn close the stitching within the seam allowance. This edge is then under-stitched which is so satisfying to do and then look at! My mum pointed out that with the low wrap neckline it could have been a dress that I spent all day fiddling with, feeling self conscious but it sat so beautifully I couldn't be more pleased.

I bound the edges of the centre back seam with bias strips of the silk before inserting the zip in an attempt to make the exposed seam allowances as pretty as possible! The instructions have you turn down the top ends of the zip tape and tack them in place before putting it it which I found fiddly and also don't like the look of now its done. I must admit the closure at the top does look so neat and clean from the outside though. I think this is the first time I managed to get the placement of hook and eye just right so the two edges sit flush together. The waistline was a few millimetres away from matching first time around and when everything else was coming together so beautifully I couldn't stand it not to be perfect! I unpicked it once and am now super happy with it. I covered the bottom end of the zipper tape with a square of the silk folded around to enclose all the raw edges. As I left the skirt unlined I didn't want the raw end of the tape catching on the silk or my tights.
Because of the faux wrap style and the the way the lining is finished the waist seam does get quite bulky at points across the front. If you're making the skirt that comes with the pattern that has the lovely drop on the front this would get even thicker and I imagine be quite tricky to handle. Throughout the whole construction process I heavily trimmed and graded my seam allowances as I didn't want any bulk showing through this lovely soft silk. As the waistline was already a tad bulky I was reluctant to bind the raw edge as I had done with the centre back. Instead I resorted to pinking it, comforting myself with the fact that it is hidden behind the waist stay anyway.

To make the waist stay I used curved petersham from Maculloch & Wallis and followed the guidance in Claire Schaeffer's Couture Sewing Techniques. I got about as confused with them as I did when I made my chiffon dress a couple of years back so ended up getting that dress out and copying it! I absolutely recommend adding a waist stay to any special occasion dress or dress whose skirt has a bit of weight to it. When it fits your waist snuggly it keeps everything sitting in just the right place. To get the length right on mine I measured my waist and added what I needed to turn back to create the fastenings at the ends rather than use the guide provided with the pattern. The sizing on this seemed to be a bit off.
Once the dress was completed I left it to hang for a good 48 hours as parts of that semi circular skirt are on the bias and would likely stretch out. It dropped all kinds of wonky and I had to put my dress form to good use, measuring up from the floor and marking an even height to level it off. I took off between 2-5" in the end, using two 1/2" turns for the hem to give it a bit of body. I'm sure it still looks uneven on the hanger but in the pictures it looks good to me!

I did have a mini disaster right at the final hurdle. I had been so careful with the silk all the way through, using an organza pressing cloth and having total paranoia about pricking my finger and bleeding on it when hand sewing! I was giving it the final press after finishing the hem and my iron decided to clean itself out all over the back of the bodice. I could have cried. I gave myself a stern taking to and carefully wet the spots a little more to 'blur' the edges and prevent water rings then dried it out the best I could by gently using the heat of the iron through layers of paper towel. Thankfully by next morning not a mark could be seen.

If you've made it to the end of the post well done! There's nothing I like more than talking about the nitty gritty of sewing techniques and once I get going there's no stopping me! I can't wait to find an excuse to take this dress for another spin, I'll have to resist making any more party dresses for a while...or just find more parties
Wow! What a beautiful dress, you must be so proud of yourself! :)
ReplyDeleteI an feeling pretty pleased I must say! So so happy with how it turned out
DeleteWhat a beautiful dress and a fascinating post. Well done and thank you!
ReplyDeleteThank you Sarah! You are so welcome, it is a real pleasure to have a place to talk about all the details! I so enjoy reading similar posts, its nice to hear that mine are too
DeleteSimply beautiful! Thanks for going through the construction process. So interesting.
ReplyDeleteI'm glad you find it as interesting as I do! Thanks Diane
DeleteDear One, It warms my heart to see a young gal like yourself loving a PROCESS and discovering all the wonder of creating something 3D from flat fabric. Kudos to you! 4Ply Silk Crepe and investing in it PLUS your time are the marks of a VERY WISE YOUNG Lady! All the best -
ReplyDeleteGosh that's such a lovely comment to read Londa, thank you. I love the process of making something probably more than the finished garments themselves sometimes! Working with such wonderful fabric is not only more pleasant but makes me so much more careful and patient that it pays off with wonderful results. I couldn't be happier with this!
DeleteYou succeeded where I failed! I half made a dress quite similar (and in green too) last year for my sister's wedding but am ashamed to admit that after a mistake on the neck line I gave up. I still have it though and my niece is getting married next so you have inspired me to finish it. Better late than never!!!
ReplyDeleteO do, do return to it! Mistakes can almost always be rectified in sewing although it does take some patience. I hope you find it much easier to finish when you return to it
DeleteI've been there, Andrea! But I find it's easier to go back and put things right if you leave the garment for a while first. Unpicking straight away is always so depressing! But, as Fiona said, most mistakes can be rectified, and doing it after a gap seems to be satisfying instead.
DeleteWell said Janet! I very rarely give up on a project but can't count the number of times something has been thrown in a corner for a week or two until I can beat to return to it with some fresh ideas!
DeleteStunning! Good advice on the waist stay. I'm working on Simplicity 8013 and I think I'll try it!
ReplyDeleteYou won't regret it! It is so comfortable and makes the world of difference to how the dress sits and stops it shifting around. Very straightforward too. Thank you!
DeleteWhen I saw this on the Mood blog my immediate thought was La La Land! I actually much prefer your version with the wrap effect than Emma Stone's with the (in my opinion awkward) center front pleats... gorgeous dress!
ReplyDeleteI couldn't believe it when I saw the La La Land dress! Such a similar shape!
DeleteThank you so much for the lovely comment. I'm quite in love with the wrap bodice too!
Love, love, love this dress!
ReplyDeleteThanks Chloe. Me too!
Deletegorgeous, what a perfect style on you and the color is lovely. All the detail work paid off, it is so beautiful.
ReplyDeleteThanks so much Beth. Coming from you that means a lot!
DeleteWowsers!! This is absolutely gorgeous, and that colour!!
ReplyDeleteThank you Lynne! I reckon this would look fab on you!
DeleteThis is such a beautiful dress (it reminds me of a grownup Cambie). The color and the drape and shape are perfect on you. I find that when I'm sewing for a special occasion and have the time (i.e., don't procrascinate until the last minute), I'm so patient and want so much to make it as "couture" as I can. You've really hit the mark here!
ReplyDeleteYou're right, the sleeves and neckline have a bit of a Cambie feel to them! That is absolutely what has happened to me with this dress, the patience I had to go back over things to get it just right surprised me! Thank you
DeleteI love everything about it! I have been wanting to sew a special occasion dress out of silk for some time! Your work is inspiring!
ReplyDeleteThanks Megan, that is the highest compliment I can here! I do so recommend doing it, it's such a satisfying process to get absorbed it. Do leave yourself plenty of time so it doesn't become stressful though
DeleteThis dress is sensational, truly!
ReplyDeleteThanks Sarah!
DeleteYou've made such a gorgeous dress! The style and color are lovely on you. Thanks for sharing all of the construction details and tips. Great job!
ReplyDeleteThank you Bernice! I always think its worth sharing all the details as I love reading about them and often find them so helpful when sewing a similar project
DeleteThis is so stunning on you- and you did such a beautiful job of it too- I can totally see the connection to the green date night dress in la la land- absolutely gorgeous!!
ReplyDeleteA weird coincidence that one but one that I couldn't be happier about! Thank you Erin
DeleteThis is a wow of a dress, and I really enjoyed all the detail in your post. Lots of good advice.
ReplyDeleteThank Mags! Glad you enjoyed the read
DeleteOh, that dress is heaven. Saw it on Instagram and it looks devine on you!
ReplyDeleteIt is heaven to wear!! Thank you so much, what a lovely comment
DeleteThis is so beautiful, and I find in depth construction posts like these fascinating and I invariably learn something so thank you for taking the time to write it!
ReplyDeleteI'm so glad to hear that you enjoy them as much as I do! They are my favourite kind of post to read on sewing blogs and I love it when someone posts a particularly complicated project. Thank you
DeleteYou look beautiful in this dress. It is such a lovely colour. Thank you for sharing all of your construction tips. It was really interesting.
ReplyDeleteGood to hear that it was interesting and I wasn't just waffling on about things that are obvious and boring to everyone! Thank you for your comment
DeleteWow! Thank you for sharing the details of this project. Love the dress and it looks awesome on you.
ReplyDeleteThank you Opal! You're very welcome, I hope you enjoyed reading about it.
DeleteStunning! And thanks for posting all the construction details, very interesting to read.
ReplyDeleteThanks Catherine, I'm glad people find these kinds of posts interesting. Sometimes I feel like I write too much but with a project like this which takes hours I have so much to say!
DeleteTotal stunner - and imagine what you'd have to pay for a custom-fitted silk dress if you couldn't make your own! So classic, too, I bet you'll get years of service from it. Well done! (And yes, the technical details are definitely interesting.)
ReplyDeleteVery good point Nina! Its these kind of garments when it really pays to sew your own.
DeleteI was hoping to create something quite timeless so its lovely to hear that. I'll just have to hope I stay exactly the same size!
Absolutely stunning dress! Love the style, the fabric, in short everything about it!
ReplyDeletehttps://sewinprogress.com/
Thank you Medi, so do I! So worth the time I put into planning it
DeleteA gorgeous dress. Thank you for a useful and technical post.
ReplyDeleteThank you Anne! I'm glad you enjoyed the read
DeleteGorgeous!!! I love the Kelly green and all the little couture touches.
ReplyDeleteOo couture touches are the best aren't they?! I need to remember to keep referring back to Claire's book and incorporating those special techniques whenever I can. Thank you for your comment
DeleteStunning, absolutely stunning. Thanks for all the construction details, it made a really interesting read. x
ReplyDeleteThanks so much! I'm glad you enjoyed the post. I've got another detailed one on the way about my first winter coat!
DeleteWow! It's gorgeous; you did such a fantastic job!
ReplyDeleteThank you!
DeleteWhat a beautiful, well-made dress and interesting post. Having just made an outfit for my son's wedding, I'm with you on taking the time to get all the details right and taking the trouble to add couture details. Wish I'd remembered about the beeswax, though!
ReplyDeleteI agree with you about sewing the zip to the main fabric only, and using the lining to cover the seam allowance. I had a similar experience with a Sew Chic pattern. In the end, I unpicked it and re-stitched it 'my' way.
Thanks Janet! O wow a mother of the groom dress must have been quite a major project! I hope you were delighted with it after all that work.
DeleteIt was my first time using beeswax and was a lot less messy than I was imagining! Really helpful. And yes, I would definitely rethink the finishing of the lining if I made this pattern again
Congratulations!
ReplyDeleteThank you Heather!
DeleteFunny, I'm making an emerald green silk crepe de chine (from Mood) dress for my nieces wedding in June! Wish me luck!
ReplyDeleteAh great minds must think alike hey! I really you enjoy the process and wearing your special dress
DeleteBeautiful! Beautiful! Beautiful! I love the green, I love the circular skirt and I love the bodice! Cheers from Jamaica
ReplyDeleteO hello to Jamaica! Thank you so much! I too love the green, the skirt and the bodice! I think this will remain the project I'm most proud of for some time yet
Delete