Sunday, 25 June 2017

Red Merino Aomori Twist Top

The new Sakura collection from Papercut Patterns had me weak at the knees when it was released earlier this month. I was seriously resenting the fact that a very busy month at work was going to give me limited to no sewing time! Knowing that I wasn't going to be getting around to making much any time soon I restrained myself to just the one purchase, the Aomori Twist Top. The concept of this design is similar to their Bowline Sweater which I made in a linen knit last year and absolutely adore. It's a relaxed fitting top/sweater that thanks to some interesting construction has a unique detail in the twist at the centre front. These kind of simple designs, with clean lines but a striking and unusual feature somewhere in them really appeal to me. They fit my wardrobe needs being infinitely wearable dressed up or down and suit a wide range of fabric choices.

Diary of a Chain Stitcher: Red Merino Aomori Twist Top from Papercut Patterns

The proof of how strongly I was taken with this design is in the fact that I managed to get it sewn up (and now photographed and blogged!) despite barely being at home for the last three weeks. After some long work hours and a stint away I was delighted to find myself with a peaceful evening in ahead of me last night...and what better way to spend it than with a glass of wine and my sewing machine!

Diary of a Chain Stitcher: Red Merino Aomori Twist Top from Papercut Patterns

The sleeveless version of the top can be made with either a woven or knit fabric but the sleeved version cut only be made using a knit. I opted for another piece of beautiful merino from The Fabric Store. Let's face it, whenever I get the chance to work with and wear some of this stuff at the moment I'm taking it! I just adore the vibrant colours available plus it washes (delicate 30 degree machine cycle) and wears so well. This is their standard 200gsm single jersey in Marsala from the premium merino range and has a lovely drape to it which would be suitable for most knit garments. For the twist front of this design you don't want anything too bulky. The colour choice is a little unusual for me as I don't tend to wear a lot of red but over the last year or so my most successful projects tend to have made use of warm, bold, solid colours so I went with my gut and think this is going to be a great addition to my somewhat black, neutral and green casual wardrobe. I think it helps that is quite a warm red with a pinkish tinge which suits my colouring much better than a brash brick or primary red. It looks much pinker in the flat photos than it does in reality!

Diary of a Chain Stitcher: Red Merino Aomori Twist Top from Papercut Patterns

The construction looks like it would be confusing or complex but it's actually extremely straightforward. The two front panels slot together when the majority of the top has been constructed leaving just the side seam to close. It was extremely satisfying to see it all come together. It was the perfect project to ease myself back into the swing of sewing when my brain was tired as it only took a couple of hours but the new to me order of construction required to achieve that twist front meant I needed to focus. I find sewing so soothing when I've got a lot going on as it's so calming to fix your thoughts on just the one thing and switch off from everything else buzzing round in my brain! The merino is of course gorgeous to work with so it was a hassle free project from start to finish.

Diary of a Chain Stitcher: Red Merino Aomori Twist Top from Papercut Patterns

The pattern is labelled as suitable for 'skilled' sewers on the Papercut difficulty scale and I think and understanding of how a garment comes together would help the process but there's nothing too complex for an advanced beginner to tackle. The trickiest part is probably the binding which runs all the way around the neckline, through the centre of the twist and around the hem in a large loop. It requires some accuracy and patience and I would recommend selecting a fabric which responds well to pressing and can hold a crease as this will help hugely to achieve a neat and even finish. I'm delighted with how mine has turned out. I've not used this binding method on a knit garment before and it's a lovely little touch that seems a step up from a classic band or turned and twin needled hem.

Diary of a Chain Stitcher: Red Merino Aomori Twist Top from Papercut Patterns

The only problem I encountered was with the overlocked edge on one side of the twist front wanting to peek out to the right side once everything was assembled. I had used black overlocking thread so this wasn't ideal and no matter how many times I tried to encourage it to twist inside it seemed to come back out. Fortunately this only seems to happen when the top is flat as once worn everything hangs just perfectly. I was also concerned that the weight of the fabric in the twist might encourage the front of the top to pull forward from the shoulder but it sits in place nicely which is testament to the quality of the drafting.

Diary of a Chain Stitcher: Red Merino Aomori Twist Top from Papercut Patterns

I cut the size XS which is one up from the smallest in the Papercut size range. I'm a pretty much exact match for that size except a couple of inches larger in the hip. I thought I could get away with it this time as it's a relaxed fit knit style but I could probably do with a little more room over the bum as it tends to ride up as I move then sit just above the hip rather than hanging down as in the sample pictures. The top does require a little more fabric than you may expect as there are some quite large and unusually shaped pattern pieces as you can see in the picture below! I did however get away with using a fair bit less than the recommended amount; I reckon I used around about 1.25m at 132cm wide.

Diary of a Chain Stitcher: Red Merino Aomori Twist Top from Papercut Patterns

The neckline does plunge down quite low but it doesn't feel revealing at all because of the way the fabric lays over the chest and dips down into the twist. I feel very comfortable and at ease in it; in fact when I tried it on for the first time I kept it on for the next hour while I was tidying up as it just felt so very me straight away. The only change I might make is to slim down the arms slightly as my personal preference is for a tighter sleeve but the dropped shoulder and volume in the upper arm balances out nicely with the twist front and I do feel very comfortable in this with the sleeves pushed up as in the photos.

Diary of a Chain Stitcher: Red Merino Aomori Twist Top from Papercut Patterns

Because of the way the hem curves up into the front twist the top does need too be worn with a high waisted trouser/skirt/short but I also think this would be a great unusual outer layer to throw on over dresses and jumpsuits when the temperature takes a dip in the evening. I love it with jeans and trainers as worn here but also think in this rich solid colour it could have an effortless glamour too.

Diary of a Chain Stitcher: Red Merino Aomori Twist Top from Papercut Patterns

I'll definitely be making a sleeveless version and I'm even tempted to get it cut out tonight as I have a fine piece of black viscose jersey lurking in my stash which I think would be perfect for it. I might treat myself to the paper version of another of the new Papercut designs too but at the moment I'm torn between the dramatic contemporary shape of the Nagoya Pants and the beautiful back of the Kobe Dress/Top. I've seen a lot of love for the Sapporo Coat on social media; which of the new designs has most taken your fancy?

Sunday, 18 June 2017

Pattern Testing: Orsola Dress from By Hand London

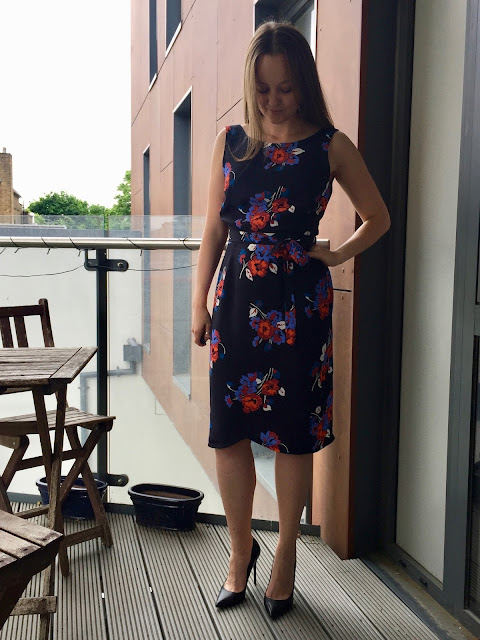
Despite telling myself that I was going to leave pattern testing to one side for a bit so I could focus on my ever increasing sewing queue I saw the design for the latest release from By Hand London and couldn't resist getting my hands on it immediately! The Orsola Dress is a chic and wearable sheath dress which features a beautiful wrapped back. This classic cut with interesting and considered details is just the kind of thing I love to wear. The bateau neckline that dips in the back combined with the figure skimming fit is super classy. Both the dress and skirt variations included in the pattern have the option for a straight front hem or a scallop shape detail which I opted for as I love how this echoes the shape created by the wrap at the back.

Diary of a Chain Stitcher: By Hand London Orsola Dress in Floral Viscose

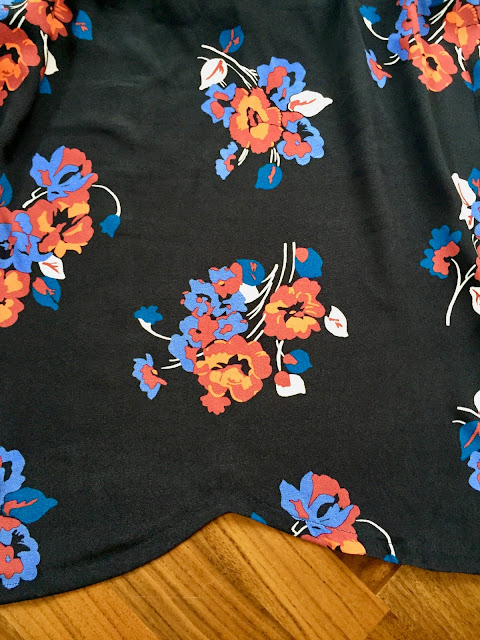
I had some fabric perfect for the skirt in my stash but I wanted to make the dress so I nipped into Lewisham one weekend to find something inexpensive from Maggie's Fabrics market stall. I happened upon this gorgeous viscose print for just £3/m and could not be happier with how it suits the style. I love how vibrant the red/orange flowers look against the navy. The slinky, slippery drape gives a relaxed vibe to the style and I feel like a more structured fabric would give it a totally different look. I really like the idea of making up a skirt version in a brocade.

Diary of a Chain Stitcher: By Hand London Orsola Dress in Floral Viscose

That lovely shifty nature did present some challenges when it came to cutting out and keeping those curves nice and even but patience and plenty of stay-stitching kept things stable. There are so many curves and edges cut on the bias in this design that taking a good bit of time over stay-stitching is essential; although yes it is frustrating not to be able to get straight on with the construction! The bodice is lined so I could have used a more stable fabric for this but I didn't want to ruin the romantic feel of the draped back so opted to self line.

Diary of a Chain Stitcher: By Hand London Orsola Dress in Floral Viscose

One of my favourite elements of the design is the faced hem which gives a gorgeous neat finish and a bit of weight to the hem. I was concerned that the effect of the scallop at the front would be lost in such a delicate and drapey fabric as my viscose so I opted to use a lightweight fusible interfacing on the facing pictures to add a bit of structure. I'm pleased I did this as I think it hangs nicely and keeps its shape well now. In a crisper fabric you wouldn't need to do this. I also added the interfacing to one set of the waistband and tie pieces. The ties are quite skinny and I felt they might end up looking a little limp in just the fine viscose. The interfacing adds just the right amount of body.

Diary of a Chain Stitcher: By Hand London Orsola Dress in Floral Viscose

Your fabric choice combined with how much you choose to stabilise the back edges of the bodice will quite drastically effect how that area fits too. Mine hangs away from the body slightly as I allowed it stretch out slightly (on purpose as I liked the idea of a softly draped back in this fine romantic print). The back edges of the By Hand London samples lay closer to the back and to achieve this you'd need to stabilise this bias edge with stay stitching and possibly the addition of some narrow twill tape/stay tape in the seam allowance.

Diary of a Chain Stitcher: By Hand London Orsola Dress in Floral Viscose

As with all By Hand London patterns (I've sewn most of them at this point!) I opted for cutting the UK10 and found it to have a little more ease than I am used to with their patterns. I wouldn't size down though as I love the more relaxed feel of this, I think the amount of room is spot on for the wrap style. I was concerned about risk of exposure with the back wrap when bending over or moving about in the wind but it feels very secure. I do usually have to shorten By Hand London patterns a little and usually do this from the hem but was well into making this one before I realised that the shaped hem would make this really tricky and I could have done with a lengthen/shorten line on the pattern piece (this has been added in since I tested it). It actually turned out fine though as I love the length as is!

Diary of a Chain Stitcher: By Hand London Orsola Dress in Floral Viscose

The only change I'd make to the fit next time is to take a little length out of the shoulder (about an inch) as it feels a little like it wants to slip off down my arm although doesn't quite. I definitely think it's the length rather than the width that is the problem and taking a bit of length away would have the added benefit or raising the point where the back wrap crosses as at the moment my bra band tends to peek out just a touch. As well as wanting to slip off the shoulders the dress doesn't want to stay on a hanger so I would recommend adding little ribbon hanging loops. You could insert these into the shoulder seam of the lining for a nice clean finish. I love this dress so much I might well end up unpicking my shoulders to take a little length out to absolutely perfect it so could add these in then.

Diary of a Chain Stitcher: By Hand London Orsola Dress in Floral Viscose

I'm not going to talk too much about the instructions as many of the little notes I made while testing have since been tweaked in the final release so my sewing experience is likely to be quite different to yours. I will say that it is a real pleasure to sew as it uses lots of familiar sewing techniques so isn't too tricky to put together and there are no fastenings to deal with! There's a bit of hand sewing involved to cleanly finish up the waistband and secure the hole in the side seam for the tie to pass through but nothing too strenuous. If you didn't want to see topstitching around your hem facing you could slipstitch this in place by hand but equally you could make more of the topstitching and use a contrasting thread or add in more at the waistband.

Diary of a Chain Stitcher: By Hand London Orsola Dress in Floral Viscose

I added a couple of tricks into the construction which I've picked up over the years and tend to do for all my dressmaking projects now. I pressed the lining darts in the opposite direction to those of the shell to reduce bulk at the waistline. This pattern does involve sewing a lot of darts which aren't my favourite thing to do in a shifty fabric. I would recommend marking them with tailors tacks and marking them at an additional point along the leg rather than just the tip and raw edge so you can ensure that nothing has shifted off grain and your darts are nice and straight. I also under-stitched the neckline as lining peeking out is a real pet hate of mine. This is really easy to do with this neckline if you do it before you sew up the armholes. The By Hand London method of sewing the neckline and armholes then the side seams of both the shell and lining in one fell swoop is fab.

Diary of a Chain Stitcher: By Hand London Orsola Dress in Floral Viscose

It's a big statement but this could be my all time favourite By Hand London design! Top three at least! I feel really elegant yet effortless in this dress and whilst the cut is fairly modest it's quite sexy at the same time with the flash of skin at the back. It would be appropriate for so many occasions made up in different fabrics; weddings, garden parties, work events or just casual summer days. A skirt version is next up in my sewing queue and then I'd like to try another dress in a solid colour of a more structured fabric like a linen!

Tuesday, 6 June 2017

Black Textured Rigel Bomber

Today I've got a jacket to share with you which has been worn pretty much non-stop since I finished it! It's become the perfect lightweight thing to throw on in the mornings over almost any outfit and feels like a piece of clothing to be proud of wearing even when I reach for it thoughtlessly. It is my second version of the Rigel Bomber from Papercut Patterns. I made my first version from a pale grey stable knit a couple of years back and whilst it's been worn fairly regularly since it has been even more in demand this spring than before. I've got bombers on the brain as there are so many delights out and about in London to inspire me this season and I decided more wardrobe could definitely do with another in my favourite staple colour...black.

Diary of a Chain Stitcher: Black Textured Rigel Bomber from Papercut Patterns

Whilst the plain grey of my first version is fantastic for working with so many different parts of my wardrobe I wanted something a little more special this time. I've had all kinds of ideas for bomber jackets bouncing around my head for months. For a while I was considering some embroidery as those little geometric panels on the shoulder of the second variations would lend themselves so well to it. I thought dense black on black embroidery or metallic on black would be really wearable. I then saw a lady pass me of the street wearing one made of sheer embroidered mesh which just looked so cool. But then I quite liked the idea of one made in a bold and colourful print as real statement outerwear to layer over simple outfits.

Diary of a Chain Stitcher: Black Textured Rigel Bomber from Papercut Patterns

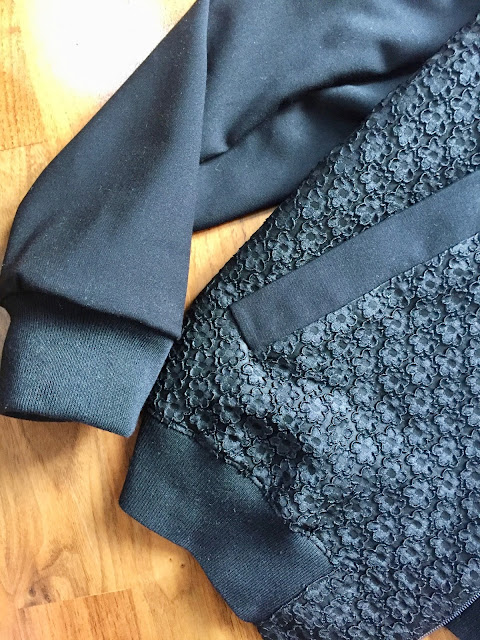
In the end the choice was made for me when I came across this amazing three dimensional floral fabric on my first visit to the Cloth House warehouse shop in Camden. I still wanted to be able to wear this jacket endlessly so hit the jackpot when I found this as it had all the unique quality I was after but what is more wearable than a solid black? As much as I love to wear black it does photograph terribly so I'm not sure these pictures are really doing it justice but take a look at the flat close ups for a more accurate idea of this unusual fabric. I'm pretty sure it's a silk/poly blend and the little flowers are part of the weave of the fabric itself. The outline of each flower is quite a pronounced ridge and the petals are filled with a satin weave which stands out against the rest of the fabric. Despite the texture on the front the back is fairly smooth with a fairly prominent weft which is interesting. I love a tactile, textured fabric in a solid colour and feel like over the last couple of years that using these kind of fabrics has produced the most successful garments in my wardrobe. I'm trying to hone in on fabrics which are interesting because of their drape, weave and texture rather than a crazy print which looks amazing on the bolt (although I love playing around with these as much as the next person!).

Diary of a Chain Stitcher: Black Textured Rigel Bomber from Papercut Patterns

I could have made the whole jacket in this fabric but really wanted to try playing around with contrasting textures and managed to find a great option to pair with it right there in the same store on their amazing shelf of £1-3/m bolts! If you are able to visit the Camden store and haven't yet it's well worth a trip. It's not huge but packed with all those top quality fabrics you oo and aah over on Berwick Street but all at discounted prices. The floral fabric I snapped up for £14/m and is definitely the kind I would have been drawn to in Soho but never actually treated myself to at full price. The sleeve fabric is a viscose twill which had the perfect combination of weight and drape I wanted for this style. It needs a kind of relaxed slouch to it I think. I went back and forth over my decision of which fabric to use for the body and which for the sleeves but am pleased with my final decision as I like the contrast pocket welts in the plain viscose. The ribbing I picked up in UK Textiles on Goldhawk Road which is where I bought the ribbing for my last version. I love the combo of all three fabrics together where they meet at the neckline!

Diary of a Chain Stitcher: Black Textured Rigel Bomber from Papercut Patterns

The brilliant thing about using different fabrics for the sleeves and body is that it doesn't need very much yardage. I bought a metre of each and still have enough left to make another jacket in the reverse of this one! In fact using different fabric could make this a great pattern for stash busting all those half metre or so pieces we all end up hoarding because we can't bear to throw that big a piece out. I cut the size XXS as I did with my last Rigel as I was really happy with the fit on that. My measurements place me more in the XS but I didn't want the bomber to be too oversized or long. This amount of ease feels very comfortable.

Diary of a Chain Stitcher: Black Textured Rigel Bomber from Papercut Patterns

The pattern doesn't come with a lining and I decided to stick with that despite other bloggers posting some lovely lined versions and advice on how to do it (see Kat's and Katy & Laney's posts). I quite liked the idea of the jacket being super lightweight for summer and also just wanted to get on with wearing it as soon as possible! I finished all the interior seams on my overlocker so it looks nice and neat inside anyway. The only thing I don't like about the pattern being unlined is that you end up seeing the square of interfacing used to reinforce the welt pocket opening. It's not as obvious in the black version as the grey but it still bugs me a bit. It's also very difficult to finish the inside edges of the pocket bags and welts neatly on the overlocker so this whole area looks a little scruffy. Ah well...next time I'll line it!

Diary of a Chain Stitcher: Black Textured Rigel Bomber from Papercut Patterns

Speaking of welt pockets, the fact that pretty much the first step is to make them is a little daunting! It's like starting with the bound buttonholes when making a coat. You feel like you could potentially mess up in a spectacular fashion right at the start. Which I guess is better than getting almost to the end and doing it. These aren't absolutely perfect as I was a couple of millimetres out getting the openings to exactly match the length of the welts but nothing that a bit of hand stitching couldn't pull into place and definitely an improvement on my first attempt.

Diary of a Chain Stitcher: Black Textured Rigel Bomber from Papercut Patterns

Inserting the zip is straightforward but does require some accuracy to get the top and bottom edges to meet nicely. I recommend basting it in first and rather than attempting to sew past the zip pull stop just short of it with the needle down, lift the foot and slide the pull on past before continuing to sew. I was a bit confused by the recommended length of zip as I was the first time around. The pattern requests a 35cm open ended zip for all sizes but of course the front length differs depending on the size you make. I advise measuring your pattern piece to determine the best length for you. Of course zips of this kind tend to be available in lengths increasing by a couple of inches at a time so getting the perfect length is nigh on impossible. I bought my zip from John Lewis and went with the suggested 35cm/14" and found it slightly too long but managed to ease it in.

Diary of a Chain Stitcher: Black Textured Rigel Bomber from Papercut Patterns

The final tricky part of the assembly is creating a clean corner where the hem ribbing slots into the body of the jacket at the centre front. Ribbing is pretty forgiving though and a good press and topstitch really helps. The neckline ribbing is so easy to do. I like the slightly lower v-shaped neckline on this pattern which makes it stand out slightly from other classic high necked bomber designs. I feel like it's a little more feminine and flattering on a curvy figure. The cuffs could be a little tighter in order to stay pushed up on my forearms how I like to wear it but I do have quite skinny forearms and wrists! I love the amount of fullness the sleeve has above the cuff.

Diary of a Chain Stitcher: Black Textured Rigel Bomber from Papercut Patterns

The only thing I'm slightly disappointed with is how the fabric is wearing. It's really easy to snag that beautiful floral and after a few weeks of hard wear it's got some quite bad thread pulls all over it. I knew after a couple of wears that it was more of a fabric for a special occasion piece but I still can't resist wearing it more! All I can do for now is neaten it up and try to look after it.

Diary of a Chain Stitcher: Black Textured Rigel Bomber from Papercut Patterns

If you're intrigued by the bomber jacket trend I highly recommend this pattern as a first go. Once you've done your welt pockets (which you could omit if you like) it's super straightforward to put together and speedy too. I love a raglan sleeve! If you don't have an overlocker or don't want to use one binding the edge of the facing and the visible inside seam allowances in a contrast fabric would be a lovely touch. Writing that has just given me an idea for yet another... a version made of embroidered mesh in a neutral colour with a bright pop of coloured binding peeking through! I'm sure my wardrobe doesn't need more than two bomber jackets but I wear them so regularly I feel like it would be worth giving one of my other ideas a whirl. I'm still tempted to add a bit of embroidery to this one but I'm not sure it needs it. What do you think?